Our ‘ol friend [Jeremey Cook] built a strandbeest out of MDF. It’s huge, heavy, about the size of a small car, and it doesn’t work. [Jeremy] has built beests before, but these were relatively small. The big MDF beest is having some problems with friction, and a tendency to shear along the joints. If anyone wants to fix this beest, give [Jeremy] a ring.
Everyone loves the Teensy, and [Paul] has released his latest design iteration. The Teensy 3.2 isn’t that much different from the Teensy 3.1; the bootloader has changed and now USB D+ and D- lines are broken out. Other than that, it’s just the latest iteration of the popular Teensy platform.
The DyIO is a pretty neat robotics controller, a semifinalist for the Hackaday Prize, and now a Kickstarter. The big win of the Kickstarter is an electronics board (with WiFi) that is able to control 24 servos for all your robotics needs.
[pighixxx] does illustrations of pinouts for popular electronics platforms. Everyone needs a hobby, I guess. He recently put together an illustration of the ESP8266. Neat stuff is hidden deep in this site.
Back in June when Hackaday attended LA Tech Day I met [Gray Bright]. He’s been a big fan of Hackaday for years and recently started producing and hosting The Tomorrow Show, a Late Night Talk Show focused on Science and Technology. [Gray] invited me on the show to talk about Hackaday and the 2015 Hackaday Prize.
[Gray’s] approach is to view scientists and engineers as the new rock stars. In each episode he invites some of the biggest names from the worlds of Science, Technology, Engineering, Art, and Mathematics (STEAM) and conducts a thought-provoking and entertaining interview. There’s a healthy dose of comedy from future correspondent [Ant Simpson] and [SupernoVanGirl], live musical performances, and it’s all filmed in front of a live studio audience.
Filming the show in the Hollywood studio on a Friday night in July was a hoot. I was honored that our segment was on the same episode as the legendary engineer and entrepreneur [Nolan Bushnell], founder of Atari and Chuck E. Cheese’s. [Nolan] even did an impromptu standup set when there was a short technical delay.
You can watch the full episode (below the fold) to see antics from The Tomorrow Show team, [Nolan’s] anecdotes about the early days of Atari and being [Steve Jobs’] boss, as well as my first TV appearance spreading the word about the Hackaday Prize. It’s also hilarious to see [Nolan] hooked up via electrodes controlling [Gray] to play Brain Pong just like when we toured Backyard Brains last year.
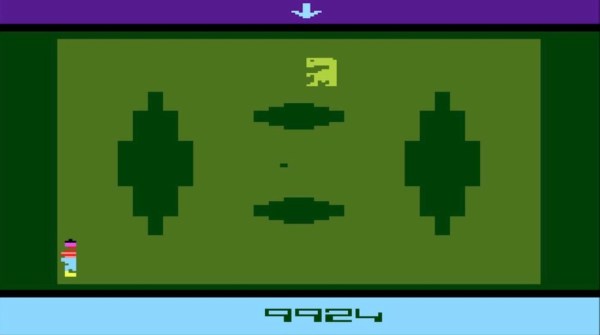
I usually see retro-gaming projects using tiny screens with a fair number of pixels (64×64) but what I really like is the look of making every pixel count. With this in mind I built 1-Pixel Pac-Man, the classic coin-op experience but with characters that consist of just one pixel. Playing a throw-back like this wouldn’t be the same without some vintage controls so I picked up an Atari joystick, patched it into a microcontroller, and started coding. Check it out:
Smartmatrix Bundle
32×32 RGB panel with acrylic diffuser
Back of the Smartmatrix
This piece of hardware made the project build really easy: the Smartmatrix. [Louis Beaudioin] developed the Smartmatrix and it’s been in the Hackaday Store for a while now. The display module itself is a commodity item that is used in LED billboards. There are shrouded headers on the back of the panels, to the left and right sides, which allow them to be daisy chained. The Smartmatrix PCB plugs into one of these shields, provides a soldering footprint for the Teensy 3.1 which drives the display, and gives you the wiring to connect screw terminals from the PCB to the power terminals on the module. Why the need for beefy power jumpers? At full white the thing can draw about 3.5A — don’t worry there’s a power supply included in the bundle.
Also integral to making this look good is the diffuser panel which is frosted acrylic. The Smartmatrix is designed to be housed in a shadowbox frame; it even includes a frame backer board with a cut-out for the Teensy 3.1 so it can be programmed without opening the thing up. I like looking at the guts so I’m leaving my free floating until I come up with an interesting way to mount everything as one unit.
Programming Pac-Man from the Ground Up
If you haven’t looked into it before, the ghost AI and gameplay details for Pac-Man are absolutely brilliant. [Toru Iwatani] did a masterful job with the original, and you should take a look at all of the analysis that has been done over the years. The best collection I could find was the Pac-Man Dossier and I based most of my code on the rules described there.
Basically the ghosts have two modes, chase and scatter. The modes set the enemy targets differently; to points at the four corners of the board in scatter, and to points relative to the player in chase. The relative part is key; only the red enemy actually chases you. Another one of them looks at the red enemy’s distance and angle, and targets the reflection of that vector. Really easy, really clever, and results in enemy behavior that’s believable. It isn’t just the enemy movement, little touches like a speed penalty (1/60 of a second) for each dot the player gobbles up means the enemies can catch up if you continuously eat, but you can escape by taking the path already-eaten.
Library, DMA, and Extra Hardware
Teensy 3.1
DB9 Connector for Joystick
Extras in the Bundle
Kickstarter remote and RTC Module
The hardware and software running the Smartmatrix made the display portions of the project really simple. First off, the Teensy 3.1 is fast, running at 96MHz in this case. Second, it has Direct Memory Access (DMA) which [Louis] used in the Smartmatrix library. This means that driving the display takes almost no CPU time at all, leaving the rest for your own use. This example of a game is under-utilizing this power… it’s totally capable of full-motion video and calculating amazing visualizations on the fly.
The PCB hosting the Teensy 3.1 breaks out several pins to one side. I’m not sure what I’ll add in the future so I actually used the extra surface-mount IO pins on the bottom of the Teensy to connect the Atari joystick (which is simply a set of switches). The are enough pads for two joysticks so I used pin sockets to interface the Teensy to the PCB so that I can get to it again later.
The kit also includes an IR receiver and remote, and also a microSD card to loading animations (there’s an SD socket on the PCB). The bundle in the Hackaday Store is a kit you solder yourself, but [Louis’] company, Pixelmatix, has a Kickstarter running for fully-assembled versions that come with a black remote and sound-visualization hardware.
Future Improvements
The game is fully working, but there are a few key things that I really want to add. The Teensy 3.1 has a single DAC pin available. I’m fairly certain the original coin-op game had mono audio. It should be possible to reproduce the sound quite accurately with this board. That would really make the project pop.
There are also a bunch of touch-ups that need to happen. I’d like to add an animation when the player is eaten by an enemy, and a countdown before the level restarts. The score, shown in binary on the right column, should be scrolled out in decimal when the game ends, and what’s a coin-op recreation without a high-score screen?
Listening tests reveal significant sound quality differences between various digital music storage technologies. Finally the audiophile press is tackling the important questions. This listening test looks at the difference between two four-bay NAS boxes, with one making the piano on Scherzo and Trio from Penguin Café Orchestra’s Union Cafe sound more Steinway-like, while another NAS makes it sound more like a Bosendörfer. Yes, your choice of digital storage medium can change the timbre of a piano. Another gem: “Additionally, the two units also had different processor architectures, which might also affect perceived audible differences.” There must be a corollary to Poe’s Law when it comes to audiophiles…
The Android IMSI-Catcher Detector. You’ve heard about Stingrays, devices used by law enforcement that are basically fake cell towers. These Stingrays downgrade or disable the encryption present in all cellphones, allowing anyone, with or without a warrant, to listen in on any cell phone conversation. Now there’s an effort to detect these Stingrays. It’s open source, and they’re looking for volunteers.
[Rob] sent in something that’s the perfect application of projection mapping. It’s called Face Hacking, and it’s pretty much just a motion capture systems, a few projectors, a whole lot of CG work, and just a tiny bit of dubstep. It look cool, but we’re wondering what the applications would be. Theatre or some sort of performance art is the best I can come up with.
A while ago, [4ndreas] saw a 3D printed industrial robot arm. He contacted the guy for the files, but nothing came of that. [4ndreas] did what anyone should do – made his own 3D printable industrial robot arm. The main motors are NEMA 17, and printing this will take a long time. Still, it looks really, really cool.
Everyone loves arcade games, and it didn’t take long for designers to figure out that people would love to take the fun home. The home gaming console market has been around for decades. Through the early days of battery-powered pong style consoles through Atari and the video game crash of the early 80’s, to the late 8 and 16 bit era spearheaded by The Nintendo Entertainment System and The Sega Master System and beyond, consoles have become a staple of the hacker home. This week’s Hacklet features some of the best retro console projects from Hackaday.io!
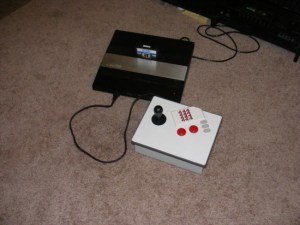
We start with [ThunderSqueak] saving the world with her Atari 5200 Custom Controller Build. For those who don’t know, the Atari 5200 “Super System” was an 8 bit system ahead of its time. The 5200 was also saddled with on of the worst controller designs ever. The buttons would stop responding after a few hours of game play. With 17 buttons, (including a full number pad), that was a pretty major design flaw! [ThunderSqueak] hacked a cheap commercial fighting game stick to make it work with the 5200. 12 individual buttons were wired in a matrix to replace the telephone style keys on the original 5200 controller. Atari’s non-centering analog stick was converted over to a standard 4 switch arcade style stick. [ThunderSqueak] did leave the original pots accessible in the bottom of the enclosure for centering adjustments. Many 5200 games work great with the new setup.
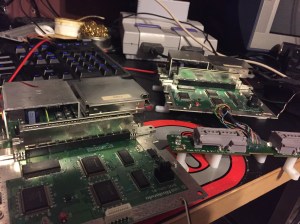
[DackR] is bringing back the glory days of Nintendo with Super Famicade, a homebrew 4 SNES arcade system inspired by Nintendo’s Super System. Nintendo’s original Super System played several customized versions of games which were available on the Super Nintendo Entertainment System (SNES). [DackR] is building his own with parts from four SNES consoles. He’s also adding a few features, like a touch screen, video overlay, and enhanced RGB.
He’s going to add custom memory monitoring hardware, which will allow him to check how many lives a player has left and handle coin operation, all without the original Super System Hardware. If you’re curious what the original Super Systems looked like, check out Hackaday’s Tokyo Speedrun video.You might just catch a glimpse of one!
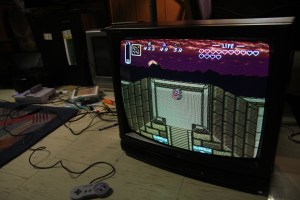
[Bentendo64] is improving on the past with RGB For ‘Murica. European systems have enjoyed the higher quality afforded by separate red, green and blue video lines for decades. North American gamers, however were stuck in the composite or S-Video realm until shortly before the HDTV age. [Bentendo64] had an old hotel CRT based monitor, and decided to hack an RGB input. After opening up the back of the set, he removed the yolk board and added direct inputs to the video amplifiers. We’re not sure if this mod will work with every CRT, but it can’t hurt to try! Just be sure to discharge those high voltage capacitors before wrenching on these old video systems. Even if a set has been unplugged for days, the caps can give a seriously painful (and dangerous) shock!
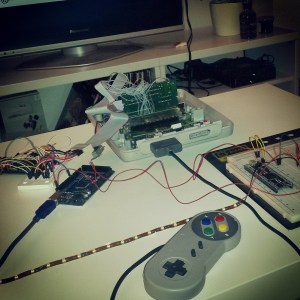
[Ingo S] is also working to improve the SNES with SNES AmbiPak, a mod which brings ambient lighting and “rumble pack” controller feedback to the vintage Super Nintendo. [Ingo S] used the popular SNES9X emulator to figure out where game data is stored while the SNES is running. His proof of concept was the original F-ZERO SNES game. [Ingo S] found that Every time the player’s car hits the wall, the system would perform a write on address 3E:0C23. All he would need to do is monitor that address on the real hardware, and rumble the controller on a write. The real hardware proved to be a bit harder to work with though. Even these “slow” vintage systems clock their ram at around 3MHz, way too fast for an Arduino to catch a bus access. [Ingo S] is solving that problem with a Xilinx XC9572 Complex Programmable Logic Device (CPLD). CPLDs can be thought of as little brothers to Field Programmable Gate Arras (FPGAs). Even though they generally have less “room” for logic inside, CPLDs run plenty fast for decoding memory addresses. With this change, [Ingo S] is back on track to building his SNES rumble pack!
It feels like we just got started – but we’re already out of space for this week’s Hacklet! As always, see you next week. Same hack time, same hack channel, bringing you the best of Hackaday.io!
1983 was the year of the great video game crash, and after the chiefs of Atari realized they had produced more copies of Pac-Man than consoles sold, these games, along with other ‘treasures’ were loaded into trucks, shipped out to the desert, and buried in a New Mexico landfill. Last year, these consoles were rescued. Now, thanks to the efforts of the Tularosa Basin Historical Society, these cartridges are for sale again.
Want to grab your own copy of E.T., Asteroids, Star Raiders, or Centipede rescued from a landfill in a desert? Here’s a link to the seller on eBay, with the highest auction being E.T., in box, going for $400 with nine days left. The auction comes with a certificate of authenticity from the city of Alamogordo.
This is only the first batch of cartridges and boxes rescued from the dump, with the Tularosa Basin Historical Society putting at least another 700 items up for sale if this batch goes well.
With the rousing success of this bit of dumpster diving, we must point out another techno-archeological myth/legend: there are several thousand Apple Lisas in a Utah landfill, just waiting for someone to come in and pick through the remnants of an Apple tax writeoff.
[fredkono] has a few vintage Atari arcade boards sitting around, and without the rest of the arcade machine – especially the XY CRT – these boards would continue to gather dust. The solution to this terrible shortage of vintage video games was to build a vector monitor from scratch. No, that doesn’t mean building a new CRT, but it does mean rewiring the yoke and building a CRT controller board for tubes salvaged from small, old TVs.
Nearly all the CRTs you’ll find at your local goodwill or surplus shop are raster displays. The CRTs used in the old Atari games were vector displays and extremely similar to the tubes found in old oscilloscopes. [fred] turned the CRT found in an old 9″ color TV into a vector monitor by rewinding the yoke.
With the tube rewired, it was only a matter of connecting the custom deflection circuit boards and getting the old arcade boards running. The images drawn with the new yoke deflector board are great and produce fine, crisp lines of some of the most famous video games in history.