Building A Brushless Motor Controller Around An ATmega Chip

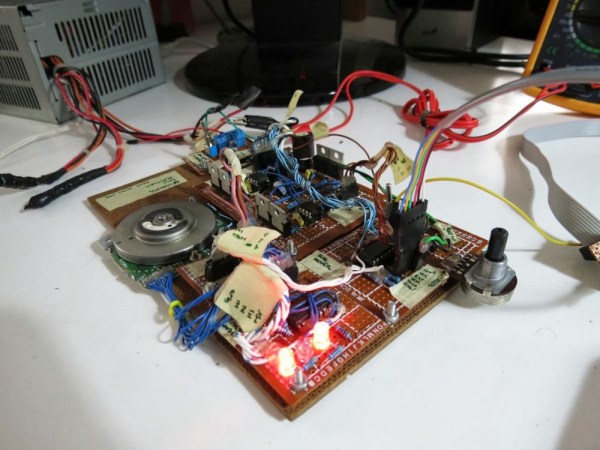
You know when you see something like this it’s just going to be awesome, and we weren’t disappointed by our first impression. [Davide Gironi] built a brushless motor controller from the ground up using an ATmega8 as the brain. If you want to understand every aspect of a subject this is how to do it. Lucky for us he explains what each portion of the prototype does.

Brushless motors have no brushes in them (duh). But what does that really mean? In order to spin the motor a very carefully crafted signal is sent through the motor coils in the stationary portion (called the stator), producing a magnetic field that pushes against permanent magnets in the rotor. A big part of crafting that signal is knowing the position of the rotor. This is often accomplished with Hall Effect sensors, but can also be performed without them by measuring the back EMF in the coils not currently being driven. The AVR-GCC compatible library which [Davide] put together can be tweaked to work with either setup.

Get a good look at the system in action after the break.

Continue reading “Building A Brushless Motor Controller Around An ATmega Chip”

Drinking Games And Digital Logic

Untitled-1

For those of you who might have forgotten, let’s go over the rules of Centurion. The object of the game is for every minute, for 100 minutes, drink a shot of beer. It doesn’t sound like a lot, but after completing the challenge you’ll have had 3 liters of beer (or about eight and a half 12 oz cans) in just under two hours. When [Peter] played Centurion, he found the biggest problem was – understandably – keeping track of the time and who drank what. For an upcoming weekend of drinking, [Peter] decided to solve this problem once and for all with shift registers and seven-segment displays.

[Peter]’s Centurion score box comes in two parts. The first and largest part of the build is the main board housing an ATMega8 microcontroller and a huge two digit seven-segment display to keep track of the countdown until the next shot. Two other boards house eight additional two digit seven-segment displays for each player, incremented every time a player presses a giant arcade button.

The entire build is designed around a small travel case that also holds a large battery for cordless drinking parties. Let’s just hope the project is reasonably water-resistant; we can see a lot of spills happening in the future. Check out the video demo below.

Continue reading “Drinking Games And Digital Logic”

Building A Replacement For A Broken Dehumidifier Controller

dehumidifier-replacement-controller

We’ve thought of doing a project like this ourselves as the dehumidifier we ordered online runs the fan 24/7 no matter what the humidity conditions. But it wasn’t that [Davide Gironi] was unhappy with the features on his unit. It’s that the dehumidifier controller stopped working so he replaced it with one of his own design. The original humidity sensor was mechanical and simply broke. He used an AVR along with a humidity and frost sensor to get the appliance up and running again.

A DHT22 humidity sensor is polled by the ATmega8 chip and compared to the user-adjustable trimpot value. If it is above that threshold the unit is switched on using one of the relays seen in the image above. The one problem you have to watch out for when using compressor cooled appliances is ice accumulation on the radiator. [Davide] uses a thermistor for temperature feedback, switching the compressor off when it gets below 7C and turning it back on again when it is above 12C.

The replacement still uses the reservoir sensor and indicator LEDs. We, however, would recommend using the watchdog timer on the chip to ensure that it is reset if something goes wrong in the code.

Adding Bluetooth Remote Control To PC Speakers

adding-bluetooth-remote-control-to-pc-speakers

[Andrzej’s] plain old computer speakers are ordinary no more. He pulled off a fairly complicated hack which now lets him control speakers via Bluetooth.

He had a set of Creative brand computer speakers with a volume potentiometer that needed replacing. He was having trouble finding a drop-in replacement part and decided he would just go with a rotary encoder. Obviously you can’t just drop one of those in, he would need a microcontroller to monitor the encoder and translate the change into the appropriate resistance. He figured if he was going this far he might as well make the most out of the uC.

Above you can see all the stuff he crammed into the original case. The rotary encoder is seen on the lower left. An ATmega8 is on a PCB he made himself. The white part to the left is a digital potentiometer which feeds the resistance to the original speaker PCB. On the left is the Bluetooth module which lets him control everything from his phone. You can see a demo of that after the break.

Continue reading “Adding Bluetooth Remote Control To PC Speakers”

Atomic Skull Clock Reminds Us We’re Dying

atomic-skull-clock

Whether you like it or not, every second that passes brings you one step closer to your own demise. It’s not a comforting topic to dwell upon, but it’s reality. This art installation entitled ‘Memento Mori’ is a haunting reminder of just that. Even with all the advanced technology we have today, we still have absolutely no way of knowing just when our time will come.

[Martin] cast a real human skull, then added a 4 digit LED display that’s attached to a rubidium atomic clock (running a FE-5680A frequency standard). The display counts down a single second over and over, measured in millisecond-steps, from 1.000 to 0.001. He built a custom electronic circuit to convert the 10 MHz sine wave into a 1 kHz pulse signal, and used ATmega8 chips running an Arduino sketch to do the rest of the dirty work.

Watching the video after the break, with that smooth mysterious music in the background, one can’t help but ponder our mortality. On a personal note, this totally feels like something you’d find in a video game.

[Thanks Martin]

Continue reading “Atomic Skull Clock Reminds Us We’re Dying”

Hacking A Coffee Machine For A Better Brew

Senseo coffee makers are automated brewers that use coffee pods. [Ronald] had one, but wasn’t satisfied with the quality of the coffee it produced. His solution was to hack it apart and build his own automatic coffee machine with the innards.

The coffee brewing part of the system is controlled by an ATmega8. This reads the temperature using the NTC sensor from the original machine and actuates the various parts of the Senseo machine, and the added grinder. The timing was all done by trial and error, optimizing for the best cup of coffee.

Keeping with the trend of adding Raspberry Pis to everything, [Ronald] connected one to this build for remote control. He runs a very hacked version of LCD2USB which deals with communicating with the RPi. An Apache web server hosts a PHP script to provide a user interface, which runs a C program to tell the system to start brewing.

Unfortunately, [Ronald] didn’t give us a link to his web interface, so we can’t remotely brew him coffee. However he did provide all of the source for the project in his write up.

Nixie Clock That Doesn’t Skimp On The Number Of Tubes

[Nina Blum] figures that if you’re going to the trouble of driving Nixie tubes you might as well use a lot of them. The details about this clock, which were sent directly to our tips line, lists a total of thirteen tubes used. There are six Russian IN-8 tubes (large digits), four Z573M tubes (small digits), but the colon tubes and the sine wave tube part numbers were not specified.

An ATmega8 controls the segments via a set of transistors. To operate the display [Nina] included a user interface made from five buttons and a four line character LCD. There is a video showing off the menu system that includes a way to set the time, date, and toggle the various illuminated bits. We’re waiting for permission to post that clip on our YouTube channel as [Nina] only included a Rapidshare link to the movie. Right now you’ll find more images after the break and we’ll embed the video if we get to okay.

Continue reading “Nixie Clock That Doesn’t Skimp On The Number Of Tubes”