Taking A U2F Hardware Key From Design To Production

Building a circuit from prototyping to printed circuit board assembly is within the reach of pretty much anyone with the will to get the job done. If that turns out to be something that everyone else wants, though, the job gets suddenly much more complex. This is what happened to [Conor], who started with an idea to create two-factor authentication tokens and ended up manufacturing an selling them on Amazon. He documented his trials and tribulations along the way, it’s both an interesting and perhaps cautionary tale.

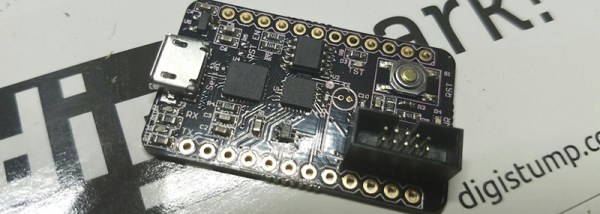
[Conor]’s tokens themselves are interesting in their simplicity: they use an Atmel ATECC508A specifically designed for P-256 signatures and keys, a the cheapest USB-enabled microcontroller he could find: a Silicon Labs EFM8UB1. His original idea was to solder all of the tokens over the course of one night, which is of course overly optimistic. Instead, he had the tokens fabricated and assembled before being shipped to him for programming.

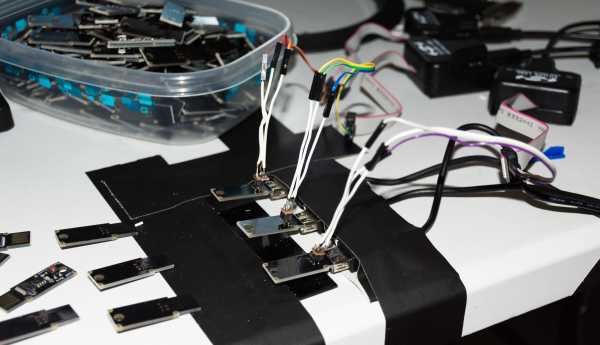
Normally the programming step would be straightforward, but using identical pieces of software for every token would compromise their security. He wrote a script based on the Atmel chip and creates a unique attestation certificate for each one. He was able to cut a significant amount of time off of the programming step by using the computed values with a programming jig he built to flash three units concurrently. This follows the same testing and programming path that [Bob Baddeley] advocated for in his Tools of the Trade series.

From there [Conor] just needed to get set up with Amazon. This was a process worthy of its own novel, with Amazon requiring an interesting amount of paperwork from [Conor] before he was able to proceed. Then there was an issue of an import tariff, but all-in-all everything seems to have gone pretty smoothly.

Creating a product from scratch like this can be an involved process. In this case it sounds like [Conor] extracted value from having gone through the entire process himself. But he also talks about a best-case-scenario margin of about 43%. That’s a tough bottom line but a good lesson anyone looking at building low-cost electronics.

Bending The New Amazon Dash Button To Your Will

Most Hackaday readers are familiar with the Amazon Dash button even if it has not yet made an appearance in their country or region. A WiFi enabled button emblazoned with a product logo, that triggers an Amazon order for that product when you press it. Stick it on your washing machine, press the button when you run out of laundry soap, and as if by magic some laundry soap appears. You still have to get out of your armchair to collect the soap from the delivery guy, but maybe they’re working on that problem too.

Of course the embedded computer concealed within the Dash button has been the subject of much interest within our community, and quite a few creative uses have been made of repurposed and reverse engineered examples.

Earlier this year a new Dash button model appeared. Largely similar on the outside, but sporting a comprehensive hardware update internally. Gone is the STM32 processor to be replaced by an Atmel part, and unfortunately since they also made changes to its communication protocol, gone also are most of the hacks for the device.

[Evan Allen] writes to us with his work on bending the new Dash button to his will. He goes into detail on the subject of retrieving their MAC addresses, and modifications to existing hacks to allow the buttons to be intercepted/redirected to trigger his MQTT server. It’s not by any means the end of the story and we’re sure we’ll see more accomplished uses of the new Dash button in due course, but it’s a start.

If the new button’s hardware interests you then [Matthew Petroff]’s teardown is definitely worth a look. As well as the Atmel chips — discovered to be a ATSAMG55J19A-MU with an ATWINC1500B wireless chip — the buttons now support power from a AA cell, and boast a significantly reduced power consumption. We really, really, need to pwn this tasty new hardware!

We’ve covered quite a few Dash button hacks before, from simply capturing button presses to cracking it wide open and running your own code. Let’s hope this new version will prove to be as versatile.

Microcontrollers Now Substitute For CPUs

Microcontrollers are getting faster and faster, as is most of the rest of the computing world. Just like you can play Nintendo console games on the newest Nintendo handhelds, it seems that modern microcontrollers can replace CPUs on personal computers from the 80s. At least, that’s what [Dave] has shown with his latest project: an Atmel microcontroller that directly attaches to the CPU slot on a Commodore PET.

Essentially, the project started out as a test rig of sorts for the Commodore. [Dave] wanted to see if some of the hardware on the Commodore was still functional and behaving properly. From there, it somewhat snowballed. The address bus was easy enough to investigate, but adding only a few more pins on the microcontroller he was already using would be enough to access the databus too. A character table was soon added, a test algorithm, and more useful insights. It’s a masterful manipulation of this older hardware with modern technology and is definitely worth a look.

There’s a lot more going on in the retrocomputing world than meets the eye. One might think these old computers were all in landfills by now, but there is a devoted fanbase that does everything from building new hard drives for old computers or investigating their true audio-visual potential.

Thanks to [Mike w] for the tip!

Hackaday Prize Entry: MiniSam-Zero

Thanks to the Arduino, Atmel’s SAM line of ARM microcontrollers are seeing a lot of use as 32-bit learning tools. For his Hackaday Prize project, [Jeremey] is using one of these chips without all the Arduino drama. He’s built a tiny Atmel SAM dev board that’s cheap, simple, and interestingly for a 32-bit ARM board, easy to program.

For this board, [Jeremy] is using Atmel’s SAM D09, the smallest member of the family that also includes the chip on the new Arduino Zero and the Arduino M0 (built by the other Arduino). The MiniSam-Zero uses a slightly smaller chip with 8 kB of on-chip Flash. Eagle-eyed complainers will notice the SAM D09 does not have internal EEPROM, so an EEPROM is added on-board. Also on board is a temperature sensor and a Silicon Labs CP2102 for serial communications.

That last chip – the Serial USART – allows for a rather interesting build if the firmware is done right. Instead of futzing about with ARM SWD while programming the device, a serial bootloader would allow anyone to plug a USB cable into this board and upload code straight from an IDE. This is perhaps the coolest feature of the MiniSam-Zero, and something [Jeremy] has worked tirelessly to get right. He can upload directly from Atmel Studio, and after a bit more work, [Jeremy] will be able to program this board directly from the Arduino IDE. That’s great work, and although this board isn’t as capable as other ARM microcontroller offerings, it’s still a fantastically useful device.

The HackadayPrize2016 is Sponsored by:

AVR Vs PIC, Round 223: Fight!

Get ready to rumble! [Thierry] made the exact same Hello-World-esque project with two microcontrollers (that are now technically produced by the same firm!) to see how the experience went.

It’s not just an LED-blinker, though. He added in a light-detection function so that it only switches on at night. It uses the Forest Mims trick of reverse-biasing the LED and waiting for it to discharge its internal capacitance. The point is, however, that it gives the chip something to do instead of simply sleeping.

Although he’s an AVR user by habit, [Thierry] finds in favor of the PIC because it’s got a lower power draw both when idling and when awake and doing some computation. This is largely because the PIC has an onboard low-power oscillator that lets it limp along at 32 kHz, but also because the chip has a lower power consumption in general. In the end, it’s probably a 10% advantage to the PIC on power.

If you’re competent with one of the two chips, but not the other, his two versions of the same code would be a great way to start familiarizing yourself with the other. We really like his isDarkerThan() function which makes extensive use of sleep modes on both chips during the LED’s discharge period. And honestly, at this level the code for the two is more similar than different.

(Oh, and did you notice [Thierry]’s use of a paper clip as a coin-cell holder? It’s a hack!)

Surprisingly, we’ve managed to avoid taking a stray bullet from the crossfire that occasionally breaks out between the PIC and AVR fans. We have covered a “shootout” before, and PIC won that round too, although it was similarly close. Will the Microchip purchase of Atmel calm the flames? Let’s find out in the comment section. We have our popcorn ready!

Smart AC Monitoring: Without The $500 Price Tag

[Tisham Dhar] has been interested in monitoring AC power and previously built a breakout board for the ADE7763. He wanted to find something cheaper and more modern. The ATM90E26 fit the bill. It can communicate via a UART or SPI, and has multiple metering modes. The problem? The evaluation module from Atmel costs about $500 (and for [Dhar] $800 Australian), although the part itself can be had for under a buck in bulk. (Atmel even sent him three samples for free.)

[Dhar] put the low voltage components from the reference design on a PCB and pocketed the difference in cost. So far, he’s tested the setup with a Teensy and low voltage measurements only. He plans to do a full test soon.

The test setup uses SPI mode 3 to talk to the processor. You can find the relevant code on GitHub.

We see a lot of energy monitoring projects go by. Of course, working on household wiring current can be dangerous, so be careful out there.

Atmel Removes Full-Swing Crystal Oscillator

It is one of our favorite chips, and the brains behind the Arduino UNO and its clones, and it’s getting a tweak (PDF). The ATmega328 and other megaX8-series chips have undergone a subtle design change that probably won’t affect you, but will cause hours of debugging headaches if it does. So here’s your heads-up. The full-swing oscillator driver circuitry is being removed. As always, there’s good news and bad news.

The older ATmega chips had two different crystal drivers, a low-power one that worked for lower speeds, and higher-current version that would make even recalcitrant crystals with fat loading capacitors sing. This “full-swing” crystal driver was good for 16 MHz and up.

The good news about the change is that the low-power crystal driver has been improved to the point that it’ll drive 16 MHz crystals, so you probably don’t need the full-swing driver anymore unless you’re running the chip at 20 MHz (or higher, you naughty little overclocker).

This is tremendously important for Arduinos, for instance, which run a 16 MHz crystal. Can you imagine the public-relations disaster if future Arduinos just stopped working randomly? Unclear is if this is going to ruin building up a perfboard Arduino as shown in the banner image. The full-swing oscillator was so robust that people were getting away with a lot of hacky designs and sub-optimal loading capacitor choices. Will those continue to work? Time will tell.

The bad news is that if you were using the full-swing oscillator to overcome electrical noise in your environment, you’re going to need to resort to an external oscillator instead of a simple crystal. This will increase parts cost, but might be the right thing to do anyway.

Whenever anyone changes your favorite chip, there’s a predictable kerfuffle on the forums. An Atmel representative said they can get you chips with the full-swing driver with a special order code. We’re thinking that they’re not going to let us special order ten chips, though, so we’re going to have to learn to live with the change.

The ATmega328 has already gotten a makeover, and the new version has improved peripheral devices which are certainly welcome. They don’t have the full-swing oscillator onboard, so you can pick some up now and verify if this change is going to be a problem for you or not. We don’t have any of the new chips to test out just yet.

Thanks to [Ido Gendel] for tipping us off to the change in our comment section! If you have any first-hand experience with the new chips, let us know in the comments and send in a tip anytime you trip over something awesome during your Internet travels.