Adding A Battery Gauge To A Project With Zero Parts

The typical way of doing a low battery detector is throwing a comparator in the circuit, setting it to measure a certain threshold voltage, and sending that signal off to a microcontroller or other circuit to notify someone the battery is going dead. [Josh] has a simpler way using an 8-bit AVR and zero other parts.

The chip [Josh] is using is the ATtiny84. The ADC in this chip is usually used to measure an unknown voltage against a reference voltage. The trick [Josh] is using is to do this in reverse: The internal 1.1 Volt reference voltage is measured against an unknown scale, namely the input voltage.

The value provided by the ADC on the chip will always be Vin times 1024 over the reference voltage. Since Vin will be 1.1 V in this case, the ADC value is known, it’s only a matter of doing some 6th grade algebra to determine the value of the input voltage.

[Josh] put together a small demonstration where the chip blinks out the number of volts its receiving from a bench power supply. By blinking a LED, it can blink out the current value of VCC as integers, but by using this technique you should be able to get a fairly fine-grained reading of what VCC actually is. Video below.

Continue reading “Adding A Battery Gauge To A Project With Zero Parts”

AVR Programmer

Inexpensive AVR Programmer Made From Five Components

If you want to program an AVR chip as inexpensively as possible, then [Ian’s] solution might just be for you. He built an AVR programmer using only four components. This design is based on the vusbtiny AVR programmer design, with a few components left out.

[Ian’s] design leaves out two of the resistors and two diodes, leaving just four components. These include a 1.5k resistor, a small capacitor, a USB connector, a six pin header, and an ATtiny45. He admits that this may not be exactly up to USB spec, but it does work.

This is one of those projects that is really an exercise in “will it work?” more than anything else. The fact that you need to first program an AVR chip means that this wouldn’t be useful in a pinch, because you would already have to have a working programmer. Nonetheless, it’s always fun to see what can be done with as little as possible.

Now Let’s See The World’s Largest Arduino

A few days ago we saw what would have been a killer Kickstarter a few years ago. It was the smallest conceivable ATtiny85 microcontroller board, with resistors, diodes, a USB connector, and eight pins for plugging into a breadboard. It’s a shame this design wasn’t around for the great Arduino Minification of Kickstarter in late 2011; it would have easily netted a few hundred thousand dollars, a TED talk, and a TechCrunch biopic.

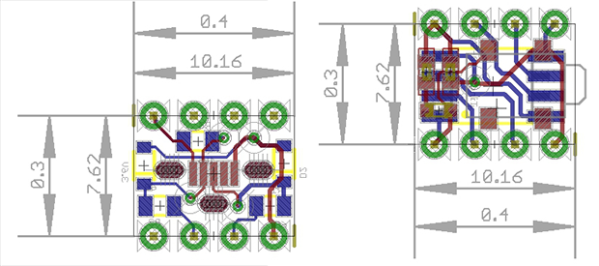
[AtomSoftTech] has thrown his gauntlet down and created an even smaller ‘tiny85 board. it measures 0.4in by 0.3in, including the passives, reset switch, and USB connector. To put that in perspective, the PDIP package of the ‘tiny85 measures 0.4 x 0.4. How is [Atom] getting away with this? Cheating, splitting the circuit onto two stacked boards, or knowing the right components, depending on how you look at it.

USB [Atom] is using a few interesting components in this build. The USB connector is a surface mount vertical part, making the USB cord stick out the top of this uC board. The reset button is extremely small as well, sticking out of the interior layer of the PCB sandwich.

[AtomSoft] has the project up on OSH Park ($1.55 for three. How cool is that?), and we assume he’ll be selling the official World’s Smallest Arduino-compatible board at Tindie in time.

What Is This, A Microcontroller Board For Ants?

You youngins probably don’t remember this, but a few years ago there was an arms race on Kickstarter to create the smallest Arduino-compatible microcontroller board. Since then, a few people have realized they can make more money on Kickstarter through fraud or potato salad, and the race to create the smallest ‘duino board petered out.

It’s a shame [Meizhu] wasn’t part of the great miniature Arduinofication of Kickstarter, because this project would have won. It’s an Atmel ATtiny85, with USB port, resistors, diodes, reset button, LED, and pin headers, that is just 72 mils larger than the PDIP package of the ‘tiny85. Outside of getting a bare die of ‘tiny85s, there isn’t much of a chance of this board becoming any smaller.

[Meizhu] was inspired to create this board from [Tim]’s Nanite 85, which up until a few days ago was the current champion of micro microcontroller boards. With a bit of work in KiCAD, the new board layout was created that is just a hair larger than the 0.4″ x 0.4″ footprint of the PDIP ATtiny85. There were a few challenges in getting a working board this small; you’d be surprised how large the plastic bits around pin headers are, but with some very crafty soldering, [Meizhu] was able to get it to work.

Halo-style Paintball

paintball buggy

It seems as though [Nathan] has taken some serious inspiration from the Warthog. The iconic armored buggy from Halo video games has a turret mounted to the roof. Although [Nathan]’s buggy only shoots paintballs from its turret.

Mounting paintball markers (guns) to various objects such as vehicles, robots, or other machines isn’t quite as straightforward as it seems. Vibrations from anything can transfer through a clamping system and cause paintballs to break. This, of course, inhibits the functionality of the marker and is a messy cleanup to boot. Then there has to be a way to fire the paintballs, which is usually handled by soldering to the electrical connections in the marker. And the entire rig has to stand up to the normal jostling and sudden turns from the buggy.

[Nathan] has solved these problems first by creating a custom fast-change mount that allows any malfunctioning markers to be changed rapidly. The electronic firing mechanism is handled by an ATtiny microcontroller and there is a custom electrical connection that is automatically made when the marker is bolted to the mount.

The new system allows markers to be changed in about 30 seconds, much better than any other system. Maybe in the future [Nathan] can upgrade the buggy’s turret to accommodate a paintball minigun.

Biometric Secured Golfcart Allows For Keyless Start

Fingerprint Secured Golf Cart

Who uses keys these days, really? Introducing the world’s first(?) biometric secured golf cart. Gives “push to start” a whole new meaning!

[Ramicaza] lives in a small community where many families (including his!) use golf carts to commute short distances, like to the grocery store, or school. Tired of sharing a key between his parents and siblings, [Ramicaza] decided to soup up his ride with a fingerprint sensor allowing for key less start.

He’s using an ATtiny85 and a GT511-C1 finger print sensor from SparkFun. After throwing together a circuit on a breadboard and testing the concept he went straight to a PCB prototype for install in the cart. What we really like is the case he integrated into the golf cart’s dash. It features a flip-up lid which turns the circuit on when it is opened, and off when it is closed to save battery. Scan your finger and a relay triggers the ignition allowing you to drive away.

Continue reading “Biometric Secured Golfcart Allows For Keyless Start”

ATtiny Watering Timer Turns Off The Water When You Forget

ATtiny Water Timer

A pal of [Kyle’s] was regularly leaving his sprinkler on for too long. He also had forgotten to turn the water off while topping off his pool a couple of times, an embarrassing and wasteful situation. Being such a good friend, [Kyle] offered to make him a water timer. This isn’t a regular water timer that turns the water on and off at the same time every day. This device allows the user to push a button to have the unit switch on a solenoid valve, permitting water flow. After a predetermined amount of time the unit removes power to the solenoid valve which stops the water flow, successfully preventing pool overflows and excessive watering.

[Kyle] started off his design using a 555 chip to do the counting. He quickly became worried that timer lengths over 10 minutes would cause inconsistent functionality due to the leakage current of the capacitor and the charge current of the resistor. There are ways around this, but rather than complicate the design he switched to an ATtiny microcontroller. The added benefit of the ATtiny is that he could connect up a potentiometer to adjust the on-time without replacing parts or making a new unit. When the potentiometer is turned, the on-board LED will flash a number of times which corresponds with the delay in minutes. Ten flashes means a 10 minute delay. It’s a simple and clear interface.

As if the home etched PCB wasn’t cool enough, [Kyle] 3D printed up a case for the unit. The case permits access to the screw terminals and has provisions for the indicator LEDs. Check out the integrated flap in the top of the case. When this portion of the case is pushed in, it presses the PCB-mounted on/off switch.

If you are interested in making one, all of the files and code are available on [Kyle’s] site.

via [dangerous prototypes]