THP Entry: Tinusaur AVR Platform Teaches Noobs, Plays Game Of Life

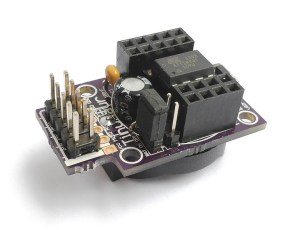
tinusaur[Neven Boyanov] says there’s nothing special about Tinusaur, the bite-sized platform for learning and teaching the joys of programming AVRs. But if you’re dying to gain a deeper understanding of your Arduino or are looking to teach someone else the basics, you may disagree with that assessment.

Tinusaur is easy to assemble and contains only the components necessary for ATTiny13/25/45/85 operation (the kit comes with an ’85). [Neven] saved space and memory by forgoing USB voltage regulator. An optional button cell mount and jumper are included in the kit.

[Neven] is selling boards and kits through the Tinusaur site, or you can get the board from a few 3rd party vendors. His site has some projects and useful guides for assembling and driving your Tinusaur. He recently programmed it to play Conway’s Game of Life on an 8×8 LED matrix. If you’re looking for the zero-entry side of the AVR swimming pool, you can program it from the Arduino IDE. Be warned, though; they aren’t fully compatible.


SpaceWrencherThe project featured in this post is an entry in The Hackaday Prize. Build something awesome and win a trip to space or hundreds of other prizes.

Simple Touch Controller Frees Up USB Port

touch screen demonstration using text

[typ.o] was working on a Raspberry Pi project and found himself running short on USB ports. The project required a touch screen interface, which takes up one of the ports. Since he was only using the screen in text mode, he decided to ditch the original USB controller and make his own.

The ever popular Attiny85 is deployed to handle the task, and is interfaced between the resistive touch panel and the Raspberry pi, using only three pins from the GPIO port. The Attiny85 runs off the 3 volt supply from the raspi, so no level shifter is needed, helping to keep his board super simple.

The calibration and calculation of the touched character location is done by a Python script running on the raspi. [typ.o] is a fan of the KISS principle, and it shows. Be sure to check out his site for all source code, schematics and a video demonstrating this simple but effective solution.

DUO Decimal – A Minimalist Single Board Computer

duodecimal

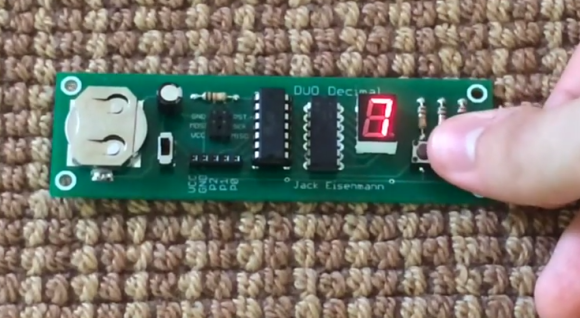
If you’ve ever struggled to fit your program into the RAM and ROM of a small micro, you’ll appreciate [Jack’s] creation, the DUO Decimal. DUO Decimal is a small single board computer running on an Atmel ATtiny84. The ’84 has 8KB flash memory, 512 bytes of SRAM, and 512 bytes of EEPROM. Not as bad as a the old days, but still tight by today’s standards.

User input to the DUO Decimal is through two buttons. Output is via a 7 segment numeric LED display. Not the easiest for typing in long programs, but on par with the switches and blinkenlights of the past. 3 bits of GPIO are available for connections to your own circuits.

[Jack] didn’t just design a board, he designed an entire language. DUO Decimal is programmed in an interpreted language called DUO Decimal Numeric Code (DDNC). There are 47 DDNC commands, covering everything from basic math to list manipulation. Programs can be entered through the buttons, or save your fingertips by downloading them through the AVR isp interface. The entire C code for the DUO Decimal, including the DDNC interpreter is available on [Jack’s] website.

[Jack] created several example DDNC programs, including a 6 function calculator with trigonometry, a Mandelbrot set tester, and an implementation of the rock paper scissors game. There’s even a platformer action game, though graphics on a single 7 segment display are simplistic to say the least.

Continue reading “DUO Decimal – A Minimalist Single Board Computer”

Attiny PWM Generator And Servo Tester

PWM-Servo-Tester

Having the right tool for the job makes all the difference, especially for the types of projects we feature here at Hackaday. [Jana Marie] must agree with this sentiment, one of her latest projects involves building a tool to generate a PWM signal and test servos using an Attiny25/45/85.

Tools come in all kinds of different shapes and sizes. Even if it might not be as widely used as [Jana’s] earlier work that combines an oscilloscope and signal generator, having a tool that you can rely upon to test servos and generate a PWM can be very useful. This well written Instructable provides all the details you need to build your own, including the schematic and the necessary code (available on GitHub). The final PWM generator looks great. For simple projects, sometimes a protoboard is all you need. It would be very cool to see a custom PCB made for this project in the future.

What tools have you build recently? Indeed, there is a tool for every problem. Think outside the (tool) box and let us know what you have made!

Developing The Grillino In 24 Hours

grillino

[Mastro Gippo] hit Shenzhen back in April and organized a challenge for himself: could he develop an electronic device from idea to product in only 24 hours? The result is the Grillino, a simple clone of the Annoy-a-Tron: a small, concealable device that makes chirping sounds at random intervals. It’s name was derived from a mix of the Italian word for a cricket—”grillo”—and, of course, “Arduino.”

Shenzhen was the perfect setting for his experiment, especially because [Mastro Gippo] was in town for the Hacker Camp we mentioned a few months ago. The build is pretty simple, requiring only a microcontroller, a battery, and a piezo speaker. What follows is a detailed journey of dizzying speed through the production process, from bags stuffed full of components, to 3D-printing a test jig, to searching for a PCB manufacturer that could fulfill his order overnight. Video and more below.

Continue reading “Developing The Grillino In 24 Hours”

Custom Electronics And LED Panels Brighten Up A Nightclub

ledPanels

When [Robert] is presented with a challenge, he doesn’t back down. His friend dreamed of reusing some old LED panels by mounting them to the ceiling of the friend’s night club. Each panel consists of a grid of five by five red, green, and blue LEDs for a total of 75 LEDs per panel. It sounded like a relatively simple task but there were a few caveats. First, the controller box that came with the panels could only handle 16 panels and the friend wanted to control 24 of them. Second, the only input device for the controller was an infrared remote. The friend wanted an easy way for DJ’s to control the color of the panels and the infrared remote was not going to cut it. Oh yea, he also gave [Robert] just three weeks to make this happen.

[Robert] started out by building a circuit that could be duplicated to control each panel. The brain of this circuit is an ATtiny2313. For communication between panels, [Robert] chose to go with the DMX protocol. This was a good choice considering DMX is commonly used to control stage lighting effects. The SN75176 IC was chosen to handle this communication. In his haste to get this PCB manufactured [Robert] failed to realize that the LED panels were designed common cathode, as opposed to his 25 shiny new PCB’s which were designed to work with a common anode design. To remedy this, he switched out all of the n-channel MOSFET with p-channel MOSFET. He also spent a couple of hours manually cutting through traces and rewiring the board. After all of this, he discovered yet another problem. The LED’s were being powered from the same 5V source as the microcontroller. This lead to power supply issues resulting in the ATtiny constantly resetting. The solution was to add some capacitors.

Click past the break for more on [Robert’s] LED panels.

Continue reading “Custom Electronics And LED Panels Brighten Up A Nightclub”

The Most Random Electronic Dice Yet

di

If you’ve written a great library to generate random numbers with a microcontroller, what’s the first thing you would do? Build an electronic pair of dice, of course.

[Walter] created the entropy library for AVRs for a reliable source of true random numbers. It works by using the watchdog timer’s natural jitter; not fast by any means but most sources of entropy aren’t that fast anyway. By sampling a whole lot of AVR chips and doing a few statistical tests, it turns out this library is actually a pretty good source of randomness, at least as good as a pair of dice.

The circuit itself uses two 8×8 LED matrices from Adafruit, an Arduino, and a pair of buttons. The supported modes are 2d6, 2d4, 2d8, 2d10, 1d12, 1d20, a deck of cards, a single hex number, a single 8-bit binary number, or an eight character alphanumeric password. It’s more than enough for D&D or when you really need an unguessable password. Video demo below.

Continue reading “The Most Random Electronic Dice Yet”