Get Twelve Charlieplexed PWM Outputs From An ATtiny85

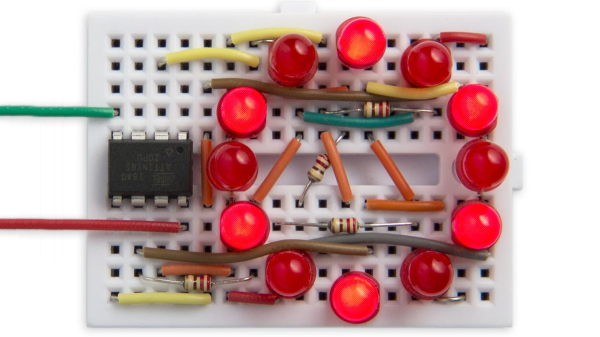
Most of us are aware that charlieplexing can drive a large number of LEDs from a relatively small number of I/O pins, but [David Johnson-Davies] demonstrates adding another dimension to that method to create individually controlled PWM outputs as well. His ATtiny85 has twelve LEDs, each with individually-set brightness levels, and uses only four of the five I/O pins on the device.

Each LED can be assigned a brightness between 0 (fully off) and 63 (fully on). The PWM is done by using one of the timers in the ATtiny85 to generate a periodic interrupt, and the ISR for the interrupt takes care of setting the necessary ratios of on and off times for each charlieplexed output. The result? Twelve flicker-free LEDs with individually addressable brightness levels, using an 8-pin microcontroller and just a few passive components on a tiny breadboard. There’s even one I/O pin left on the ATtiny85, for accepting commands or reading a sensor.

[David] really wrings a lot out of the ATtiny series of microcontrollers with his compact projects, like his Tiny Function Generator (which recently got an update.) He also demonstrated that while charlieplexing is usually used with LEDs, charlieplexing can be used with switches just as easily.

A Tiny IDE For Your ATtiny

When writing code for the ATtiny family of microcontrollers such as a the ATtiny85 or ATtiny10, people usually use one of two methods: they either add support for the chip in the Arduino IDE, or they crack open their text editor of choice and do everything manually. Plus of course there are the stragglers out there using Eclipse. But [Wayne Holder] thinks there’s a better way.

The project started out as a simple way for [Wayne] to program the ATtiny10 in C under Mac OS, but has since evolved into an open source, cross-platform integrated development environment (IDE) for programming a wide range of ATtiny chips in C, C++, or Assembly. Not only does it integrate the source code editor and programmer, but it even bundles in documentation for common variants of the chips including block diagrams and pinouts; making it a true one-stop-shop for ATtiny hacking.

His IDE runs under Java, including OpenJDK, and [Wayne] provides a stable pre-built executable for those who don’t want to clone the whole GitHub repository. He’s included the GNU/AVR toolchains, though notes that testing so far has been limited to Mac OS, and he’s interested in feedback from Windows and Linux users. Assembly is done either with GNU AVR-AS, or an assembler of his own design, though the latter is currently limited to the ATTiny10.

To actually get the code onto the chip, the IDE supports using the Arduino as a programmer as well as dedicated hardware like the BusPirate or the USBasp. If you go the Arduino route, [Wayne] has even come up with a little adapter board which he’s made available through OSH Park to help wrangle the diminutive chips.

The ATtiny10 might have something of a learning curve, but in exchange this family of tiny microcontrollers offers an incredible amount of capability. When you’re working with what’s essentially a programmable grain of rice, the only limit is your own creativity.

Quartet Of SMD Resistors Used To Sense Z-Axis Height

Here’s a neat trick for your next 3D-printer build or retrofit: a Z-axis sensor using a DIY strain gauge made from SMD resistors. We’re betting it could have plenty of other applications, too.

Conventional load cells, at least the ones you can pick up cheaply from the usual sources or harvest from old kitchen or bathroom scales, are usually way too big to be used on the extruder of a 3D-printer. [IvDm] wanted to build a touch sensor for his Hybercube printer, so he built his own load cell to do it. It consists of four 1000 ohm SMD resistors in the big 2512 device size. He mounted them to an X-shaped PCB and wired them in the classic Wheatstone bridge configuration, with two resistors on one side of the board and two on the other.

The extruder mounts into a hole in the center of the board and floats on it. Through an HX711 load cell driver chip, the bridge senses the slight flex of the board when the extruder bottoms out on the bed, and an ATtiny85 pulls a limit switch input to ground. [IvDm] even did some repeatability testing with this sensor and it turned out to be surprisingly consistent. The first minute or so of the video below shows it in action on the Hypercube.

We found the use of SMD resistors as strain gauges pretty clever here, but there’s plenty to do with off-the-shelf load cells: measuring how much filament is left on a roll, checking the thrust of a model rocket engine, or even figuring out if you’re peeing correctly.

Continue reading “Quartet Of SMD Resistors Used To Sense Z-Axis Height”

Lighting Up A Very Wiry Candle

Entries into the Circuit Sculpture Contest tend to be pretty minimalist by nature, and this LED candle by [Amal Mathew] is a perfect example. The idea here was to recreate the slim and uncomplicated nature of a real candle but with a digital twist, and we think he’s pulled it off nicely with a bare minimum part count and exaggerated wire length that gives it the look of a thin pillar candle.

To give the LED a fading effect, [Amal] uses a ATtiny85 programmed with the Arduino IDE. His code uses the analogWrite() in a loop to gradually increase and then decrease the PWM frequency. With the LED connected directly to one of the pins on the ATtiny85, the simple program achieves the fading effect without needing any additional components.

On the opposite side of the candle, connected by long copper wires, is the single CR2032 which provides power for the circuit. In a nice touch, [Amal] has turned the battery 90 degrees relative to the rest of the circuit, so it can serve as a weighted base. We imagine getting it to stand up might be a little fiddly from the looks of it, but once it’s up and merrily fading in and out, it really helps sell the candle idea.

The finished product might look fairly straight-forward, but in his write-up on Hackaday.io, [Amal] gives detailed instructions on how to build your own version if you’re not a bare microcontroller wizard. This includes direction on how to program the ATtiny85 using an Arduino Uno; a neat trick to know even if you aren’t planning on making any candles in the near future. The next logical step is making it so you can “blow out” the LED, which should only take the addition of a resistor and some updated code.

There’s still plenty of time to enter your own functional piece of art in the Circuit Sculpture Contest. Just write it up on Hackaday.io and submit it before the January 8th, 2019 deadline.

Continue reading “Lighting Up A Very Wiry Candle”

Drawing On An OLED With An ATtiny85, No RAM Buffers Allowed

Small I2C OLED displays are common nowadays, and thanks to the work of helpful developers, there are also a variety of graphics libraries for using them. Most of them work by using a RAM buffer, which means that anything one wants to draw gets written to a buffer representing the screen, and the contents of that buffer are copied out to the display whenever it is updated. The drawback is that for some microcontrollers, there simply isn’t enough RAM for this approach to work. For example, a 128×64 monochrome OLED requires a 1024 byte buffer, but that’s bad news if a microcontroller has only 512 bytes of RAM in total like the ATtiny85. [David Johnson-Davies] has two solutions: a Tiny Graphics Library that needs no RAM buffer and an even slimmer Tiny Function Plotter, which we’ll discuss in order.

Tiny Function Plotter works on both SSD1306 and SH1106-based displays.

[David]’s Tiny Graphics Library works by taking advantage of a feature of SH1106 driver-based displays: the ability to read the display over I2C as well as write to it. With the ability to perform read-modify-write on a section at a time, using a large RAM buffer can be avoided. The only catch is that the library only works with OLEDs using the SH1106, but the good news is that these are very common at the usual Chinese resellers. ([David] notes that SH1106 is sometimes misspelled as “SSH1106”, so keep that in mind when searching.)

What about all those other SSD1306-based OLED displays out there? Are they out of luck? Not quite. [David] has one more trick up his sleeve: his Tiny Function Plotter works on the SSD1306 and also requires no RAM buffer. It’s unable to write text, but it can easily handle drawing graphs plotting things like values over time while needing very little overhead.

Another approach we’ve seen for using OLEDs driven by microcontrollers with limited memory is the solution [Michael] used in Tiny Sideways Tetris, which was done in part by realizing the smallest screen element he needed was a 4×4 block, and using that premise as the basis of a simple compression scheme.

I2C Bootloader For ATtiny85 Lets Other Micros Push Firmware Updates

There are a few different ways of getting firmware onto one of AVR’s ATtiny85 microcontrollers, including bootloaders that allow for firmware to be updated without the need to plug the chip into a programmer. However, [casanovg] wasn’t satisfied with those so he sent us a tip letting us know he wrote an I2C bootloader for the ATtiny85 called Timonel. It takes into account a few particulars of the part, such as the fact that it lacks a protected memory area where a bootloader would normally reside, and it doesn’t have a native I2C interface, only the USI (Universal Serial Interface). He’s just released the first functional version for the ATtiny85, but there’s no reason it couldn’t be made to work with the ATtiny45 and ATtiny25 as well.

Timonel is designed for systems where there is a more powerful microcontroller or microprocessor running the show (such as an ESP8266, Arduino, or even a board like a Raspberry Pi.) In designs where the ATtinys are on an I2C bus performing peripheral functions such as running sensors, Timonel allows the firmware for these peripheral MCUs to be updated directly from the I2C bus master. Embedded below is a video demo of [casanovg] sending simple serial commands, showing a successful firmware update of an AVR ATtiny85 over I2C.

Continue reading “I2C Bootloader For ATtiny85 Lets Other Micros Push Firmware Updates”

The Crustacean Battle Bot Of Your Nightmares

We’ve all seen a movie or TV show that got our imagination going, and the more studious of us might get fired up over a good book (one without pictures, even). You never know were inspiration might come from, which is why it’s so hard to track down in the first place. But one place we don’t often hear about providing many hackers with project ideas is the grocery store. But of course the more we learn about [Michael Kohn], the more we realize he’s got a very unique vision.

On a recent trip to the grocery store, [Michael] saw a two pack of frozen lobsters and thought they would make fine battling robots. You know, as one does. Unfortunately the process of taking a frozen lobster and turning it into a combat droid (which incidentally does include eating the thing at some point in the timeline) ended up being so disgusting that he only finished one of them. Whether that makes this poor fellow the winner or loser though…that’s a question that will require some contemplation.

The first step was cooking and eating the beast, and after that came cleaning the shell of as much remaining meat and innards as possible. He then baked it in a toaster oven for 40 minutes and let it sit for a couple of days to make sure it didn’t have any residual smell. Once he confirmed the shell was clean, he glued it back together and got started on mounting it to his hardware.

A wooden frame under the lobster holds the dual HD-1711MG mini servos that power the karate chop action of the claws, as well as the electronics. [Michael] used a ATtiny85 and NTD4963N MOSFETs to make a basic RC platform which responds to IR from a Syma S107 toy helicopter controller. He tried to power everything with AAA and then AA batteries, but found they just didn’t give him the juice he needed once the bot got going. So the final version utilizes a 5 V regulator and a standard RC 7.2v LiPO battery pack.

If you’re not big on shellfish, never fear. He’s created similar roving contraptions based around sausages and carrots too. One could say he’s truly a man of refined…taste.

Continue reading “The Crustacean Battle Bot Of Your Nightmares”