Cut Through The Noise, See Tiny Signals

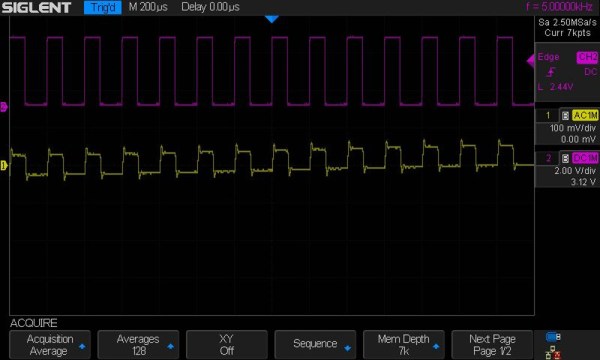
An oscilloscope is a handy tool for measuring signals of all kinds, but it’s especially useful if you want to measure something with a periodic component. Modern oscilloscopes have all kinds of features built-in that allow you sample a wide range of signals in the hundreds of megahertz, and make finding and measuring your signal pretty easy, provided you know which buttons to push. There are some advanced oscilloscope methods that go beyond the built-in features of even the best oscilloscopes, and [AM] has a tutorial on one of them.

The method used here is called phase-senstitive detection, and allows tiny signals to be found within noise, even if the magnitude of the noise is hundreds of times greater than the signal itself. Normally this wouldn’t be possible, but by shifting the signal out of the DC range and giving it some frequency content, and then using a second channel on the oscilloscope to measure the frequency content of the source and triggering the oscilloscope on the second channel, the phase of the measured signal can be sifted out of the noise and shown clearly on the screen.

In [AM]’s example, he is measuring the intensity of a laser using a photodiode with a crude amplifier, but even with the amplifier it’s hard to see the signal in the noise. By adding a PWM-like signal to the power source of the laser and then syncing it up with the incoming signal from the photodiode, he can tease out the information he needs. It’s eally a fascinating concept, and if you fancy yourself a whiz with an oscilloscope this is really a tool you should have in your back pocket.  If you’re new to this equipment, we do have a primer on some oscilloscope basics, too.

Continue reading “Cut Through The Noise, See Tiny Signals”

Code Review Lamp Subtly Reminds You To Help Your Fellow Developer

[Dimitris Platis] works in an environment with a peer review process for accepting code changes. Code reviews generally are a good thing. One downside though, is that a lack of responsiveness from other developers can result in a big hit to team’s development speed. It isn’t that other developers are unwilling to do the reviews, it’s more that individuals are often absorbed in their own work and notification emails are easily missed. There is also a bit of a “tragedy of the commons” vibe to the situation, where it’s easy to feel that someone else will surely attend to the situation, but often no one does. To combat this, [Dimitris] built this Code Review Lamp, a subtle notification that aims to prod reviewers into action.

The lamp is based on a ring of RGB LEDs and a Wemos D1 Mini board. The Wemos utilizes the popular ESP8266, so it’s easy to develop for. The LED ring and Wemos are tied together with a slick custom PCB. Mounting the LED ring on the top of the PCB and the Wemos on the bottom allows for easy powering via a USB cable while directing light upward.  The assembly is placed in a translucent 3D printed enclosure creating a pleasant diffuse light source.

Every developer gets a Code Review Lamp. The lamps automatically log in to the change management system to check whether anything is awaiting review. If a review is ready, the Lamp glows in a color specific to the individual developer. All this serves as a gentle but persistent reminder that someone’s work is being held up until a review is completed.

We love the way that the device has a clear purpose: it does its job without any unnecessary features or parts. It’s similar to this ESP8266 IoT Motion Sensor in that it has a single job to do, and focuses on it well.

Continue reading “Code Review Lamp Subtly Reminds You To Help Your Fellow Developer”

A Cow-Powered Human Centrifuge

Spoiler alert: group of fun-loving French folks build an animal-or-human-powered merry-go-round that spins fast enough to fling all takers into the lake (YouTube, embedded below). Actually, that’s basically it. The surprise is ruined, but you probably want to check out the video anyway, because it looks like a ton of fun.

Granted, you may not have a well-stocked metal shop or a team of oxen up by the lake wherever you live, but there are certainly details in the video that will survive in translation. Basically, the team took the axle off of a junked car, attached it to a pole in the middle of the lake, made a large wooden drive wheel, and wrapped an infinite length of rope around it.

[Charles] from [Mad Cow] wrote us that there was about a 10:1 ratio between the drive wheel and the arms of the people-flinger. So if the cattle were pulling at 3 km/h, the human angular velocity was a brisk 30 km/h! Then it’s just a matter of convincing a team of cows, or a team of soccer players (?), to put their backs into it.

The [Mad Cow] crew seems to have more than their fair share of engineering dangerous fun up at their summer hideaway: check out their human crossbow that we featured a few years back.

Continue reading “A Cow-Powered Human Centrifuge”

This Cup Holder Crystal Ball Tells Your MPG Future

Hybrid vehicles, which combine an eco-friendly electric motor with a gasoline engine for extended range, are becoming more and more common. They’re a transitional technology that delivers most of the advantages of pure electric vehicles, but without the “scary” elements of electric vehicle ownership which are still foreign to consumers such as installing a charger in their home. But one element which hybrids are still lacking is a good method for informing the driver whether they’re running on petroleum or lithium; a way to check at a glance how “green” their driving really is.

[Ben Kolin] and his daughter [Alyssa] have come up with a clever hack that allows retrofitting existing hybrid vehicles with an extremely easy to understand indicator of real-time vehicle efficiency. No confusing graphics or arcade-style bleeps and bloops, just a color-changing orb which lives in the cup holder. An evolved version which takes the form of a smaller “dome light” that sits on the top of the dashboard could be a compelling aftermarket accessory for the hybrid market.

The device, which they are calling the ecOrb, relies on an interesting quirk of hybrid vehicles. The OBD II interface, which is used for diagnostics on modern vehicles, apparently only shows the RPM for the gasoline engine in a hybrid. So if the car is in motion but the OBD port is reporting 0 RPM, the vehicle must be running under electric power.

With a Bluetooth OBD adapter plugged into the car, all [Ben] and [Alyssa] needed was an Arduino Nano clone with a HC-05 module to read the current propulsion mode in real-time. With some fairly simple conditional logic they’re able to control the color of an RGB LED based on what the vehicle is doing: green for driving on electric power, purple for gas power, and red for when the gas engine is at idle (the worst case scenario for a hybrid).

Check out our previous coverage of OBD hacking on the Cadillac ELR hybrid if you’re looking to learn more about what’s possible with this rapidly developing class of vehicle

Continue reading “This Cup Holder Crystal Ball Tells Your MPG Future”

The Portable, Digital, Visual Theremin

The theremin is, for some reason, what people think of first when they think of electronic musical instruments. Maybe that’s because it was arguably the first purely electronic musical instrument, or because there’s no mechanical analog to something that makes sound simply by waving your hand over it. This project takes that idea and cranks it up to eleven. It’s a portable synthesizer that’s controlled by IR reflectors. Just wave your hand in front of it, and that’s what pitch is going to sound.

The audio hardware for this synth is, like so many winners in the Musical Instrument Challenge in this year’s Hackaday Prize, based on the Teensy and its incredible Audio library. The code consists of two oscillators and a pink noise generator. Pressing down button one activates the oscillators, and the frequency is determined by the IR sensor. Button two cycles through various waveforms, while the third and fourth buttons shift the octaves up and down. The output is I2S, and from there everything is out to an amplifier and speaker.

Of course, it’s really not a musical instrument unless it looks cool, and that’s where this project is really great. It’s a fully 3D printed enclosure that actually looks good. There’s an 8×8 LED array to display the current waveform, and this is something that could actually be a product instead of a project. It’s a great synth, and we’re happy to have it in the running for the Hackaday Prize.

Continue reading “The Portable, Digital, Visual Theremin”

Adaptive Layer Height On The Monoprice Select Mini

If you’ve used a desktop 3D printer, you’re likely familiar with the concept of layer heights. Put simply: thicker layers will print faster, and thinner layers will produce better detail. Selecting your layer height is making a choice between detail and speed, which usually works well enough. For example, prints which are structural and don’t have much surface detail can be done in higher layer heights to maximize speed with no real downside. Conversely, if you’ve got a model with a lot of detail you’ll have to just deal with the increased print time of thinner layers.

At least, that’s how it’s been up till now. Modern slicer software is starting to test the waters of adaptive layer heights, which change the layer height during the print. So the software will raise or lower the layer height depending on the level of detail required for the current area being printed. [Dylan Radcliffe] wanted to experiment with this feature on his Monoprice Select Mini, but it took some tweaking and the dreaded mathematics to get Cura’s adaptive layer height working on the entry-level printer. He’s documented his settings for anyone who wants to check out this next-generation 3D printing technology without forking out the cash for a top of the line machine.

While Cura is a popular slicer, the fact of the matter is that it’s developed by Ultimaker primarily for their own line of high-end printers. It will control machines from other manufacturers, but it makes no promises that all the features in the software will actually work as expected on lesser printers. In the case of the Monoprice Mini, the issue is the rather unusual Z hardware. The printer uses a 7.5° 48-step motor coupled to 0.7 mm thread pitch M4 rod. This is a pretty suspect arrangement that was no doubt selected to keep costs down, and results in an unusual 0.04375 mm step increment. For the best possible print quality, layer heights should be a multiple of this number. That’s where the math comes in.

After enabling adaptive layers in Cura’s experimental settings, you need to define the value which Cura will add or subtract to the base layer height. In theory you could enter 0.04375 mm here, but while that’s the minimum on paper, the machine itself is unlikely to be able to pull off such a small variation. [Dylan] recommends doubling that to 0.0875 for the “variation step size” parameter, and setting the base layer height to 0.175 mm (4 x 0.04375 mm).

[Dylan] reports these settings reduced the print time on his topographical map pieces from 12 hours to 7 hours, while still maintaining high detail on the top surface. Of course print time reduction is going to be highly dependent on the model being printed, so your mileage may vary.

If Cura isn’t your style, our very own [Brian Benchoff] gave us a tour of “variable layer height”, the Slic3r version of this technique. Perfect for that Prusa i3 MK3 you finally spent the cash on.

Video Quick Bit: The Best DIY Musical Instruments

The Hackaday Prize is almost over, and soon we’ll know the winners of the greatest hardware competition on the planet. A few weeks ago, we wrapped up the last challenge in the Hackaday Prize, the Musical Instrument Challenge. This is our challenge to build something that goes beyond traditional music instrumentation. Majenta’s back again looking at the coolest projects in the Musical Instrument Challenge in the Hackaday Prize.

We’re old-school hardware hackers here, and when you think about building your own drum machine, there’s really nothing more impressive than building one out of an Atari 2600. That’s what [John Sutley] did with his Syndrum project. It’s a custom cartridge for an Atari with a fancy ZIF socket. Of course, you need some way to trigger those drum sounds, so [John] is using an Arduino connected to the controller port as a sort-of MIDI-to-Joystick bridge.

If you want more retro consoles turned into musical instruments, look no further than [Aristides]’ DMG-01 Ukulele. It’s a ukulele with a 3D printed neck, bolted onto the original ‘brick’ Game Boy. Yes, it works as a ukulele, but that’s not the cool part. There are electronics inside that sense each individual string and turn it into a distorted chiptune assault on the ears. Just awesome.

How about a unique, new musical instrument? That’s what [Tim] is doing with Stylish!, a wearable music synthesizer. It’s based heavily on a stylophone, but with a few interesting twists. It’s built around an STM32, so there are a lot of options for what this instrument sounds like, and it’s all wrapped up in a beautiful enclosure. It’s some of the best work we’ve seen in this year’s Musical Instrument Challenge.

The Hackaday Prize is almost over, and on Saturday we’ll be announcing the winners at this year’s Hackaday Superconference. Tune in to the live stream to see which project will walk away with the grand prize of $50,000!