A Dead Simple, Well Constructed FM Transmitter

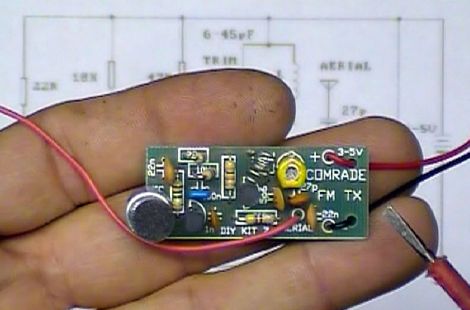
[Angelo] is only 15, but that doesn’t mean his fabrication skills are limited to Lego and K’Nex. He’s built himself an amazingly well constructed FM transmitter that’s powerful enough to be received a quarter mile away.

The FM transmitter circuit itself is based off one of [Art Swan]’s builds, but instead of the solderless breadboard construction you would expect to find in a small demo circuit, [Angelo] went all the way, etching his own PCB and winding his own coil.

Using photosensitized copper clad board, [Angelo] laid out the circuit with Fritzing, etched a board, and went at it with a drill. The components found in the transmitter are pretty standard and with the exception of the trimmer cap and electret mic, can be picked up in the parts drawers of any Radio Shack. He gets bonus points for using a 1/4 – 20 bolt for winding the coil, too.

The power supply for the transmitter is a single 9V battery, the battery connector being salvaged from a dead 9V. Awesome work, and for someone so young, [Angelo] already seems to have a grasp of all the random, seemingly useless information that makes prototyping so much easier. Video below.

Continue reading “A Dead Simple, Well Constructed FM Transmitter”

Recovering From A Seagate HDD Firmware Bug

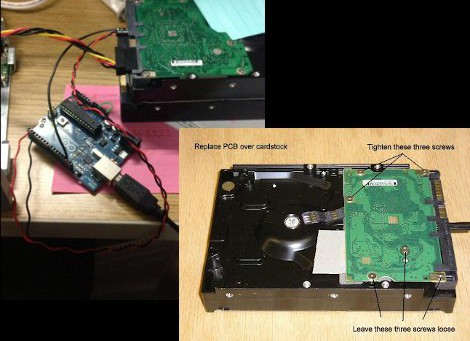
Hard drive firmware is about the last place you want to find a bug. But that turned out to be the problem with [BBfoto’s] Seagate HDD which he was using in a RAID array. It stopped working completely, and he later found out the firmware has a bug that makes the drive think it’s permanently in a busy state. There’s a firmware upgrade available, but you have to apply it before the problem shows its face, otherwise you’re out of luck. Some searching led him to a hardware fix for the problem.

[Brad Garcia] put together the tutorial which illustrates the steps needed to unbrick the 7200.11 hard drive with the busy state bug. The image in the lower right shows the drive with a piece of paper between the PCB and the connectors which control the head. This is necessary to boot the drive without it hanging due to the bug. From there he issues serial commands to put it into Access Level 2, then removes the cardboard for the rest of the fix.

In the tutorial [Brad] uses a serial-TTL converter. [BBfoto] grabbed an Arduino instead, using it as a USB-ttl bridge.

Cardboard Hexapod Gets Around With Three Motors

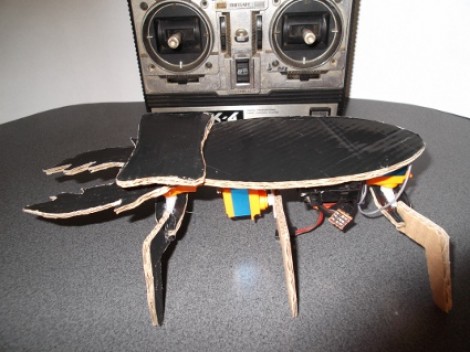
Here’s a lesson in doing a lot with very little. [Oldrobot] built this hexapod using cardboard for most of the pieces. He still had the box from his vacuum clear and it just happened to have a large black area the makes the top of the beetle look like it’s been painted.

The control board is from an old radio controlled airplane. Since RC airplanes used servos for flight control, it was a snap to hook up the three that make the bug go. One controls the set of middle legs which lift the body and change which of the propulsion legs are in contact with the ground. The other two servers move pairs of the front or back legs. It uses the same concept as this other RC controller hexapod, but much less time went into crafting the chassis and legs.

As you can see in the video after the break, the control scheme isn’t the most intuitive. But once you get a hang of which stick orientation affects each leg movement the bot ends up having fairly precise steering.

Continue reading “Cardboard Hexapod Gets Around With Three Motors”

Building A Simple FM Transmitter Bug

simple_fim_transmitter_hack_a_week

[Dino] got his hands on an FM transmitter “bug” kit via a friend, and thought it would make for an easy and fun Hack a Week project. The kit is simple two transistor half-wave FM transmitter, which the manufacturer suggests could be used to bug a room, hence the name. After poking a bit of fun at the instructions, [Dino] gets to work building the transmitter, wrapping things up in a little less than an hour.

Once he finished soldering everything together, he takes a few moments to test out the bug and to explain how various parts of the board work together in order to transmit the FM signal. He mentions that adding a dipole antenna would make it easy to extend the range of the transmitter, and briefly teases next week’s episode, where he plans on constructing a similar dual-stage transmitter.

This sort of FM circuit is one of the first few simple projects you would see in a beginner’s electronics class, so if you know anyone that is just starting to get their feet wet, be sure to pass this Hack a Week episode along.

Continue reading to see [Dino] explain the ins and outs of his FM bug transmitter.

Continue reading “Building A Simple FM Transmitter Bug”

FM Bug Using Salvaged SMD Parts

If you’re a soldering ninja this FM transmitter bug is for you. It’s quite similar to the one we looked at yesterday, but this uses 100% salvaged parts. Two phones donated components; a Nokia 3210 for its voltage-controlled oscillator and a Nokia 1611 for the rest of the parts. The bad news is that mobile technology like cellphones use some of the smallest surface mount packages known to man. That’s where the soldering skill come into play. The good news is that if you’ve been scavenging for discarded phones in order to reuse their LCD screens you already have these parts on hand.

[Thanks George]

Tiny FM Transmitter Bugs Rooms

Lucid Science delves into spy-tech once again with this tiny FM transmitter. Their post demonstrates a bit larger version than seen above, using a 9-volt battery and protoboard sized to match which makes for easier soldering. The design uses a microphone, two transistors, enameled wire for the coil, as well as various resistors, capacitors, and a potentiometer. What you end up with is an amazingly clear audio signal that can be picked up with a normal FM radio.

This would make a great project to do with the kids. You can talk about circuit design, practice soldering, and when finished they’ve got an almost miraculous toy to play with. Just be careful what you say around the house, the room might be bugged!

DelFly2 And DelFly Micro

[youtube=http://www.youtube.com/watch?v=4Mxq-nr9xyY]

The video you see above is the on board footage of the DelFly2 autonomous ornithopoter robot. Weighing 16 grams, it carries a small camera and can provide a live feed. If you’re amazed at the tiny size and weight of the DelFly2, check out the DelFly micro, video after the break, that weighs 3 grams. Remember when we thought 17 grams was small for an ornithopter?

All processing for the DelFly2 is done at a base station and transmitted to the flying bot to keep the weight down. The team also had to create their own brushless motor that runs at 60% efficiency and weighs only 1.6 grams. The 130mAh battery can sustain 15 minutes of horizontal flight or 8 minutes of hovering.

Continue reading “DelFly2 And DelFly Micro”