Radio Waves Bring The Heat With This Microwave-Powered Forge

Depending on the chef’s skill, many exciting things can happen in the kitchen. Few, however, grab as much immediate attention as when a piece of foil or a fork accidentally (?) makes it into the microwave oven. That usually makes for a dramatic light show, accompanied by admonishment about being foolish enough to let metal anywhere near the appliance. So what’s the deal with this metal-melting microwave?

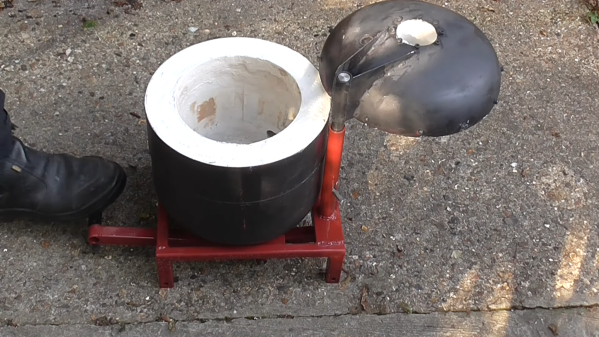
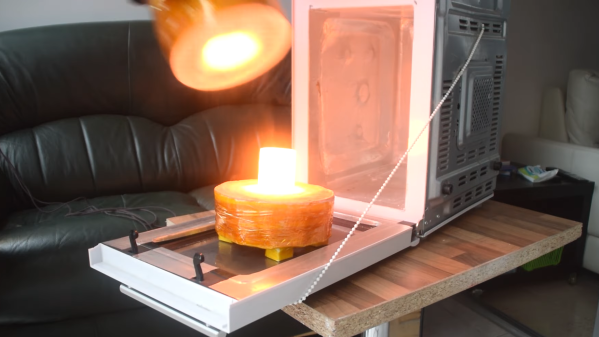
As it turns out, with the proper accessories, a standard microwave makes a dandy forge. Within limits, anyway. According to [Denny], who appears to have spent a lot of time optimizing his process, the key is not so much the microwave itself, but the crucible and its heat-retaining chamber. The latter is made from layers of ceramic insulating blanket material, of the type used to line kilns and furnaces. Wrapped around a 3D printed form and held together with many layers of Kapton tape, the ceramic is carefully shaped and given a surface finish of kiln wash.

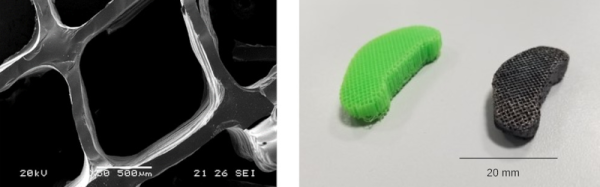
While the ceramic chamber’s job is to hold in heat, the crucible is really the business end of the forge. Made of silicon carbide, the crucible absorbs the microwave energy and transduces it into radiant heat — and a lot of it. [Denny] shares several methods of mixing silicon carbide grit with sodium silicate solution, also known as water glass, as well as a couple of ways of forming the crucible, including some clever printed molds.

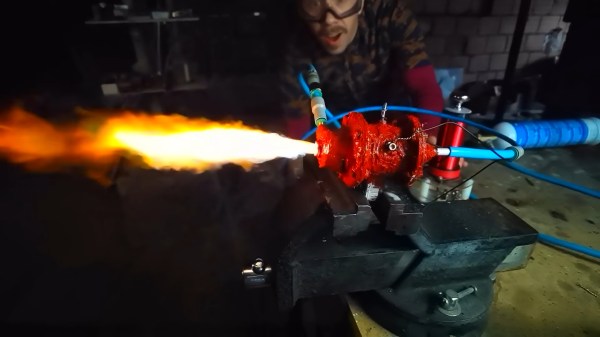
As for results, [Denny] has tried melting all the usual home forge metals, like aluminum and copper. He has also done brass, stainless steel, and even cast iron, albeit in small quantities. His setup is somewhat complicated — certainly more complex than the usual propane-powered forge we’ve seen plenty of examples of — but it may be more suitable for people with limited access to a space suitable for lighting up a more traditional forge. We’re not sure we’d do it in the kitchen, but it’s still a nice skill to keep in mind.

Continue reading “Radio Waves Bring The Heat With This Microwave-Powered Forge”

Mac 128K Emulator Gets DIY Ceramic Enclosure

Creative technologist [Joselyn McDonald] wanted to hone her ceramic skills by building an iconic Macintosh 128K sculpture, complete with a fully functional operating system.

At first, she was determined to use Processing to create an interface for her sculpture by recreating the UI visually and adding some touch controls. However, she soon abandoned this tedious task after discovering MacintoshPi, which steps you through installing Mac OS 7, 8, and 9 emulators on a Raspberry Pi. [Joselyn] has also installed several retro games, including DOOM II, Carmen Sandiego, and Sim City, thanks to sites like Macintosh Garden and Macintosh Repository. 

Next, [Joselyn] hopes to set it up to display her and her partner’s schedules, and to let friends play around with nostalgic games. This piece was made using hand building, but other cool ceramic techniques like this slip cast dog bowl and this stone 3D printer have us thinking about what other types of enclosures could be built!

Cut Just About Anything With This Combination Lathe And Wire EDM

They say that if you have a lathe, you have every other machine tool too. To some degree, that’s true — you can make almost anything on a lathe, including another lathe, and even parts best made on other machine tools can usually be made on a lathe in a pinch. But after seeing this lathe attachment for a DIY electric discharge machining tool, we might be inclined to see the EDM as the one machine tool to rule them all.

Now, we’ll admit that the job [BAXEDM] built this tool for might be a little contrived. He wanted to make some custom hex inserts for his Swiss Army knife, which seem like they’d have been pretty easy to make from hex bar stock in a conventional lathe. Then again, hardened steel is the kind of material that wire EDM was made for, and there seem to be many use cases for an attachment that can spin a workpiece against an EDM cutting wire.

That was really the trick of this build — spinning a part underwater. To accomplish this, [BAXEDM] built a platform to carry a bearing block that supports a standard ER-25 collet, with a bracket that holds a stepper clear of the water in the EDM cutting tank. There are plenty of 3D printed insulators too, to keep most of the attachment electrically isolated from the EDM current, plus exotic parts like ceramic bearings that won’t corrode under water. There were a ton of other considerations, too; [BAXEDM] goes through the long iterative design process in the video below, as well as taking his new tool for a literal spin starting at about the 27:00 mark.

If you’re intrigued by what EDM can accomplish — and who wouldn’t be? — but you need more background on the process, we’ve got you covered.

Continue reading “Cut Just About Anything With This Combination Lathe And Wire EDM”

A Glowing Potato Peeler Makes A Nernst Lamp

Over the last couple few decades there has been a great shift in electric lighting, first towards more compact and efficient fluorescent lights, and then towards LED bulbs. The old incandescent bulbs, while giving a pleasant light, were not by any means efficient. Digging into the history books the incandescent bulb as we know it was not the only game in town; while suspending a filament in a vacuum stopped it from being oxidized there was another type of light that used a ceramic element at atmospheric pressure. The Nernst lamp required its filament to be heated before it would conduct electricity, and [Drop Table Adventures] has made one using the blade from a ceramic potato peeler.

The right ceramic is not the problem given the ease of finding ceramic kitchen utensils, but two problems make a practical light difficult. The copper connections themselves become too hot and oxidize, and preheating the ceramic with a blowtorch is difficult while also keeping an even heat. Finally, they do manage a self-sustaining lamp, albeit not the brightest one.

If you think the Nernst lamp sounds familiar, maybe it’s because we covered it as part of our retrotechtacular series.

Continue reading “A Glowing Potato Peeler Makes A Nernst Lamp”

A flip-top foundry for metal casting

Flip-Top Foundry Helps Manage The Danger Of Metal Casting

Melting aluminum is actually pretty easy to do, which is why it’s such a popular metal for beginners at metal casting. Building a foundry that can melt aluminum safely is another matter entirely, and one that benefits from some of the thoughtful touches that [Andy] built into his new propane-powered furnace. (Video, embedded below.)

The concern for safety is not at all undue, for while aluminum melts at a temperature that’s reasonable for the home shop, it’s still a liquid metal that will find a way to hurt you if you give it half a chance. [Andy]’s design minimizes this risk primarily through the hands-off design of its lid. While most furnaces have a lid that requires the user to put his or her hands close to the raging inferno inside, or that dangerously changes the center of mass of the whole thing as it opens, this one has a fantastic pedal-operated lid that both lifts and twists. Leaving both hands free to handle tongs is a nice benefit of the design, too.

The furnace follows a lot of the design cues we’ve seen before, starting as it does with an empty party balloon helium tank. The lining is a hydrid of ceramic blanket material and refractory cement; another nice safety feature is the drain channel cast into the floor of the furnace in case of a cracked crucible. The furnace is also quite large, at least compared to [Andy]’s previous DIY unit, and has a sturdy base that aids stability — another plus in the safety column.

Every time we see a new furnace design, we get the itch to start getting into metal casting. And with the barrier to entry as low as a KFC bucket or an old fire extinguisher, why not give it a try? Although it certainly pays to know what can go wrong before diving in.

Continue reading “Flip-Top Foundry Helps Manage The Danger Of Metal Casting”

Printing Ceramics Made Easier

Creating things with ceramics is nothing new — people have done it for centuries. There are ways to 3D print ceramics, too. Well, you typically 3D print the wet ceramic and then fire it in a kiln. However, recent research is proposing a new way to produce 3D printed ceramics. The idea is to print using TPU which is infused with polysilazane, a preceramic polymer. Then the resulting print is fired to create the final ceramic product.

The process relies on a specific type of infill to create small channels inside the print to assist in the update of the polysilazane. The printer was a garden-variety Lulzbot TAZ 6 with ordinary 0.15mm and 0.25mm nozzles.

Continue reading “Printing Ceramics Made Easier”

3D Printed Vortex Cooled Rocket Needs To Stop Leaking

Rocket engines are known for one thing above all else, and that’s getting hot. It’s this very property that makes them such a challenge to build and run from a materials engineering standpoint. It’s hard enough to build one with advanced metal alloys, but [Integza] presses on with trying to make one on a 3D printer. Progress is being made, but success remains elusive.  (Video, embedded below.)

To try and mitigate the thermal effects of burning propellants in his engine design, [Integza] looked to vortex cooling. This is where oxygen is swirled around the outer edge of the combustion chamber in a vortex, acting as a buffer layer between the burning fuel and the chamber walls. With 3D printed chamber components, keeping temperatures as low as possible is key, after all. Unfortunately, despite using a special ceramic-laden resin for printing and lathering the rocket components in various refractory materials, it wasn’t possible to stop the chambers leaking. Solid combustion was possible for a few seconds at a time, but eventually each motor tested turned into a ball of flames as the walls broke down.

Thankfully, nobody was hurt in testing, and [Integza] has a clear idea of the problems that need to be fixed in the next iteration. We’ve featured other vortex cooled rockets before – the theory is sound. As always, the devil is in the implementation.

Continue reading “3D Printed Vortex Cooled Rocket Needs To Stop Leaking”