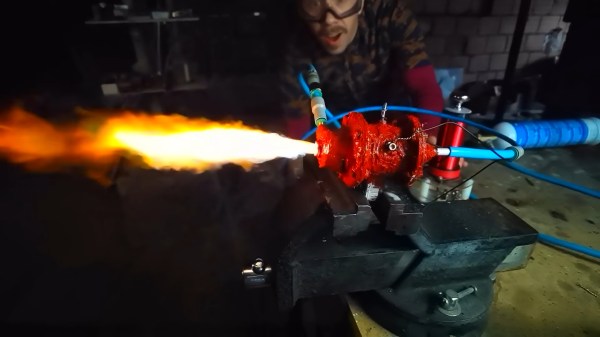
Rocket engines are known for one thing above all else, and that’s getting hot. It’s this very property that makes them such a challenge to build and run from a materials engineering standpoint. It’s hard enough to build one with advanced metal alloys, but [Integza] presses on with trying to make one on a 3D printer. Progress is being made, but success remains elusive. (Video, embedded below.)
To try and mitigate the thermal effects of burning propellants in his engine design, [Integza] looked to vortex cooling. This is where oxygen is swirled around the outer edge of the combustion chamber in a vortex, acting as a buffer layer between the burning fuel and the chamber walls. With 3D printed chamber components, keeping temperatures as low as possible is key, after all. Unfortunately, despite using a special ceramic-laden resin for printing and lathering the rocket components in various refractory materials, it wasn’t possible to stop the chambers leaking. Solid combustion was possible for a few seconds at a time, but eventually each motor tested turned into a ball of flames as the walls broke down.
Thankfully, nobody was hurt in testing, and [Integza] has a clear idea of the problems that need to be fixed in the next iteration. We’ve featured other vortex cooled rockets before – the theory is sound. As always, the devil is in the implementation.
Mouser and Digi-Key are great for servicing most needs, and the range of parts they offer is frankly bewildering. But given the breadth of the hardware hacking community’s interests, few companies could afford to be the answer to everyone’s needs.
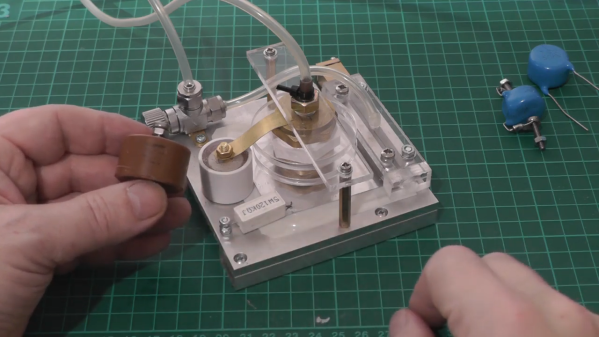
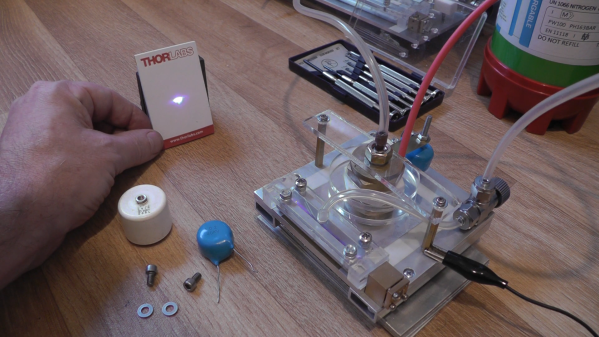
That’s especially true for the esoteric parts needed when one’s hobby involves high voltages and homemade lasers, like [Les Wright]. He recently came up with a DIY doorknob capacitor design that makes the hard-to-source high-voltage caps much easier to obtain. We’ve seen [Les] use these caps in his transversely excited atmospheric (TEA) lasers, a simple design that uses high-voltage discharge across a long, narrow channel filled with either room air or nitrogen. The big ceramic caps are needed for the HV supply, and while [Les] has a bunch, they’re hard to come by online. He tried a follow-up using plain radial-lead ceramic capacitors, and while the laser worked, he did get some flashover between the capacitor leads.
[Les]’s solution was to dunk the chunky caps in acetone for a week or so to remove their epoxy covering. Once denuded, the leads were bent into a more axial configuration and soldered to brass machine screws. The dielectric slug is then put in a small section of plastic tubing and potted in epoxy resin with the bolts protruding from each end. The result is hard to distinguish from a genuine doorknob cap; the video below shows the build process as well as some testing.
Hats off to [Les] for taking pity on those of us who want to replicate his work but find ourselves without these essentials. It’s nice to know there’s a way to make unobtanium parts when you need them.
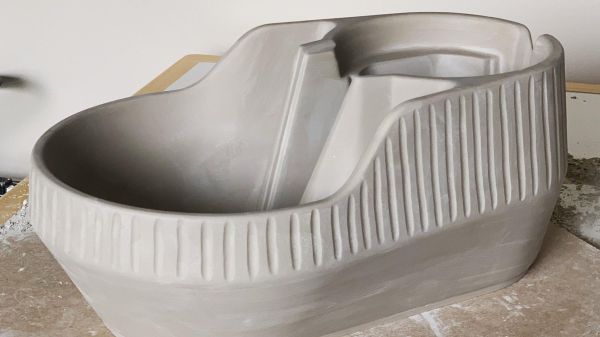
Here at Hackaday, we feature projects that are built of just about every material imaginable. Silicon-spangled fiber-reinforced epoxy resin is our primary medium, but we see plastic, wood, steel, aluminum, and even textiles from time to time. It’s not often we see slip-cast ceramic molding, though, and when it pops up, it’s always good to take a look at this versatile manufacturing method.
The back-story on this one is that [thoughtfulocean], a mechanical engineer idled by COVID lockdowns, wanted custom water bowls for his dogs, one of whom is clearly a grumpy Ewok. The design started with a 3D-print of the final vessel, printed in sections and glued together. These were used to create a two-piece plaster mold into which a watery slurry of clay, or slip, was poured. The plaster mold dehydrates the slip, leaving behind a semi-solid layer of clay of the desired thickness once the excess slip is poured off. The resulting casting is then fired in a kiln and glazed.
Of course, [thoughtfulocean] ran into a few problems along the way. The first mold was warped thanks to the mold box bowing under pressure from the plaster, so the whole molding process had to be revamped. The finished bowl also shrunk less than expected after firing, which led to some more revisions. But the finished bowl look really nice, and the included pump and filter keeps the Ewok’s water free from the yuck a dog’s face can introduce. As a bonus, it sounds like [thoughtfulocean] might have created a marketable product from all this. Take that, COVID!
Slip-casting ceramic may not be all that common around here, but ceramic as a material isn’t exactly a stranger. And who says slip casting is limited to ceramic? After all, we’ve seen a similar method used with plastic resin.
Sometimes the decision to tackle a project or not can boil down to sourcing parts. Not everything is as close as a Digi-Key or Mouser order, and relying on the availability of surplus parts from eBay or other such markets can be difficult. Knowing if and when a substitute will work for an exotic part can sometimes be a project all on its own.
Building lasers is a great example of this, and [Les Wright] recently looked at substitutes for hard-to-find “doorknob” capacitors for his transversely excited atmospheric lasers. We took at his homebrew TEA lasers recently, which rely on a high voltage supply and very rapid switching to get nitrogen gas to lase. His design uses surplus doorknob caps, big chunky parts rated for very high voltages but also with very low parasitic inductance, which makes them perfect for the triggering circuit.
[Les] tried to substitute cheaper and easier-to-find ceramic power caps with radial wire leads rather than threaded lugs. With a nominal 40-kV rating, one would expect these chunky blue caps to tolerate the 17-kV power supply, but as he suspected, the distance between the leads was short enough to result in flashover arcing. Turning down the pressure in the spark gap chamber helped reduce the flashover and prove that these caps won’t spoil the carefully engineered inductive properties of the trigger. Check out the video below for more details.
Thanks to [Les] for following up on this and making sure everyone can replicate his designs. That’s one of the things we love about this community — true hackers always try to find a way around problems, even when it’s just finding alternates for unobtanium parts.
How cool would it be if there was a material that couldn’t be cut or drilled into? You could make the baddest bike lock, the toughest-toed work boots, or the most secure door. Really, the list of possibilities just goes on and on.
Proteus chews through an angle grinder disc in seconds.
The material is made of aluminium foam that’s embedded with a bunch of small ceramic spheres. It works by inducing retaliatory vibrations into the cutting tools, which turns the tools’ force back on themselves and quickly dulls their edges.
The creators have named the material Proteus after the elusive and shape-shifting prophet of Greek mythology who would only share his visions of the future with those who could get their arms around him and keep him still. It sounds like this material could give Proteus a run for his money.
The ceramic spheres themselves aren’t indestructible, but they’re not supposed to be. Abrading the spheres only makes Proteus stronger. As the cutting tool contacts them, they’re crushed into dust that fills the voids in the aluminium foam, strengthening the material’s destructive vibratory effect. The physical inspiration for Proteus comes from protective hierarchical structures in nature, like the impact-resistant rind of grapefruit and the tendency of abalone shells to resist fracture under the impact of shark teeth.
How It’s Made
Proteus recipe in pictures.
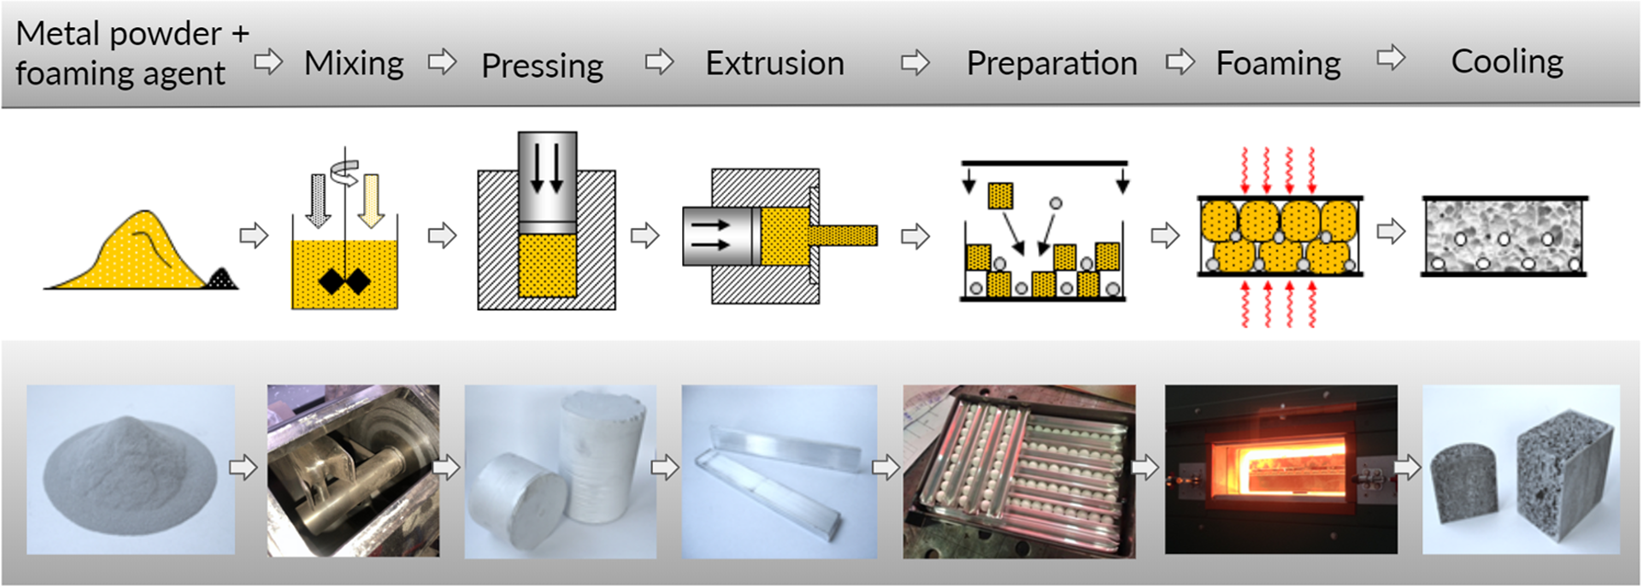
At this point, Proteus is a proof of concept. Adjustments would likely have to be made before it can be produced at any type of scale. Even so, the recipe seems pretty straightforward. First, an aluminium alloy powder is mixed with a foaming agent. Then the mixture is cold compacted in a compressor and extruded in dense rods. The rods are cut down to size and then arranged along with the ceramic spheres in a layered grid, like a metallurgical lasagna.
The grid is spot-welded into a steel box and then put into a furnace for 15-20 minutes. Inside the furnace, the foaming agent releases hydrogen gas, which introduces voids into the aluminium foam and gives it a cellular structure.
Effects of cutting into a cylinder of Proteus with an angle grinder.
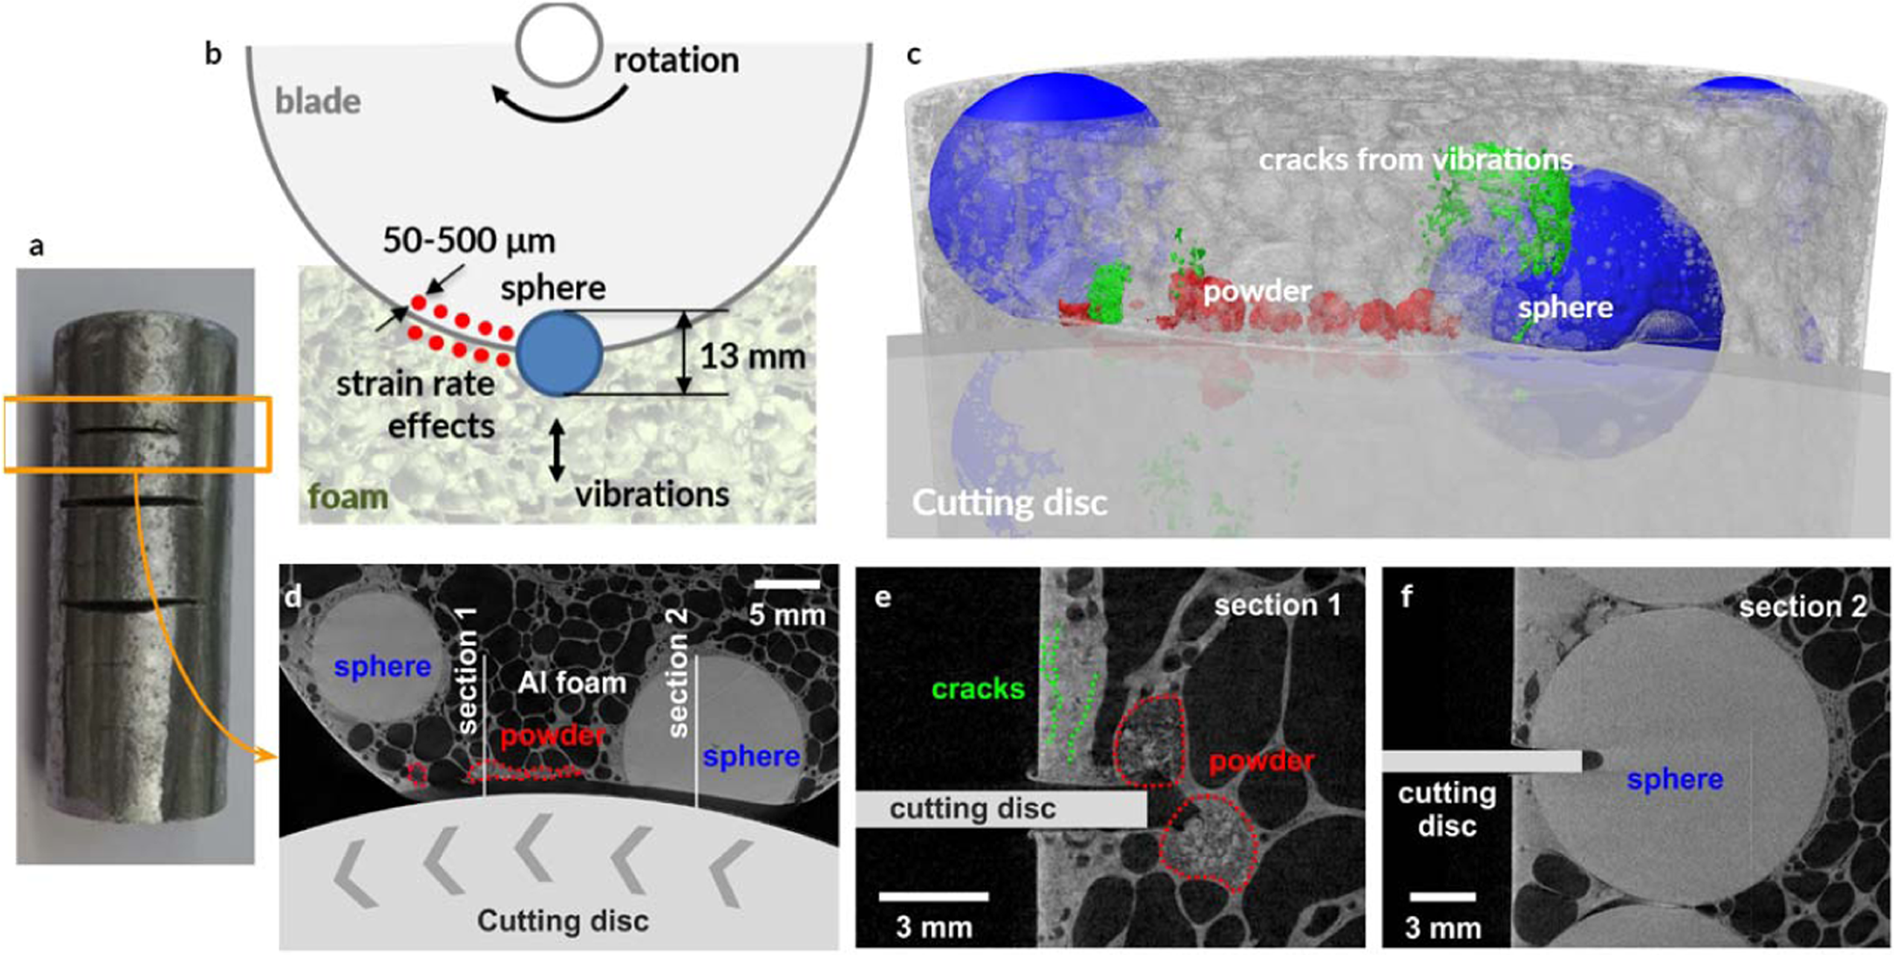
According to their paper, the researchers tried to penetrate the material with an angle grinder, a water jet cutter, and a drill. Of these, the drill has the best chance of getting through because the small point of contact can find gaps more easily, so it’s less likely to hit a ceramic sphere. The researchers also made cylindrical samples without steel cladding which they used to test the compressive strength and prove Proteus’ utility as a structural material for beams and columns. It didn’t fare well initially, but became less compressible as the foam matrix collapsed.
The creation process lends some leeway for customization, because the porosity of the aluminium foam can be varied by changing the bake time. As for the drill bit problem, tightening up security is as easy as adjusting the size and/or density of the ceramic spheres.
In the video after the break, you can watch a chunk of Proteus eat up an angle grinder disc in under a minute. Some may argue about the tool wielder’s technique, but we think there’s something to be said for any material that can destroy a cutting disc that fast. They don’t claim that Proteus is completely impenetrable, but it does look impressive. We wish they would have tried more cutting tools like a gas torch, or experimented with other destructive techniques, like plastic explosives, but we suppose that research budgets only go so far.
After dominating the illumination market for more than a century, it’s easy to think of the glowing filament of the standard incandescent lamp as the only way people found to turn electricity into light. But plenty of fertile minds turned out alternative designs, one of which is the fascinating Nernst lamp, which we’d previously never heard of.
If the name sounds familiar, it’s likely through exposure to [Walther Nernst]’s equation for electrochemistry, or for his “New Heat Theorem” which eventually became the Third Law of Thermodynamics. Pal of [Einstein] and eventual Nobel laureate, [Nernst] was also a bit of a tinkerer, and he came up with a design for an incandescent lamp in 1897 that was twice as efficient as carbon-filament lamps. The video below, from the Edison Tech Center, details the design, which used a ceramic “glower rod” that would incandesce when current flowed through it. The glower, though, was not conductive until it was quite hot, so separate heater coils that gave the glower a start on the process were included; these were switched off by a relay built into the base of the lamp once the glower started conducting.
It’s a complicated design, but its efficiency, coupled with a better light spectrum and the fact that it didn’t need a vacuum bulb since the glower wouldn’t oxidize like a carbon or tungsten filament, gave it certain advantages that let it stake out a decent share of the early market for electric illumination. It was even the light source for one of the first facsimile machines. We find it a very clever use of what were at the time exotic materials, and wonder if this could have lead to something like vacuum tubes without the vacuum.
For most of human history, our inventions and innovations have been at a scale that’s literally easy to grasp. From the largest cathedral to the finest pocket watch, everything that went into our constructions has been something we could see with our own eyes and manipulate with our hands. But in the middle of the 20th century, we started making really, really small stuff: semiconductors. For the first time, we were able to create mechanisms too small to be seen with the naked eye, and too fine to handle with our comparatively huge hands. We needed a way to scale these devices up somewhat to make them useful parts. In short, they needed to be packaged.
We know that the first commercially important integrated circuits were packaged in the now-familiar dual in-line package (DIP), the little black plastic millipedes that would crawl across circuit boards for the next 50 years. As useful and versatile as the DIP was, and for as successful as the package became, its design was anything but obvious. Let’s take a look at the dual in-line package and how it got that way.