DIY 8-Bit Computer Knows All The Tricks

Some projects are a rite of passage within their respected fields. For computer science, building one’s own computer from scratch is certainly among those projects. Of course, we’re not talking about buying components online and snapping together a modern x86 machine. We mean building something closer to a fully-programmable 8-bit computer from the ground up, like this one from [Federico] based on 74LS logic chips.

The computer was designed and built from scratch which is impressive enough, but [Federico] completed this project in about a month as well. It can be programmed manually through DIP switches or via a USB connection to another computer, and also includes an adjustable clock which can perform steps anywhere from 1 Hz to 32 kHz. Complete with a 1024 byte memory, a capable ALU, four seven-segment LEDs and (in the second version of the computer) a 2×16 LCD disply, this 8-bit computer has it all.

Not only is this a capable machine designed by someone who clearly knows his way around a logic chip, but [Federico] has also made the code and schematics available on his GitHub page. It’s worth a read even without building your own, but if you want to go that route without printing an enormous PCB you can always follow the breadboard route.

Thanks to [killergeek] for the tip!

Continue reading “DIY 8-Bit Computer Knows All The Tricks”

Watch Life Tick Away, One LED Segment At A Time

In the grand scheme of things, a single human lifetime is a drop in the bucket. Even if we don’t like to acknowledge it, we all know the meter is running so to speak. Yet you’re still squandering your precious time on this Earth by reading Hackaday instead of doing something constructive. Of course nobody is burning up more time on this site than those of us who are writing it all, so don’t feel too bad.

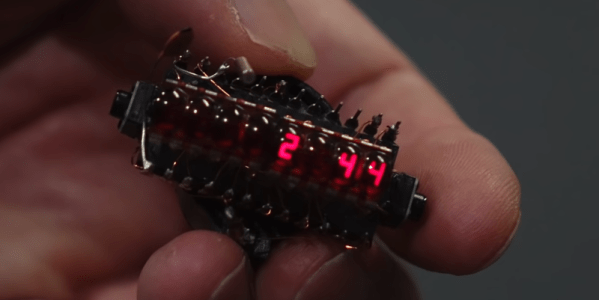
To remind us that life is fleeting, [Dries Depoorter] has designed the Shortlife: a device that counts down until your expected departure date. Before you get too excited, it can’t predict the future. The gadget is programmed with the vital statistics for the individual user, and data provided by the World Health Organization is used to calculate how much of your estimated life expectancy has already elapsed. Some would find this information depressing, while others will no doubt look at it as a source of inspiration. Us? We just think its a slick piece of gear.

The Shortlife is made up of a custom PCB mounted to a marbled block of recycled plastic. On the board there’s an ATmega328 microcontroller, a MAX7219 LED driver, and of course the red LED segment displays. Three of them are the classic seven count, while the rightmost display sports fourteen segments for a bit of added accuracy. All the user has to do if they want to watch their remaining time slip away is plug the device into a USB power source and set the current time.

We’ve seen similar mortal countdown clocks in the past, but the Shortlife certainly brings a certain level of elegance to the idea. Plus we also like the fact that you’re just a line of code or two away from having the display tick down to some other date in the future when that whole existential crisis kicks in

Colorful Quinary Clock Makes The Most Out Of Five Neopixels

If binary digits are bits, are quinary digits “quits”? Perhaps, but whatever you call them, you’re going to have to wrap your head around some new concepts in order to make sense of this quinary display clock.

The transition between 15:42 and 15:43.

Why quinary? [Spike Snell] wanted to minimize the number of LEDs, and 52 is enough to cover all 24 hours. Binary clocks may have geek chic, but there are only so many ways to display ones and zeros.

[Spike]’s clock is unique because it shows each quit using a single WS2812 Neopixel. The values zero through four are each represented by a different color, meaning the user needs to memorize which color goes with which value, which we suspect is the hardest part of learning this clock. The clock’s software is fairly simple and runs on an ESP8266, and uses NTP to keep on track. The clock self-adjusts for Daylight Savings time, and it has a nice feature that dims the display in the evening to make living with it easier.

Even for those not up on their base-five arithmetic,  [Spike]’s clock is still a nice, slowly evolving abstract art piece. And for those who grok the quinary clock, perhaps a career awaits you in an alternate future where bi-quinary relay computers caught on.

Domino Clock Tells The Time In Style

It seems there are as many ways to display the time as there are ways to measure it in the first place. [Kothe] saw a fancy designer domino clock, and wanted a piece of the action without the high price tag. Thus, the natural solution was to go the DIY route.

An Arduino Nano is the heart of the build, paired with a DS1307 RTC for accurate timekeeping. The case of the clock consists of a 3D printed housing, fitted with layers of lasercut acrylic. Behind this, a smattering of WS2812B addressable LEDs are fitted, which shine through the translucent grey plastic of the front panel. This enables each LED to light up a dot of the domino, while remaining hidden when switched off. Reading the time is as simple as counting the dots on the dominoes. The first domino represents hours, from 1 to 12, while the second and third dominoes represent the minutes.

As a timepiece, the domino clock serves well as a stylish decor piece, and could also be a fun way to teach kids about electronics and telling the time. Makers do love a good timepiece, and our clock tag is always overflowing with fresh hacks on a regular basis. If you’ve got your own fancy build coming together at home, you know who to call!

Big Workshop Clock Is 3D Printing Done Right

Time is something uniquely important to humans, and they remain the only creatures on the planet to build devices to regularly track its progress. [Ivan Miranda] is one such creature, and built a giant 7-segment clock for his workshop that really ties the room together.

The clock is a testament to [Ivan]’s design skills in the 3D printed space. Taking advantage of his large format printer, each segment consists of a front panel, large single-piece diffuser, LED carrier, and backing plate. There are plenty of nice touches, from the interlocking ridges between each digit, to integral printed arrows on the inside that guide installation of the LED strips. Fit and finish approaches the level of a commercial product, a reward for [Ivan]’s years of practice in the field.

Electronically, an ESP8266 runs the show, synchronizing the time over its in-built WiFi connection. Each segment contains 9 WS2812B LEDs, wired up in a single long strip that’s addressed by the microcontroller. This means that the segments can be lit up to any color of the rainbow, though [Ivan] is a man who best appreciates the look of classic red.

[Ivan]’s long been a proponent of big 3D-printed builds — his tank-tracked electric skateboard is a particularly good example. Video after the break.

Continue reading “Big Workshop Clock Is 3D Printing Done Right”

A Clock From An Electricity Meter

Electric utilities across the world have been transitioning their meters from the induction analog style with a distinctive spinning disc to digital “smart” meters which aren’t as aesthetically pleasing but do have a lot of benefits for utilities and customers alike. For one, meter readers don’t need to visit each meter every month because they are all networked together and can download usage data remotely. For another, it means a lot of analog meters are now available for projects such as this clock from [Monta].

The analog meters worked by passing any electricity used through a small induction motor which spun at a rate proportional to the amount of energy passing through it. This small motor spun a set of dials via gearing in order to keep track of the energy usage in the home or business. To run the clock, [Monta] connected a stepper motor with a custom transmission to those dials for the clock face because it wasn’t possible to spin the induction motor fast enough to drive the dials. An Arduino controls that stepper motor, but can’t simply drive the system in a linear fashion because it needs to skip a large portion of the “minutes” dials every hour. A similar problem arises for the “hours” dials, but a little bit of extra code solves this problem as well.

Once the actual clock is finished, [Monta] put some finishing touches on it such as backlighting in the glass cover and a second motor to spin the induction motor wheel to make the meter look like it’s running. It’s a well-polished build that makes excellent use of some antique hardware, much like one of his other builds we’ve seen which draws its power from a Stirling engine.

Continue reading “A Clock From An Electricity Meter”

A Unique Display Makes An Unusual Clock

Do you know the clock speed of the computer you’re reading this article on? Maybe Hackaday readers are more likely to reply “Yes!” to that question than the general public, but if there’s a takeaway it’s that for most computer users their clock speed is now an irrelevance. It’s quick enough for the job in hand and that’s all that matters. This was not always the case though, and a few decades ago the clock speed of a PC was its major selling point. Beige boxes would have seven-segment displays lit up with the figure, and it was an unusual example of one that [Ken Yap] used to produce a clock that he believes is one-of-a-kind; unless by some slim chance somebody else has rescued the same part.

The displays were hard wired without any signals from the processor, and what makes this one unusual is that as well as having a couple of digits in yellow it also sports a segmented “MHz” in red. This would have been quite a big deal on your 486 back in about 1994. To make a clock from this unpromising start required a little creative thinking, and he manages it by using the “M” and the “H” digits to represent minutes and hours, and displaying each figure in turn. The display is wired on a piece of protoboard with an STM8 dev board, and yes, as you can see in the very short video below the break, it does tell the time.

Custom displays are more usually seen in the world of LCDs than LEDs, so this one remains a rarity on these pages. Happily there are projects out there in which people spin their own takes on the idea.

Continue reading “A Unique Display Makes An Unusual Clock”