[Dennis] recently invested some money in the Tormach Tooling System for his CNC’d Sieg SX3 mill in order to make his tool changes easier. While the kit allows him to easily account for height offsets while changing tools, he has no quick, reliable means of locating the spindle in relation to his workpiece. Tired of manually finding the edges of his workpiece for each axis, he built himself a DIY touch probe to automate the process.
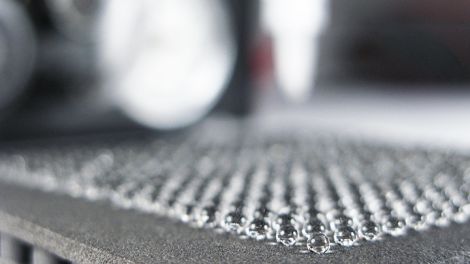
The theory behind the probe’s operation is pretty simple. In the probe’s housing, three conductive rods are mounted perpendicular to the probe tip. Each rod rests between two metal balls forming a complete circuit. When the probe touches the edge of his milling material, the circuit is broken, sending a signal to his CNC control box.
The probe is comprised of several different parts, milled from either aluminum or black delrin. [Dennis] says that after everything was assembled, the runout on the probe was unacceptable, so he made a few tweaks, and now the runout has been reduced to about 0.00025” – well within acceptable tolerance limits for any work he will be doing.
Be sure to check out his site, as there are plenty more pictures of the probe’s construction, as well as additional video.
In the meantime, continue reading to see a quick video of the finished probe in action.