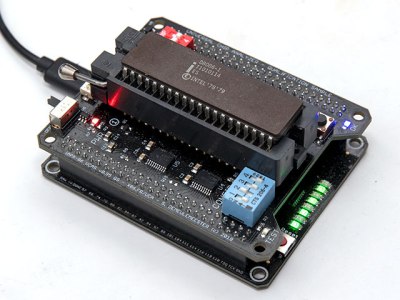
Learn By Fixing: Another Verilog CPU

Because I often work with students, I’m always on the look-out for a simple CPU, preferably in Verilog, in the Goldilocks zone. That is, not too easy and not too hard. I had high hopes for this 16-bit RISC processor presented by [fpga4student], but without some extra work, it probably isn’t usable for its intended purpose.

The CPU itself is pretty simple and fits on a fairly long web page. However, the details about it are a bit sparse. This isn’t always a bad thing. You can offer students too much help. Then again, you can also offer too little. However, what was worse is one of the modules needed to get it to work was missing! You might argue it was an exercise left to the reader, but it probably should have been pointed out that way.

At first, I was ready to delete the bookmark and move on. Then I decided that the process of fixing this design and doing a little analysis on it might actually be more instructive than just studying a fully working design. So I decided to share my fix with you and look inside the architecture a bit more. On top of that, I’ll show you how to get the thing to run in an online simulator so you can experiment with no software installation. Of course, if you are comfortable with a Verilog toolchain (like the ones from Xilinx or Altera, or even free ones like Icarus or CVer) you should have no problem making that work, either. This time I’ll focus on how the CPU works and next time I’ll show you how to simulate it with some free tools. Continue reading “Learn By Fixing: Another Verilog CPU”

An 8-Bit Transport Triggered Architecture CPU In TTL

When we are introduced to the internals of a microprocessor, it is most likely that we will be shown something like one of the first generation of 8-bit CPUs from the 1970s. There will be the familiar group of registers and counters, an arithmetic and logic unit (ALU), and an instruction decoder with associated control logic. A complex instruction set causes the decoder to marshal registers and ALU to perform all the various functions in the right order. CPUs may have moved on in many ways since the 1970s, but the block diagram of an 8080 or similar still provides a basic grounding for the beginner.

So when we tell you about another home-made CPU using TTL logic chips, you might expect it to follow this well-worn path. Fortunately though the hardware hacking community is always capable of springing surprises upon us, and [Szoftveres] has done just that with his design. It’s a one-instruction-set machine following a transport triggered architecture, and that means it deviates sharply from the conventional architecture described above. Each instruction is a move between the different physical functions of the processor, and computation is achieved by the physical functions working on the data as it is moved into them and presenting the result on their outputs ready to be moved elsewhere. The result is a computer that is in its own way beautifully simple, though at the expense of some inflexibility and lack of some hardware functions we take for granted in more conventional processors.

This machine has been built on a piece of stripboard, and has an accompanying board with display, keypad, and a modem. There is a small board based upon an ATmega8 microcontroller which performs the function of fast program loading, and can be removed once the code is loaded. Software can be written in a C-like language anc compiled using the compiler in his GitHub repository, and he has produced a YouTube video of the machine in operation. This project is well worth reading through in-depth, for its introduction to this slightly unusual architecture.

Continue reading “An 8-Bit Transport Triggered Architecture CPU In TTL”

8-Bit Breadboard Computer Is Up To 8 Hours

[Ben Eater] posted some videos of an 8-bit computer with no CPU chip that he built completely on a breadboard a few years ago. After being asked for schematics, he finally admitted that he didn’t have any. So, instead, he decided to rebuild it and keep a video log of each step in the process. You can see his kickoff video, below, but you can also find 30 more recent videos covering topics from the ALU design and troubleshooting to the decimal LED display. He even uses an Arduino to program a EEPROM that he uses to replace a lot of logic.

You probably want to wait until you have some free time as there are around eight hours of videos so far. The videos start off with a simple 555 timer and work up from there. Each piece gets a test separate from the whole, so with luck you won’t have an impossible job trying to troubleshoot the whole thing at the end.

Continue reading “8-Bit Breadboard Computer Is Up To 8 Hours”

IPhone Brain Surgery

You think you’re good at soldering? Can you solder a CPU? A CPU inside an iPhone? A decapped CPU inside an iPhone? Can you solder inside a decapped CPU inside of an iPhone?

If you can’t, fear not – someone can, and we found him or her courtesy of a video that [Bunnie Huang] tweeted a while back. There’s not much information in the video, but from what we can gather it comes from an outfit called G-Lon Technology in Guang Zhou. Their Facebook page suggests that they teach cellphone repair, and if they take their repairs this far, we’d say the students are getting their tuition’s worth.

The reason for the repair is unclear, although the titles refer to a “CPU to U0301 AP31 AR31 broken repair,” which we take to refer to a boot error that can be repaired by exposing a couple of pads inside the CPU and wiring them to another chip. We’d love to hear comments from anyone familiar with the repair, but even in the absence of a clear reason for undertaking this, the video is pretty impressive. The epoxy cap of the CPU is painstakingly ground away under a microscope, then tiny tools are used to scrape down to the correct layers. Solder mask is applied, hair-thin wires are tacked to the pads, and a UV-curing resin is applied to fill the CPU’s new gaping hole and to stabilize the wires. It seems like a lot of work to save an iPhone, but it sure is entertaining to watch.

Can’t get enough of poking around the innards of chips? We’ve got decapping stories aplenty: one, two, and three that you might like. We’ve even covered at least one CPU internal repair before too.

Continue reading “IPhone Brain Surgery”

The Cardboard Computer

Every time we say “We’ve seen it all”, along comes a project that knocks us off. 60 year old [Mark Nesselhaus] likes to learn new things and he’s never worked with hardware at the gate level. So he’s building himself a 4-bit Computer, using only Diode-Transistor Logic. He’s assembling the whole thing on “card board” perf-board, with brass tacks for pads. Why — because he’s a thrifty guy who wants to use what he has lying around. Obviously, he’s got an endless supply of cardboard, tacks and Patience. The story sounds familiar. It started out as a simple 4-bit full adder project and then things got out of hand. You know he’s old school when he calls his multimeter an “analog VOM”!

It’s still work in progress, but he’s made a lot of it in the past year. [Mark] started off by emulating the 4-bit full adder featured on Simon Inns’ Waiting for Friday blog. This is the ALU around which the rest of his project is built. With the ALU done, he decided to keep going and next built a 4-to-16 line decoder — check out the thumbnail image to see the rats nest of jumbled wires. Next on his list were several flip flops — R-S, J-K and D types, which would be useful as program counters. This is when he bumped into problems with signal levels, timing and triggering. He decided to allow himself the luxury of adding one IC to his build — a 555 based clock generator. But he still needed some pulse shaping circuitry to make it work consistently.

from right, Input, +5V, nc, gnd
LED Driver : from left, Gnd, NC, +5V, Input

[Mark] also built a finite-state-machine sequencer based on the work done by Rory Mangles TinyTim project. He finished building some multiplexers and demultiplexers, and it appears he may be using a whole bank of 14 wall switches for address, input and control functions. For the output display, he assembled a panel using LED’s recovered from a $1 Christmas light string. Something seems amiss with his LED driver, though — 2mA with LED on and >2.5mA with LED off. The LED appears to be connected across the collector and emitter of the PNP transistor. Chime in with your comments.

This build seems to be shaping along the lines of the Megaprocessor that we’ve swooned over a couple of times in the past. Keep at it, [Mark]!

Continue reading “The Cardboard Computer”

FPGA Computer Covers A To Z

[F4HDK] calls his new computer A2Z because he built everything from scratch (literally, from A to Z). Well, strictly speaking, he did start with an FPGA, but you have to have some foundation. The core CPU is a 16-bit RISC processor with a 24-bit address bus and a 128-word cache. The computer sports 2 megabytes of RAM, a boot ROM, a VGA port and keyboard, and some other useful I/O. The CPU development uses Verilog.

Software-wise, the computer has a simple operating system, a filesystem, and basic programs like a text editor and an image viewer. Development software includes an assembler and a compiler for a BASIC-like language that resides on the PC. You can also run an emulator to experiment with A2Z without hardware. You can see a “car game” running on A2Z in the video below. You can also see videos of some other applications.

Continue reading “FPGA Computer Covers A To Z”

Make Mulled Wine With A Processor Heatsink!

Now, over the holiday season there seems to be a predilection towards making merry and bright. As many an engineer and otherwise are sure to note, fine alcohols will facilitate this process. One such warm holiday beverage is mulled wine; there are many traditions on how to make it, but a singular approach to preparing the beverage would be to re-purpose an old PC and a CPU liquid cooling unit into a mulled wine heating station.

Four years ago, [Adam] found himself staring at a pile of mostly obsolete PCs in his IT office and pondering how they could be better used. He selected one that used a power-hungry Pentium 4 — for its high heat output — strapped a liquid cooling block to the CPU and pumped it full of the holiday drink. It takes a few hours to heat three liters of wine up to an ideal 60 Celsius, but that’s just in time for lunch! The Christmastime aroma wafting through the office is nice too.

Continue reading “Make Mulled Wine With A Processor Heatsink!”