Brits: Make A Vote, Put Cash A Hackerspace’s Way

Those of you who have been involved in the running of a hackerspace or makerspace will know the never-ending struggle to maintain financial solvency, and the quest for sources of income to move your organisation forward. It’s certainly a topic upon which Hackaday’s crew have some experience, more than one of us has helped run a space.

A good avenue to explore lies with community grants: money from organisations on a philanthropic basis to invest in community organisations. These can come from charities, governmental organisations, or even from companies as part of their corporate social responsibility. It’s this last source of grant money that claims our attention today, because we are in the final days of voting for the Aviva Community Fund, in which the British financial and insurance company makes grants for worthy causes across the country. The causes compete to gain as much support as they can, and hope to thus win their prize.

Among the many worthy recipients of the cash are a selection of hackerspaces. First up are Hitchin Hackspace, whose Big Hak full-size rendition of a Milton Bradley Big Trak toy was featured in our coverage of EMF Camp 2016. They are building a new space in what we’ll call a redundant community facility because it sounds better than “Former public toilet”, and winning a grant will help them a lot in that aim.

Then we have East London Makerspace. They have secured an unused garage to turn into a makerspace, as the capital’s population of our community swells to support ever more spaces in its different suburbs. Like Hitchin, the money would go to the essential work involved in creating a functioning space where previously there was nothing.

Finally, we have the unexpected, a heating system from Milton Keynes Men In Sheds. If you know about Men In Sheds as a community organisation for older people, you’ll be wondering why this is listed here. What we haven’t told you is that MK Makerspace is a subgroup of the MK Shed that occupies the upstairs portion of their building, and what warms the Shedders also warms the hacker community of one of Britain’s new towns.

These appear to be the only hackerspaces bidding for grant money, but votes can usefully be given to other allied causes. Linlithgow Remakery and Tool Library, for instance could use a boost, as could the other Men In Sheds groups scattered across the competition.

So if you are one of Hackaday’s British readers, please take a minute to stop by the voting pages listed above, and give them a boost. You have a couple of days to get your votes in, so make them count, and make a difference!

Disclosure: [Jenny List] is a member of Milton Keynes Makerspace.

Huge 74181 Is A Classic ALU You Can Actually Understand

You can no longer buy a brand-new 74181, they’ve been out of production for years. All is not lost though, for [Dave’s Dev Lab] have created a facsimile of one on a printed circuit board, using modern single-gate 74-series chips.

Why on earth would you want an oversized replica of an outdated logic chip from nearly five decades ago, we hear you ask? The answer lies in education. If you were to embark on learning about the internals of a microprocessor by taking a modern example such as the one that powers the device on which you are reading this, you would find it to be a daunting task. Over six decades of progress in computer technology have delivered the performance enhancements that put a supercomputer in your smartphone, but at the expense of a contemporary microprocessor being an extremely complex machine which you can’t peer into for any level of understanding.

Simple enough to work your way through the logic

The starting point for the student of microprocessor internals often lies in the past. The technology of the early 1970s holds the fundamentals from which a modern processor can be understood, but remains simple enough to grasp in its entirety as a beginner. Registers, instruction decoders, counters, and an arithmetic/logic unit, or ALU. And for decades the 74181, as an all-in-one 4-bit ALU on a chip that you might have found in a minicomputer at the turn of the 1970s, represented the most convenient way to teach the operation of these devices. Electronic engineers and computer scientists of all ages will have encountered them as they gained their qualifications.

The PCB version of the 181 faithfully follows the original, but with modern 74LVC gates laid out as they would be in the circuit diagram of the chip, and LEDs to show logic state at the different parts of the circuit. Thus when it is used to teach ALU operation it can show every part of the device in detail in a way a real 74181 would never have done.

If the 74181 has caught your interest, we’ve previously brought you [Ken Shirriff]’s reverse engineering of the device in detail using breathtaking images of the silicon.

DS212 Oscilloscope Review: Open Source And Great For Hacking

We’ve seen plenty of oscilloscopes that look like repurposed cell phones. Usually, though, they only have one channel. The DS212, has two channels and a signal generator! [Marco] gives his review and a quick tear down in the video below.

The scope isn’t going to replace a big bench instrument, but for a portable scope with a rechargeable battery, it isn’t bad. The 1 MHz analog bandwidth combines with a 10 megasample per second front end and 8K of sample memory. The signal generator can produce basic waveforms up to 1 MHz. We were somewhat surprised the unit didn’t sport a touch screen, which is why you can see [Marco’s] fingers in the screenshot above. He seems to like the dual rotary encoder system the devices uses for navigation.

Where this really stands out is that it is open source for the the firmware running on the STM32 processor inside. We so rarely see this for commercially available bench tools and it makes this a fine hacking platform. It’s easy to imagine adding features like digital signals out and decoding digital data. It would be interesting to marry it with a WiFi chip and use it as a front end for another device over WiFi. Lots of possibilities. [Marco] shows that even though he’s not familiar with the STM32, he was able to add a custom waveform output to the device easily. This has the potential to be a custom troubleshooting platform for your builds. Lining up all of the sensing and signal generation settings for each specific type of test means you don’t need a guru to walk through the common failure modes of a product.

There are many small inexpensive scopes out there that might not match a big bench instrument but can still be plenty useful. [Jenny List] just reviewed one that comes in at around $21. And last year, we saw a sub-$100 scope that would net you just one channel scope. That’s progress!

Drill The Wet Side Wet And The Dry Side Dry

Working mostly in metal as he does, [Tuomas Soikkeli] has invested in some nice tools. So when his sweet magnetic-base drill was in need of a new home, he built this two-in-one drilling station to maximize shop space and add some versatility to boot.

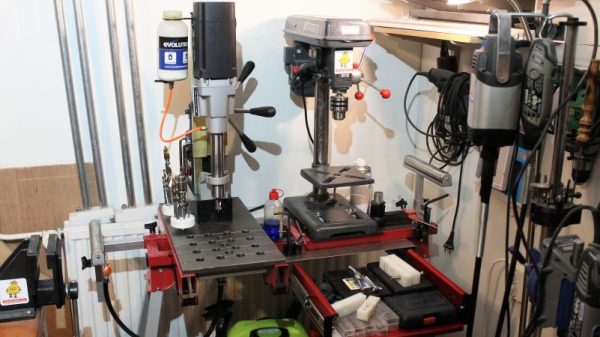
For the non-metalworkers out there, a mag-base drill is basically a portable drill press where the base is replaced with a strong electromagnet like the one shown here. They’re often used in the construction trades to drill holes in steel beams or columns, and often include nice features like a built-in coolant system.

[Tuomas] effectively turned his mag-base drill into a very beefy drill press by mounting it to a disused miter saw stand. A thick piece of plate steel forms the base, and with holes and drain channels machined into it, used coolant can be captured in a drain pan below for reuse. A second base for a benchtop drill press means he’s got a dry drilling station too, and the original support arms on the miter stand are ready for drilling long stock. The drawer below the dry side is a nice touch too.

There’s a lot to learn about fabrication from [Tuomas]’ video and the others on his channel, which is well worth checking out. And if you want to convert your drill press into a mag-base drill, why not check out this microwave oven transformer to electromagnetic crane project for inspiration?

Continue reading “Drill The Wet Side Wet And The Dry Side Dry”

3D Printed WiFi Reflectors Custom Designed For The Building

Are you a wizard at antenna design? Chances are you’ve never even given it a try, but this tool could change that. Most home-made WiFi signal boosting antenna plans around the Internet share one feature: they are directional antennas or reflectors. But WiPrint is a tool for designing custom WiFi reflectors that map to the specific application.

If we want to increase the signal strength in two or three different locations the traditional solution is an omnidirectional antenna. The problem is, although a good omnidirectional antenna increases the signal power in those locations we want, it also increases the signal power where we don’t want.

A team of researchers led by Dartmouth College created WiPrint to allow users to input a floor plan, the location of the WiFi access point and a desired signal map into the system. The software uses an optimization algorithm to produce a custom reflector shape for that floor plan. The reflector can then be fabricated and placed next to the access point antenna to reflect and concentrate the signal in the specified area, while decreasing signal strength outside of it. The best thing is: you can actually 3D print the reflector and just glue tin foil on it!

The results show that optimized reflectors can weaken or enhance signals in target areas by up to 10 or 6 dB, respectively, and resulting in throughput changes by up to -63.3% or 55.1%. That is not the only advantage, as the researchers point out:

Our approach provides four benefits. First, it provides strong physical security by limiting the physical reach of wireless signals, hence creating a virtual wall for wireless signals. Second, it relies on a low-cost ($35), reproducible 3D reflector, which can be easily replaced upon substantial changes in the environment or coverage requirement. Third, it offers an easily accessible and easy-to-configure solution to non-expert users. Users only need to specify coverage requirements and a coarse environment model, with which our system computes a reflector shape tailored to the built environment. Finally, it is applicable to commodity low-end Wi-Fi APs without directional or multiple antennas.

The sad part is that, for now, no software is available. The study and results have just been presented at ACM’s BuildSys 2017. It would be great to see something like this open-sourced. Meanwhile, this is further proof that [Brian Benchoff] knew what he was doing when he told you to use duct tape for superior WiFi range.

MiSTer Upgrades Vintage Computer Recreations

The MiST project provides an FPGA-based platform for recreating vintage computers. We recently saw an upgraded board — MiSTer — with a similar goal but with increased capability. You can see a video of the board acting like an Apple ][ playing Pac Man, below.

The board isn’t emulating the target computer. Rather, it uses an FPGA to host a hardware implementation of the target. There are cores for Apple, Atari, Commodore, Coleco, Sega, Sinclair and many other computers. There are also many arcade game cores for games like Defender, Galaga, and Frogger.

Continue reading “MiSTer Upgrades Vintage Computer Recreations”

Problems That Plagued An Edible Marble Machine

Prolific creator [Martin Raynsford] recently created a plus-sized edible version of his laser-cut Marble Machine for a Cake International exhibit and competition; it seemed simple to do at first but had quite a few gotchas waiting, and required some clever problem-solving.

Gears are three layers, stacked and cemented with sugar glue, and coated with a hard edible shine.

The original idea was to assemble laser-cut gingerbread parts to make the machine. Gingerbread can be laser-cut quite well, and at first all seemed to be going perfectly well for [Martin]. However, after a few days the gingerbread was sagging badly. Fiddling with the recipe and the baking was to no avail, and it was clear [Martin] needed to find something other than gingerbread to work with. After experimenting, he settled on a modified sugar paste which kept its shape and dried hard enough to work with. (While appearing to stretch most people’s definition of “cake” past the breaking point, the category [Martin] entered in the competition allows it.) The parts were cut by hand using laser-cut wood parts as a guide, then finished in a food dehydrator overnight.

The next problem was how to create the large spiral which forms the main ramp. The answer was to laser-cut a custom support structure that supported the piece while it dried out, and doubled as a way to transport the piece safely. High stress points got extra layers cemented with sugar glue, and some parts were reinforced internally with strands of uncooked spaghetti. Everything was sealed with an edible shine, which [Martin] says acts as a kind of varnish for cakes. A video demonstration is embedded below. Continue reading “Problems That Plagued An Edible Marble Machine”