Custom Raspberry Pi Case Shows The Whole Workflow

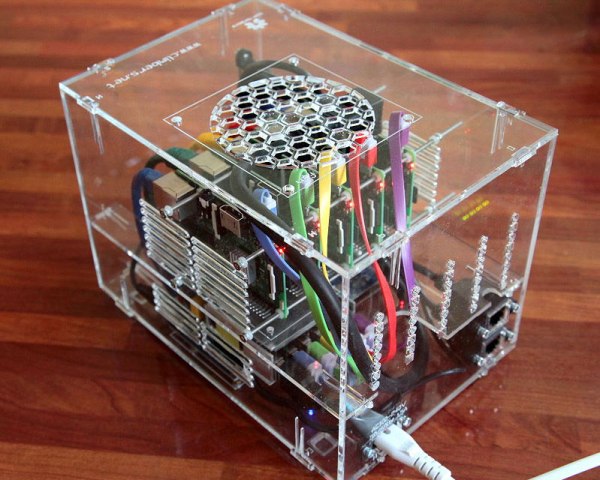
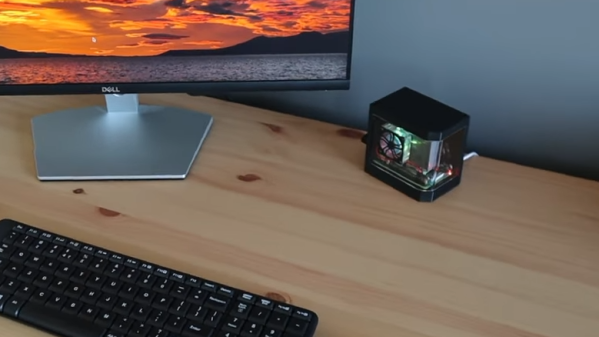
If you are a process junkie and love seeing the end-to-end of how a thing is made and with what tools, then watch [Michael Klements] show off his Raspberry Pi case design. His case has quite a few cool-looking elements to it, and incorporates 3D printing as well as laser-cut and clear bent acrylic for a gorgeous three-quarter view.

[Michael]’s write-up (and accompanying video, embedded below) are partly a review of his Creality 3D printer, and partly a showcase of his Raspberry Pi case design (for which he sells the design files for a small fee on his Etsy store.) But the great part is seeing the creation of every piece that goes into the end product. Not everyone is familiar with the way these tools work, or what they can create, so it’s nice to see attention paid to that side of things.

Both the blog post and the video nicely show off what goes into every part. The video opens with unpacking and setting up the 3D printer (skip ahead to 4:58 if you aren’t interested), followed by printing the parts, laser-cutting the acrylic on a K40 laser cutter, bending the acrylic using a small hand tool, and finally, assembling everything. For the curious, there are also links to the exact parts and equipment he uses.

Like we said, it’s part 3D printer review and part showcase of a design he sells, but it’s great to see each of the parts get created, watch the tools get used, and see the results come together in the final product. And should you wish to go in the opposite direction? A one-piece minimalist case for your Raspberry Pi is only a 3D printer away.

Continue reading “Custom Raspberry Pi Case Shows The Whole Workflow”

Music Production Studio In A Box

[Emil Smith] is an electronic music producer in the Greater London area. He spent a lot of time commuting in and out of central London, so he decided to put together COVERT-19, a portable music production studio. After making a couple of prototypes, [Emil] settled on what he needed from his portable studio: a sampler, a sequencer, a synthesizer, a mixer, and a way to record his work.

[Emil] didn’t overlook any details with his mechanical design. Taking the beautiful London weather into account, he designed a laser-cut plywood case that has a neoprene foam gasket to keep water out when closed and put all of the inputs and outputs on the interior of the case. Inside the case, he opted for machine screws with threaded inserts so he could disassemble and reassemble his creation as often as he liked, and he included gas springs to keep the studio open while he’s making music. [Emil] even thought to include ventilation slots to keep the built-in PC cool!

A portable studio is useless without a power supply, so [Emil] taught himself some circuit theory and bought his first soldering iron in order to create the custom power delivery system. Power is supplied by a battery of twelve 18650 cells with switching converters to supply the three different voltages his studio needs. Even with all of his music-making gear, he manages to get about four hours of battery life!

The music-making gear consists of a sequencer and synthesizer as well as a touch-screen NUC PC running Xubuntu. The built-in PC runs software that allows him to mix the audio, apply extra effects, record his creations, and save his patches when he’s done working. The system even has an extra MIDI output and audio input to allow it to incorporate an external synthesizer.

If you’re interested in getting started with MIDI synthesizers, but you’re more interested in building than buying, check out the KELPIE.

Nintendo Switch Laptop Isn’t As BASIC As It Looks

Remember the days when computers booted up straight into a BASIC screen, where theoretically you could program yourself a full game without any further software needed? Well, in reality most of us were amused enough making it print “butts” over and over again, but there are those who are adept in the dark arts of making impressive things with such a limited language. [Bugtaro] is one of those people, and to help with his game development in SmileBASIC 4 on the Nintendo Switch, he built himself a dock that turns it into a laptop with an integrated keyboard.

Details on the build are scarce as it’s only outlined in his Twitter account, but there’s enough to give us an idea about what it’s composed of. The Switch slides into the top just like the official dock it comes with, and the laptop shell takes advantage of those functions. Inside it is a 5000 mAh battery to extend the portable life of the whole ensemble, plus a USB hub which gives it its built-in keyboard and allows for a mouse to be plugged in as well. The laptop also gives the Switch its docked TV output mode and can hold the Joy-cons slotted on its sides.

This project would pass for any other case mod here at Hackaday if it weren’t for the fact that [Bugtaro] is in fact a programmer that has been releasing BASIC software on Japanese magazines since the 1980s and worked on several cult classic Mega Drive games with Wolf Team and NexTech during the 1990s. His latest game is GIVERS P3D, a game programmed in SmileBASIC using a 3D engine of his own design and one of the flagship games for the platform. It would be interesting to see if more SmileBASIC programmers end up coming up with their own solutions to aid their development experience following this project.

If you’re interested in the possibilities of custom-made Switch docks like these but don’t fancy giving it a keyboard, how about this one that wraps a Gamecube controller around the screen? And if you don’t have a Switch yet and are looking for a bigger challenge, well, you can make your own from scratch.

[Via GoNintendo]

Fallout-Inspired Clock Radio Helps You Party Like It’s 2077

Since its first release seven years ago, Raspberry Pi single-board computers have become notoriously ubiquitous in compact and portable builds. They’re used in many different applications, but one of the most interesting has got to be how it can turn just about any old thing into a Linux computer. [xito666] writes in with his own build, a portable retro computer inspired by the retro-futuristic stylings of the Fallout games.

For true aesthetic accuracy, [xito666] used an old discarded Crown 5TV-65R portable TV and radio combo. The unit hails from the 1970s, so a bit newer than Vault technology, but it still gives off a great retro charm with its CRT screen and knobs. Sadly, the original components couldn’t be reused, and the shell was stripped empty so that the new hardware could take its place. This includes an off-the-shelf HDMI LCD screen with resistive touchscreen and new potentiometers and knobs that still fit in with the overall look of the machine.

What makes this build unique, however, is that it also includes custom software to turn it into a clock and music player, with the deliciously Pip Boy-like UI being controlled entirely with the front buttons and knobs. The whole project is well written up in the Reddit post, in it [xito666] explains some of their choices and planned improvements. One that we would suggest ourselves is replacing the menu scrolling selector dial with a rotary encoder rather than a potentiometer, for that added knob feel. We also think that with the addition of a keyboard, it would easily pass for one of those luggables from the 1980s, a style of project we’ve featured once or twice here before.

Raspberry Pi Cluster Build Shows How And What

Raspberry Pi clusters are a dime a dozen these days. Well, maybe more like £250 for a five-Pi cluster. Anyway, this project is a bit different. It’s exquisitely documented.

[Nick Smith] built a 5-node Pi 3 cluster from scratch, laser-cutting his own acrylic case and tearing down a small network switch to include in the design. It is, he happily admits, a solution looking for a problem. [Smith] did an excellent job of documenting how he designed the case in CAD, prototyped it in wood, and how he put the final cluster together with eye-catching clear acrylic.

Of interest is that he even built his own clips to hold the sides of the case together and offers all of the files for anyone who wants to build their own. Head over to his page for the complete bill of materials (we didn’t know Pis were something you could order in 5-packs). And please, next time you work on a project follow [Nick’s] example of how to document it well, and how to show what did (and didn’t) work.

If 5 nodes just doesn’t do it for you, we suggest this 120-node screen-equipped monster, and another clear-acrylic masterpiece housing 40 Pis. This stuff really isn’t only for fun and games. Although it wasn’t Pi-based, here’s a talk at Hackaday Belgrade about an ARM-based SBC cluster built to crunch numbers for university researchers.