3D Print Smoothing, With Lasers

As anyone who has used an FDM printer can tell you, it’s certainly not the magical replicator it’s often made out to be. The limitations of the platform are numerous — ranging from anisotropic material characteristics to visual imperfections in the parts. In an attempt to reduce the visual artifacts in 3D prints, [TenTech] affixed a small diode laser on a 3D printer.

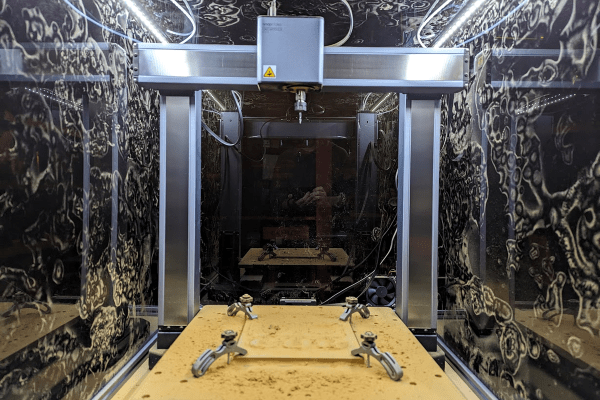
Getting the 1.5 watt diode laser onto the printer was a simple matter of a bracket and attaching it to the control board as a fan. Tuning the actual application of the laser proved a little more challenging. While the layer lines did get smoothed, it also discolored the pink filament making the results somewhat unusable. Darker colored filaments seem to not have this issue and a dark blue is used for the rest of the video.

A half smoothed half unprocessed test print
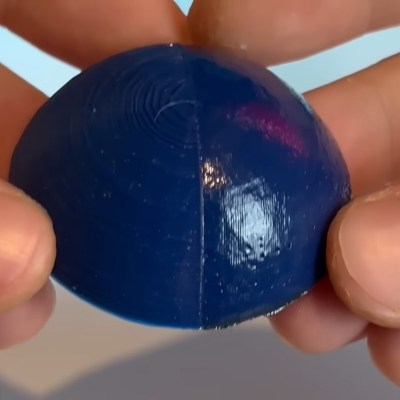
The smoothing process begins at the end of a 3D print and uses non-planar printer movements to keep the laser at an ideal focusing distance. The results proved rather effective, giving a noticeably smoother and shiner quality than an unprocessed print. The smoothing works incredibly well on fine geometry which would be difficult or impossible to smooth out via traditional mechanical means. Some detail was lost with sharp corners getting rounded, but not nearly as much as [TenTech] feared.

For a final test, [TenTech] made two candle molds, one smoothed and one processed. The quality difference between the two resulting candles was minimal, with the smoothed one being perhaps even a little worse. However, a large amount of wax leaked into the 3D print infill in the unprocessed mold, with the processed mold showing no signs of leaking.

If you are looking for a bit safer of a 3D print post-processing technique, make sure to check out [Donal Papp]’s UV resin smoothing experiments!

Continue reading “3D Print Smoothing, With Lasers”

Mowing The Lawn With Lasers, For Science

Cutting grass with lasers works great in a test setup. (Credit: Allen Pan, YouTube)

Wouldn’t it be cool if you could cut the grass with lasers? Everyone knows that lasers are basically magic, and if you strap a diode laser or two to a lawn mower, it should slice through those pesky blades of grass with zero effort. Cue [Allen Pan]’s video on doing exactly this, demonstrating in the process that we do in fact live in a physics-based universe, and lasers are not magical light sabers that will just slice and dice without effort.

The first attempt to attach two diode lasers in a spinning configuration like the cutting blades on a traditional lawn mower led to the obvious focusing issues (fixed by removing the focusing lenses) and short contact time. Effectively, while these diode lasers can cut blades of grass, you need to give them some time to do the work. Naturally, this meant adding more lasers in a stationary grid, like creating a Resident Evil-style cutting grid, only for grass instead of intruders.

Does this work? Sort of. Especially thick grass has a lot of moisture in it, which the lasers have to boil off before they can do the cutting. As [Allen] and co-conspirator found out, this also risks igniting a lawn fire in especially thick grass. The best attempt to cut the lawn with lasers appears to have been made two years ago by [rctestflight], who used a stationary, 40 watt diode laser sweeping across an area. When placed on a (slowly) moving platform this could cut the lawn in a matter of days, whereas low-tech rapidly spinning blades would need at least a couple of minutes.

Obviously the answer is to toss out those weak diode lasers and get started with kW-level chemical lasers. We’re definitely looking forward to seeing those attempts, and the safety methods required to not turn it into a laser safety PSA.

Continue reading “Mowing The Lawn With Lasers, For Science”

What The Artisan 3-in-1 CNC Offers (If One Has The Table Space)

I never feel like I have enough space in my workshop. The promise of consolidating tools to make the most of limited space drew me to the Snapmaker Artisan, a plus-sized 3-in-1 tool combining 3D printer, laser engraver, and CNC machine.

Smaller than three separate tools, but still big.

Jacks of all trades may be masters of none, but it is also true that a tool does not need to be a master of its functions to be useful. For many jobs, it enough to simply be serviceable. Does a machine like the Artisan offer something useful to a workshop?

Snapmaker was kind enough to send me an Artisan that I have by now spent a fair bit of time with. While I have come to expect the occasional glitch, having access to multiple functions is great for prototyping and desktop manufacturing.

This is especially true when it allows doing a job in-house where one previously had to outsource, or simply go without. This combo machine does have something to offer, as long as one can give it generous table space in return.

What It Is

The Artisan is a large dual-extrusion 3D printer, CNC router, and diode-based laser engraver. To change functions, one physically swaps toolheads and beds. Very thankfully, there are quick-change fixtures for this.

Driving the Artisan is Snapmaker’s software Luban (GitHub respository). Named for the ancient Chinese master craftsman, it is responsible for job setup and control. For laser and CNC work, there are convenient built-in profiles for a variety of paper, plastic, leather, and wood products.

The unit is enclosed, nicely designed, and — while I have come to expect the occasional glitch — serviceable at all three of its functions. The size and stature of the machine warrants some special mention, however.

Continue reading “What The Artisan 3-in-1 CNC Offers (If One Has The Table Space)”

Review: WAINLUX K8, A Diode Laser That’s Ready To Work

Rarely a week goes by that some company doesn’t offer to send us their latest and greatest laser. You know the type — couple of aluminum extrusions, Class 4 diode flopping around in the breeze, and no enclosure to speak of unless you count the cardboard box they shipped it in. In other words, an accident waiting to happen. Such gracious invitations get sent to the trash without a second thought.

Now don’t get me wrong, I have no doubt that the average Hackaday reader would be able to render such a contraption (relatively) safe for use around the shop. Build a box around it, bolt on a powerful enough fan to suck the smoke out through the window, and you’ve turned a liability into a legitimate tool. But the fact remains that we simply can’t put our stamp on something that is designed with such a blatant disregard for basic safety principles.

The earlier WAINLUX JL4 — lucky rabbit foot not included.

That being the case, a recent email from WAINLUX nearly met the same fate as all those other invitations. But even at a glance it was clear that this new machine they wanted to send out, the K8, was very different from others we’d seen. Different even from what the company themselves have put out to this point. This model was fully enclosed, had a built-in ventilation fan, an optional air filter “sidecar”, and yes, it would even turn off the laser if you opened the door while it was in operation. After reading through the promotional material they sent over, I had to admit, I was intrigued.

It seemed like I wasn’t the only one either; it was only a matter of days before the Kickstarter for the WAINLUX K8 rocketed to six figures. At the time of this writing, the total raised stands at just under $230,000 USD. There’s clearly a demand for this sort of desktop laser, the simplicity of using a diode over a laser tube is already appealing, but one that you could actually use in a home with kids or pets would be a game changer for many people.

But would the reality live up to the hype? I’ve spent the last couple of weeks putting a pre-production WAINLUX K8 through its paces, so let’s take a look and see if WAINLUX has a winner on their hands.

Continue reading “Review: WAINLUX K8, A Diode Laser That’s Ready To Work”

Cutting Metals With A Diode Laser?

Hobbyist-grade laser cutters can be a little restrictive as to the types and thicknesses of materials that they can cut. We’re usually talking about CO2 and diode-based machines here, and if you want to cut non-plastic sheets, you’re usually going to be looking towards natural materials such as leather, fabrics, and thin wood.

But what about metals? It’s a common beginner’s question, often asked with a resigned look, that they already know the answer is going to be a hard “no. ” However, YouTuber [Chad] decided to respond to some comments about the possibility of cutting metal sheets using a high-power diode laser, with a simple experiment to actually determine what the limits actually are.

Using an XTool D1 Pro 20W as a testbed, [Chad] tried a variety of materials including mild steel, stainless, aluminium, and brass sheets at a variety of thicknesses. Steel shim sheets in thicknesses from one to eight-thousandths of an inch appeared to be perfectly cuttable, with an appropriate air assist and speed settings, with thicker sheets needing a good few passes. You can definitely see the effect of excess heat in the workpiece, resulting in some discoloration and noticeable warping, but those issues can be mitigated. Copper and aluminium weren’t touched by the beam at all, likely due to the extra reflectivity, but we do have to wonder if appropriate surface treatments could improve matters.

Obviously, we’ve seen that diode lasers can have an impact on metals, simply smearing a little mustard on the workpiece seems to make marking a snap. Whilst we’re on the subject of diode lasers, you can get a lot of mileage from just strapping such a laser module onto a desktop CNC.

Continue reading “Cutting Metals With A Diode Laser?”

Mokeylaser: A DIY Laser Engraver That You Can Easily Build

[Mark aka Mokey] borrowed his friend’s open-frame laser engraver for a while, and found it somewhat lacking in features and a bit too pricey for what it was. Naturally, he thought he could do better (video, embedded below.) After a spot of modelling in Fusion 360, and some online shopping at the usual places, he had all the parts needed to construct an X-Y bot, and we reckon it looks like a pretty good starting point. [Mark] had a Sainsmart FL55 5.5W laser module kicking around, so that was dropped into the build, together with the usual Arduino plus CNC shield combo running GRBL.

[Mark] has provided the full F360 source (see the mokeylaser GitHub) and a comprehensive bill-of-materials, weighing in at about $400, and based upon the usual 2040 aluminium extrusions. This makes MokeyLaser a reasonable starting point for further development. Future plans include upgrading the controller to something a bit more modern (and 32-bits) as well as a more powerful laser (we do hope he’s got some proper laser glasses!) and adding air assist. In our experience, air assist will definitely improve matters, clearing out the smoke from the beam path and increasing the penetration of the laser significantly. We think there is no need for more optical power (and greater risk) for this application. [Mark] says in the video that he’s working on an additional build video, so maybe come by later and check that out?

Obviously, MokeyLaser is by no means the only such beast we’ve featured, here’s the engravinator for starters. For even more minimalism, we covered a build with some smart optics doing all the work. But what if you don’t happen to have a 5W laser module “lying around” then perhaps try a more natural heat source instead?

Continue reading “Mokeylaser: A DIY Laser Engraver That You Can Easily Build”

Cutting The Grass With Frickin’ Lasers

We techie types are quite often much more comfortable in front of a keyboard knocking out code, than out in the yard splitting logs for winter, and even the little jobs like cutting the grass are sometimes just too much like hard manual labour for our liking. The obvious solution is a robot mower, but they’re kinda boring, with their low-tech spinning metal blades. What we need is a big frickin’ laser. YouTuber [rctestflight] has been experimenting with using a 40W blue diode laser module to cut the weeds, (Video, embedded below) and it sort of works, albeit in a rather dangerous fashion.

A nice flat ‘cut’

The first test used a fixed assembly, mounting the laser to a camera lens, upon a rotating gear driven by a small stepper motor. An Arduino controls the beam scanning, very slowly, burning the grass in its sights. But with a range limited to around eight feet best case, sitting in one spot just isn’t going to cut it. (sorry) The obvious next step was to mount one of the tested laser modules onto a moveable platform. After tweaking one of his earlier projects — a tracked rover — with a new gearbox design, it could now drive slow enough to be useful for this slow task. The laser was mounted to a simple linear rail slider, with an attempt at a vacuum pickup system to suck up the clippings, removing them from the beam path, and stopping them impeding the cutting efficiency of the laser.

Obviously this vacuum idea didn’t work, and since the contraption takes the best part of a week to cut just one small area, we reckon it would likely be growing faster than that! Still, it must have been fun to build it anyway. It just goes to show that despite the march of technological progress, maybe the boring old spinning blades of old are still the best way to get the job done.

Lawnmowing is clearly one of those jobs we love to hate, and do so with hacks. Here’s a way to prevent your mower sucking up foreign bodies and hurling them at you at ballistic speeds, and for those who really want to be hands off, add RTK-GPS to a robot mower, and just leave it to do the dirty work.

Continue reading “Cutting The Grass With Frickin’ Lasers”