Contactless Doorbell Built To Avoid Coronavirus

It’s often said that necessity breeds creativity, and during a global pandemic such words have proved truer than ever. Realising the common doorbell could be a potential surface transmission point for coronavirus, [CasperHuang] whipped up a quick build.

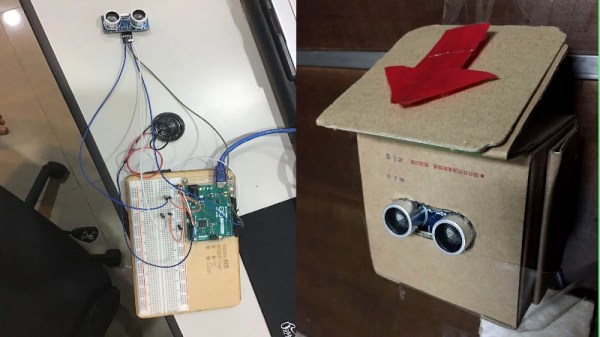
The build eschews the typical pushbutton we’re all familiar with. Instead, it relies on an ultrasonic distance sensor to detect a hand (or foot) waved in front of the door. An Arduino Leonardo runs the show, sounding a buzzer when the ultrasonic sensor is triggered. In order to avoid modifying the apartment door, the build is housed in a pair of cardboard boxes, taped to the base of the door, with wires passing underneath.

It’s a tidy way to handle contactless deliveries. We imagine little touches like this may become far more common in future design, as the world learns lessons from the COVID-19 pandemic. Every little bit helps, after all. Video after the break.

Continue reading “Contactless Doorbell Built To Avoid Coronavirus”

The Easiest Way To Put Your Doorbell On The Internet

Thanks to low-cost WiFi enabled microcontrollers such as the ESP8266 and ESP32, it’s never been a better time to roll your own smart home system. But that doesn’t mean it isn’t daunting for new players. If you’re looking for an easy first project, putting your old school doorbell on the Internet of Things is a great start, but even here there’s some debate about how to proceed.

Most people stumble when they get to the point where they have to connect their low-voltage microcontroller up to the relatively beefy transformer that drives a standard doorbell. We’ve seen a number of clever methods to make this connection safely, but this tip from [AnotherMaker] is probably the easiest and safest way you’re likely to come across.

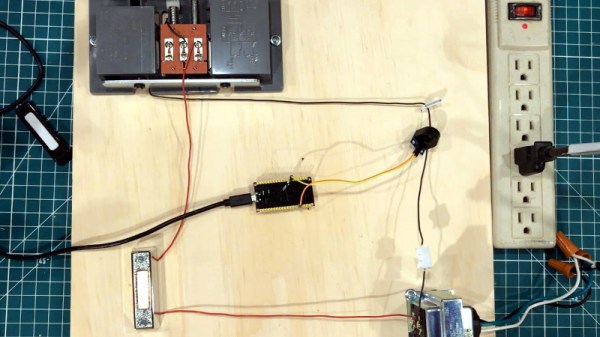
His solution only requires an inductive current sensor, which can be had for less than $1 from the usual overseas suppliers. One leg of the doorbell circuit is passed through the center of this sensor, and the sensor itself is connected up to your microcontroller of choice (here, and ESP32). The rest is software, which [AnotherMaker] explains in the video after the break. With the addition of a little debounce code, your microcontroller can reliably determine when somebody is out there jabbing the bell button; what you do with this information after that is up to you.

If you’re worried this method is too easy you could always try it with an optocoupler, or maybe convert the low-voltage AC to something your microcontroller can handle.

Continue reading “The Easiest Way To Put Your Doorbell On The Internet”

A Raspberry Pi Video Intercom System

When it comes to hacks, we’re always amazed by the aesthetic of the design as much as we are by the intricacies of the circuit or the cleverness of the software. We think it’s always fun to assemble projects that were just sort of rigged up in our shop really quickly and made to just work, without worrying about much else. But, when you really invest time in the aesthetics and marry form with function, the results are always one to marvel at.

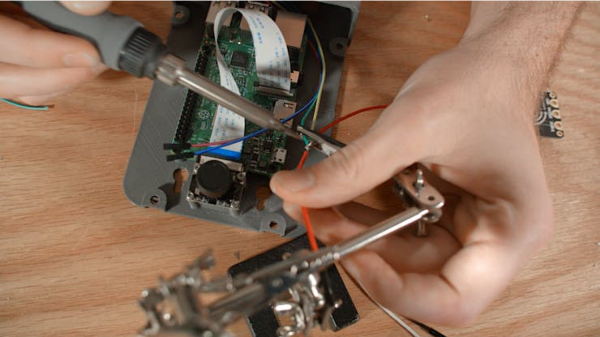
That’s what the engineers over at [Hacker Shack] did with their Raspberry Pi-based video intercom system over on Hackster. Now we’ve seen RPi doorbell projects here on Hackaday before, but it’s the implementation of a full-duplex video intercom system that makes [Hacker Shack’s] project really stand out. (Unless you want to be a bit more secretive). They used a Raspberry Pi 3 Model B with an off-brand Pi camera, but the R Pi branded camera will also work just fine. Couple the camera with a very crisp LCD display, microphone, and speaker and you’re good to go! Continue reading “A Raspberry Pi Video Intercom System”

Never Miss A Doorbell With This Notifier

[PatH] tells us that he tragically missed a craft beer delivery to his home, and vowed never to let this happen again. His problem was that he’d missed the doorbell, resulting in one of those annoying notes from the delivery guy. His solution? An ESP8266-driven doorbell detector, that both sends him an SMS and records each doorbell press to a Google Sheet.

The doorbell detection is surprising but simple and non-intrusive, instead of running a GPIO line through some kind of interface to the button itself he’s added a reed switch to his ESP8266 board and used that to detect the magnetic field of the bell solenoids. It’s a convenient method, but one that only works with an old-style bell.

When the bell rings the magnetic field triggers the reed switch, and in turn the sketch running on the ESP calls out to IFTTT which triggers both an SMS and a write to a Google Sheets document that records each doorbell activation.

The ESP8266 seems to be a popular choice with doorbell automatprs probably because of its built-in networking and low price, but it’s not the only option. This optocoupler-sensed effort for example uses a Particle Xenon.

In Soviet Russia, Doorbell Rings You

We can imagine that the origin of the doorbell is truly ancient. if you lived in a cave, you probably had a stick and a rock nearby for people to get your attention without invading your cave. In 1817 a Scot named William Murdoch had a bell in the house that visitors rang via a compressed air system, but the electric doorbell had to wait until 1831. Since then, little has changed with the basic idea. [Erientes] — who lives in the Netherlands, not Russia — wanted a smarter doorbell. In particular, he’s read about older people being victimized by people who ring the doorbell for entry. So [Erientes] used a Raspberry Pi to make a doorbell that supports facial recognition.

The exercise is really more of an operations challenge than a technical one thanks to a high-quality Python library for face recognition powered by DLib. However, we did like the user interface aimed at non-technical users. The metaphor is a traffic light in which a red light means do not allow entry. The lights are buttons, so you can use them to whitelist or blacklist a particular person.

Continue reading “In Soviet Russia, Doorbell Rings You”

An Optocoupler Doorbell Notifier

Over the years we’ve seen several attempts at adding Internet connectivity to the lowly wired doorbell. Generally, these projects aim to piggyback on the existing wiring, bells, and buttons rather than replace them entirely. Which invariably means at some point the AC wiring is going to need to interface with a DC microcontroller. This is often where things get interesting, as it seems everyone has a different idea on how best to bridge these two systems.

That’s the point where [Ben Brooks] found himself not so long ago. While researching the best way to tap into the 20 VAC pumping through his doorbells, he found a forum post where somebody was experimenting with optocouplers. As is unfortunately so often the case, the forum thread never really had a conclusion, and it wasn’t clear if the original poster ever figured it out.

DIY optocouplers wrapped in electrical tape

[Ben] liked the idea though, so he thought he would give it a shot. But before investing in real optocouplers, he created his own DIY versions to use as a proof of concept. He put a standard LED and photoresistor together with a bit of black tape, and connected the LED to the doorbell line with a resistor. Running the LED on 60 Hz AC meant it was flickering rapidly, but for the purposes of detecting if there was voltage on the line, it worked perfectly.

Wanting something slightly more professional for the final product, [Ben] eventually evolved his proof of concept to include a pair of 4N35s, a custom PCB, and a 3D printed enclosure. Powered by a Particle Xenon, the device uses IFTTT to fire off smartphone notifications and blink the lights in the house whenever somebody pushes the bell.

If you’re still wondering why it’s so tricky to connect a microcontroller up to your door bell, a quick look at some of the similar projects we’ve covered should give you a pretty good idea of how annoying these systems can be to modernize.

Sniffed Transformer Puts Wired Doorbell Online

There’s certainly no shortage of “smart” gadgets out there that will provide you with a notification, or even a live audiovisual stream, whenever somebody is at your door. But as we’ve seen countless times before, not everyone is thrilled with the terms that most of these products operate under. Getting a notification on your phone when the pizza guy shows up shouldn’t require an email address, credit card number, or DNA sample.

For [Nick Touran], half the work was already done. There was already a traditional wired doorbell in his home, he just had to come up with a minimally invasive way to link it with Home Assistant. He reasoned that he could tap into the low-voltage side of the doorbell transformer and watch for the telltale fluctuations that would indicate the bell was doing its thing. The ESP8266 has an ADC to measure voltage and WiFi to connect to Home Assistant, so it seemed like the perfect bridge between old and new.

Transformer voltage before and after

Of course, as with any worthwhile project, it ended up being a bit more complicated. Wired doorbells generally operate on 16-24 VAC, and [Nick] knew if he tried to put his Wemos D1 across the line he’d release the critical Magic Smoke. What he needed was a voltage divider circuit that would take low-voltage AC and drop it to an even lower DC voltage that the microcontroller could cope with.

The simple circuit [Nick] comes up with cuts the voltage way down and removes the negative component completely. So what was originally 18.75 VAC turned into a series of 60 Hz blips at 2.4 VDC; perfect for feeding into a microcontroller ADC. With a baseline to work from, he could then write some code that would watch for variations in this signal to determine when the bell was ringing.

Or at least, that was the idea. While the setup worked well enough on the bench, its performance in the real-world left something to be desired. If his house guest had a heavy hand, it worked great. But a quick tap of the doorbell button would tend to go undetected. After investigating the issue, [Nick] found that he needed to use some software trickery to ensure the ESP8266 was able to keep up with the speedy signal. Once he was able to reliably detect short and long button presses, the rest was just a simple matter of sending an MQTT message to his automation system.

Compared to the hoops we’ve seen other hackers have to jump through to smarten up their doorbells, we think [Nick] got off fairly easy. This project is also an excellent example of how learning about circuit design and passive components can still come in handy in the Arduino Era.

Continue reading “Sniffed Transformer Puts Wired Doorbell Online”