Talking Tactile 3D Prints

Cell biology professor [Mike] has created a way for blind students to decipher microscope slides using 3D prints and the magic of capacitive sensing. His write-up focuses on a slide showing the anaphase stage of mitosis in whitefish blastula, a popular choice for studying cell division. When a student touches a certain area of the print, the capacitive sensor triggers audio playback to tell them what they’re feeling.

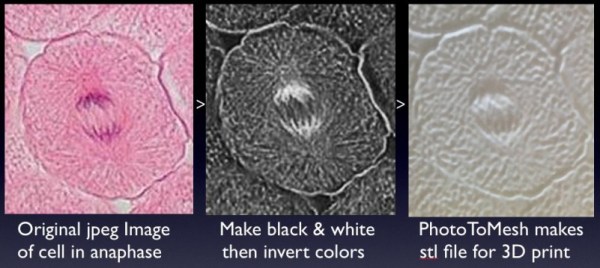
[Mike] started by turning a 2D image of a cell into a 3D print. To do this, he made the image black and white, and then inverted the colors so that the 3D print’s topography will correspond correctly. The talking part is handled by an Arduino Duemilanove and a Spikenzie voice shield. The latter has a somewhat limited amount of space, but is more than adequate for the audio labels [Mike] made, which are all less than three seconds long.

A hard copy of the 2D file comes in handy for making sure the cap sensors are in the right places. To make those, [Mike] cut up some floor protector pads and covered the sticky side with copper tape. These are held on the 2D image with double-sided tape. The 3D print sits on top, separated by more furniture pads at the corners. He labeled this scientific sandwich model with a 3D printed Braille label that reads ‘anaphase’. [Mike] has made the referenced STL file along with a few others available at the National Institutes of Health’s 3D print exchange site.

Wireless Arduino Cat Food Dispenser

catfooddispenser

Reader, [Andres Leon], has two adorable cats with very specific dietary needs. Instead of altering his schedule, he donned his hacking hat and designed a very solid cat food dispenser. The dispenser consists of a rotating drum with a slot in it and a PVC pipe Y-fitting to distribute the food evenly. The brains of the machine is an Arduino Deumillanove and an XBee module. The unit can be controlled by a web interface or it can run completely standalone. [Andres] ran into a problem where the drum’s resistance to turning varied based on how much food was inside. He solved this with a clever laser position indicator. A piece of plywood is lined up with the slot at the top so that whenever the slot is facing up it keeps the laser from shining on a photoresistor. The cats were afraid of the servo noise at first, but now they run to their bowls whenever they hear it.

Arduino Buyers Guide And The Seeeduino

seeeduino

Make has assembled a buyers guide for the many different types of Arduino devices. The Arduino is an open hardware platform designed to make prototyping easily accessible. The design allows for other people to modify, expand, and improve on the base, and many people have started producing their own versions. The guide features a lot of the hardware we’ve covered in the past like the LilyPad, Arduino Pro, Sanguino, Duemilanove, Ethernet Shield, and Freeduino.

Out of the pack, the Seeeduino (pictured above) definitely caught our eye. It’s a low profile SMD design much like the Arduino Pro. They’ve taken advantage of the space saved by the SMD ATmega168 by adding more useful headers. In addition to the ICSP, you get the pins in UART order and an I2C header. Vcc is switch selectable for 3.3 or 5volts. The reset switch has been moved to the edge plus two additional ADC pins. Our favorite feature is the new spacing on the digital pins. Arduino digital pin headers have an inexplicable 160mil gap between the banks. The Seeeduino has the standard row for shield compatibility, but has an additional row spaced at standard 100mil spacing for use with protoboard. At $23.99, it’s competitively priced too.

Arduino Duemilanove

The latest generation of Arduino hardware has been released. The Arduino Duemilanove (2009 in Italian) has the same form factor as previous generations. The specs are essentially identical to the Diecimila, but there have been a few changes to the hardware. The power source is no longer chosen using a jumper. A MOSFET and dual OPAMP have been added to the board to automatically selected between USB power and the external plug. Automatic hardware resets are optional now. Next to the USB port are two solder pads labeled RESET-EN. Cut the trace between them to kill the reset. If you ever want it back, just bridge the pads. The hardware was updated to correspond with the release of Arduino cofounder [Massimo Banzi]’s new book.