E-Ink Screen Combined With Analog Dial Is Epic Win

Analog dials used to be a pretty common way of displaying information on test equipment and in industrial applications. They fell out of favor as more advanced display technologies became cheaper. However, if you combine an analog dial with a modern e-ink display, it turns out you get something truly fantastic indeed.

This build comes to us from [Arne]. The concept is simple—get an e-ink display, and draw a dial on it using whatever graphics and scale you choose. Then, put it behind a traditional coil-driven analog dial in place of the more traditional paper scale. Now, you have an analog dial that can display any quantity you desire. Just update the screen to display a different scale as needed. Meanwhile, if you don’t need to change the display, the e-ink display will draw zero power and still display the same thing.

[Arne] explains how it all works in the writeup. It’s basically a LilyGo T5 ESP32 board with an e-ink screen attached, and it’s combined with a MF-110A multimeter. It’s super easy to buy that stuff and start tinkering with the concept yourself. [Arne] uses it with Home Assistant, which is as good an idea as any.

You get all the benefits of a redrawable display, with the wonderful visual tactility of a real analog dial. It’s a build that smashes old and new together in the best way possible. It doesn’t heart that [Arne] chose a great retro font for the dial, either. Applause all around!

Landscape Motif Makes This E-Ink Weather Display Easy To Understand

True weather geeks will disagree, but there might be a better way to know how to dress for the day than divining what the weather will likely be from the current readings for temperature, pressure, humidity, and wind. Sure, the data will give you a good idea of where the weather is heading, but perhaps a quick visual summary such as the one offered by this pictorial landscape weather display is a better way to get out the door in the morning.

While many consumer weather stations incorporate some kind of graphical forecast for quick reference, [lds133] took a slightly different approach to forecasting. A cartoon landscape represents the day ahead, with various elements representing the coming weather scrolling across the display as time progresses. Trees are used to indicate wind direction and speed, with palm trees indicating south wind and pine trees winds from the north, and the taller the trees, the stronger the wind. The forest floor rises and falls with the expected temperature, the sun and moon appear at the proper time to indicate sunrise and sunset, and cloud icons are added when needed to show the degree of cloud cover. And because into each life a little rain must fall, animations show when you can expect rain or snow.

As for the electronics, if you think this would be a perfect application for an E-ink module, [lds133] agrees. The 296×128 pixel Waveshare display is the perfect aspect ratio for the job and provides nice, crisp icons. The display is updated every 15 minutes from the OpenWeather API by a Python program running on an ESP32 behind the scenes.

We’ve seen similar graphical forecast displays before, but we get it if that’s not your thing. Perhaps a more data-driven weather forecast will suit you better?

Teaching A Pi Pico E-Ink Panel New Tricks

We’ve noticed that adding electronic paper displays to projects is getting easier. [NerdCave] picked up a 4.2-inch E-ink panel but found its documentation a bit lacking when it came to using the display under MicroPython. Eventually he worked it out, and was kind enough to share with the rest of the class.

These paper-like displays draw little power and can hold static images. There were examples from the vendor of how to draw some simple objects and text, but [NerdCave] wanted to do graphics. There was C code to do it, but it wasn’t clear how to port it to Python.

The key was to use the image2cpp website (we’ve used it before, but you can also use GIMP). Instead of C code, though, you get the raw bytes out and place them in your Python code. Once you know the workflow, it isn’t that hard, and this is an inexpensive way to add a different kind of display to your projects. The same image conversion will help you work with other displays, too.

We aren’t sure what driver chip this particular display uses, but if you have one with the UC8151/IL0373, you can find some amazing MicroPython drivers for those chips.

Continue reading “Teaching A Pi Pico E-Ink Panel New Tricks”

Have You Heard Of The Liquid Powder Display?

Over the decades the technology behind flat panel displays has continuously evolved, and we’ve seen many of them come and go. Among the popular ones there are a few that never quite made the big time, usually because a contemporary competitor took their market. An example is in a recent [Wenting Zhang] video, a mystery liquid powder display. We’d never heard of it, so we were intrigued.

The first segment of the video is an examination of the device, and a comparison with similar-looking ones such as a conventional LCD, or a Sharp Memory LCD. It’s clearly neither of those, and the answer finally came after a lot of research. A paper described a “Quick response liquid powder” as a mechanism for a novel display, and thus it was identified. It works by moving black and white electrically charged powder to flip a pixel from black to white, and its operation is not dissimilar to the liquid-based e-ink displays which evidently won that particular commercial battle.

The process of identifying the driver chip and pinout should be an essential watch for anyone with an interest in display reverse engineering. After a lot of adjusting timing and threshold voltages the dead pixels and weird effects fall away, and then it’s possible to display a not-too-high-quality image on this unusual display, through a custom PCB with an RP2040. Take a look at the video below the break.

We’ve seen [Wenting Zhang]’s work here a few times before, most recently in a very impressive mirror-less camera project.

Continue reading “Have You Heard Of The Liquid Powder Display?”

Free And Open E-Reader From The Ground Up

Although ebooks and e-readers have a number of benefits over reading an analog paper book as well as on more common electronic devices like tablets, most of them are locked behind proprietary systems like Kindle which make it difficult to take control over your electronic library. While there are a few off-brand e-readers that allow users to take a bit of control back and manually manage their files and libraries, there are few options for open-source solutions. This project aims to provide not only a free and open e-reader from the hardware to the software, but also a server to host a library as well.

The goal of most of the build is to keep everything as FLOSS as possible including the hardware, which is based on a Raspberry Pi compute module. The display comes from Good Display, which includes a built-in light and a touchscreen. There’s a lithium battery to power the tablet-like device with a number of support chips to charge it, handle the display, and interface with the Pi. On the software side, the system uses MuPDF which has support for most ebook file types while the server side is based on Calibre and the Open Publication Distribution System.

A subsection of the build log discusses a lot of how the code works for those looking to build their own similar system based on this project. The project code is even hosted on GitLab, a more FLOSS-y version of GitHub. Free and open ebook readers have been a goal of a number of builders for some time now, as we’ve seen projects going back at least a few years now and others that hope to make the Kindle hardware a little more open instead.

Clever E-Ink Driver Does 32 Levels Of Grey, Avoids Update Flicker, And More

There’s a lot to like about E-Ink displays, and you might be about to like them even more with [antirez]’s MicroPython driver for the Badger 2040 (or any display based on the UC8151 / IL0373) because it brings all kinds of useful features to your next project.

E-Ink displays are great. They are high contrast, daylight-readable, and require zero power to maintain a displayed image. But a few things come with the territory: displays have slow refresh rates compared to other display types, expect flickering during screen changes, and the displays are monochrome. [Antirez]’s new driver not only provides a MicroPython interface but goes in some fantastic directions that challenge those usual drawbacks.

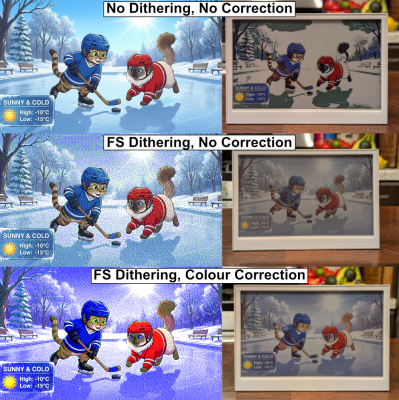
Probably the most striking is the ability to display greyscale images without relying on dithering, which means the results avoid the charmingly gritty look of old-school dithering. Dithering has its place, but it’s not always the best choice, so options are great.

Similarly, display flicker may be a small price to pay for some, but if the obvious flicker is too boorish and crude-looking one can use an anti-flicker refresh mode that greatly limits flickering at the cost of update speed. Over time some image ghosting will accumulate which necessitates an occasional whole-screen refresh, but the effect is overall much nicer when updating something like a clock face.

How is this all done? It turns out that the controller chips for these displays are highly configurable, and it’s possible to do much more than simply drive the display in known-good and completely approved modes. It’s also entirely possible to permanently damage one’s display by doing so. Part of what makes [antirez]’s work so appealing is that he has already done the work finding workable configurations.

His driver is designed using computed LUTs (look-up tables) that make using and exploring alternative refresh modes easy and efficient, invaluable for exploring the capabilities of a patented, poorly documented technology like E-Paper displays.

We’ve seen the Badger 2040 E-Ink display in a teapot timer and a custom macropad, and [antirez]’s uc8151_micropython project is a fantastic step forward. And don’t miss another of [antirez]’s clever microcontroller hacks: playing audio without a DAC.

Custom Multi-Segment E-Ink Displays From Design To Driving

With multi-segment displays, what you see available online is pretty much what you get. LEDs, LCDs, VFDs; if you want to keep your BOM at a reasonable price, you’ve pretty much got to settle for whatever some designer thinks looks good. And if the manufacturer’s aesthetic doesn’t match yours, it’s tough luck for you.

Maybe not though. [upir] has a thing for custom displays, leading him to explore custom-made e-ink displays. The displays are made by a company called Ynvisible, and while they’re not exactly giving away the unique-looking flexible displays, they seem pretty reasonably priced. Since the displays are made with a screen printing process, most of the video below concerns getting [upir]’s preferred design into files suitable for printing. He uses Adobe Illustrator for that job, turning multi-segment design ideas by YouTuber [Posy] into chunky displays. There are some design restrictions, of course, chief of which is spacing between segments. [upir] shows off some Illustrator-fu that helps automate that process, as well as a host of general vector graphics design tips and tricks.

After sending off the design files to Ynvisible and getting the flexible displays back, [upir] walks us through the details of driving them. It’s not as simple as you’d think, at least in the Arduino world; the segments need +1.5 volts with reference to the common connection to turn on, and -1.5 volts to turn off. His clever solution is to use an Arduino Uno R4 and take advantage of the onboard DAC. To turn on a segment, he connects a segment to a GPIO pin set high while sending 3.5 volts out of the DAC output into the display’s common connection. The difference between the two pins is 1.5 volts, turning the segment on. To turn it off, he drops the DAC output to 1.5 volts and drives the common GPIO pin low. Pretty clever, and no extra circuitry is required.

This isn’t the first time we’ve seen [upir] trying to jazz things up in the display department. He’s played with masking LED matrix displays with SMD stencils before, and figured out how to send custom fonts to 16×2 displays too.

Continue reading “Custom Multi-Segment E-Ink Displays From Design To Driving”