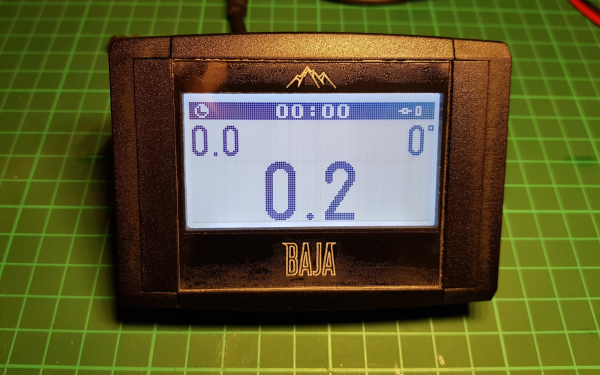
A Wi-Fi Enabled Dog!

Our canine friends have been at our side for millennia, their prehistoric wolf ancestors evolving alongside us into the breeds we know today. But astoundingly until now no dog has been Wi-Fi enabled, at least according to [Entropy], whose dog [Kaya] now sports a colourful Wi-Fi enabled collar.

Light-up dog collars and harnesses have been with us for a while, and serve the very useful purpose of protecting the animals from accidents by making them visible at night, but [Kaya]’s colar was a particularly disappointing example. Its single light and lacklustre optical fibre coupled with disappointing battery life left much to be desired, so when it broke there was ample excuse to upgrade it. In went a strip of addressable LEDs and an ESP32 module, along with an 18650 lithium-ion cell. We’re a bit unsure whether lights can be controlled from a mobile phone, but perhaps the most significant benefit lies elsewhere. The Wi-Fi hotspot from the ESP32 serves as a beacon to find [Kaya] within a short distance should she wander off, which as any dog owner will tell you can be a boon when they’re investigating some fascinating new smell and ignoring your calls. You can see her modelling the collar in the video below the break.

Canine hacks appear on these pages from time to time. One of our favourites is this not very successful but highly amusing remote controlled dog.

Continue reading “A Wi-Fi Enabled Dog!”

Augmented Reality On The Cheap With ESP32

Augmented reality (AR) technology hasn’t enjoyed the same amount of attention as VR, and seriously lags in terms of open source development and accessibility.  Frustrated by this, [Arnaud Atchimon] created CheApR, an open source, low cost AR headset that anyone can build at home and use as a platform for further development

[Arnaud] was impressed by the Tilt Five AR goggles, but the price of this cutting edge hardware simply put it out of reach of most people. Instead, he designed and built his own around a 3D printed frame, ESP32, cheap LCDs, and lenses from a pair of sunglasses. The electronics is packed horizontally in the top of the frame, with the displays pointed down into a pair of angled mirrors, which reflect the image onto the sunglasses lenses and into the user’s eyes. [Arnaud] tested a number of different lenses and found that a thin lens with a slight curve worked best. The ESP32 doesn’t actually run the main software, it just handles displaying the images on the LCDs. The images are sent from a computer running software written in Processing. Besides just displaying images, the software can also integrate inputs from a MPU6050 IMU and  ESP32 camera module mounted on the goggles. This allows the images to shift perspective as the goggles move, and recognize faces and AR markers in the environment.

All the design files and software is available on GitHub, and we exited to see where this project goes. We’ve seen another pair of affordable augmented reality glasses that uses a smartphone as a display, but it seems the headset that was used are no longer available.

A Tracker For Radio Sondes

Radiosondes – the telemetry packages carried aloft by sounding balloons for atmospheric weather data measurements – are regularly used by weather bureaus around the world to collect data, and there are quite a number of launches daily. Most of them are in Europe, but they also happen at many locations in North and South America, Japan, and Australia. The balloons burst when they reach a high enough altitude, the radiosonde falls back, and most often there is no effort made to recover them since they are deemed “expendable”. So it’s Finders Keepers, and rich pickings for any hacker who is fortunate enough to grab the fallen radiosondes. For successful recovery, you need to first be able to track those radiosondes, and that’s why leet guy [Robert Stefanowicz aka p1337] built his Weather ballon tracker (sic) project.

The hardware is all off-the-shelf, packaged in a pretty cool 3D printed package designed to make it look like the hand held radio that it is. At its heart is the ESP32 based TTGO T-BEAM V1.0 which has almost everything needed for this project. Add an OLED display, 18650 Li-Po cells, antenna and connectors and you can put it all together in an evening over your favourite beverage.

[DL9RDZ] wrote the software which runs on the T-Beam, available at the RDZ-Sonde repo on Github, that allows hunting these balloons. Setup is straightforward, and you need to fiddle with just a couple of well-explained config parameters. Once connected to your WiFi, config and settings can be accessed via convenient web URL’s and the single user action button on the TTGO offers quick access to different functional modes. At the moment, the software is written to decode signals from the widely used Vaisala RS41, Graw DFM06 and Graw DFM09 radiosondes. This LINK provides details for some of the popular radiosonde models.

Once you’re done building this piece of hunting gear, you’ll need some additional help finding out when and where the launches are taking place. If you’re in Europe, you luck out – there is a live radiosonde tracker map, thanks to the great work done by [Michał Lewiński – SQ6KXY]. If you live else where and know of similar resources, let us know in the comments. As a side note, Wikipedia tells us there are about 1300 launch sites worldwide and twice a day missions, so there’s quite a number of fallen pieces of hardware lying around just waiting to be picked up. At the very least, each will have a GPS module and temperature and humidity sensors that you can recover.

So, what do you do with the recovered radiosondes ? Here’s a tip on a “Fallen Radiosonde reborn as active L-band antenna“. And If you’d like to get the skinny on radiosondes, check out “Radiosondes: getting data from upstairs

Thanks for the tip, [Alex aka MD23F3].

Ringing In The Holidays With Self-Playing Chimes

The holiday season is here, and along with it comes Christmas music. Love them or hate them, Yuletide tunes are a simple fact of life each December. This year, [Derek Anderson] put a modern spin on a few classic melodies and listened to them via his set of self-playing chimes.

Inspired by [Derek]’s childhood Ye Merry Minstrel Caroling Christmas Bells (video), these chimes really bring the old-school Christmas decoration into the 21st century. Each chime is struck by a dedicated electromagnetically-actuated mallet, which is in turn controlled by an ESP32 running MicroPython.

Winding the electromagnets

The chimes play MIDI files, so you could, of course, play music unrelated to Christmas if you wanted to. And they even feature an OLED screen that displays what song is being played. For added flair, the entire thing is beautifully framed in black walnut, not to mention the custom-wound solenoids.

This project incorporated mechanical and electrical design, woodworking, 3D printing, programming, and song arrangement. It’s a wonder that [Derek] was able to create the entire product in the 40-80 hour time frame he estimated. (Though it looks like he had a bit of help.)

We always love to see projects like this, ones in which several disciplines get rolled together to create a beautiful finished piece.


Continue reading “Ringing In The Holidays With Self-Playing Chimes”

Racing The Old Clock

[Keenan Rebera] recently found himself with an old racing clock (a chronoix cc3000) left behind by a roommate. How the roommate obtained such a clock seems murky at best, but undeterred [Keenan] set to work bringing the clock to life with Bluetooth functionality. The mechanical nature of the digits provided a satisfying auditory click, making it a good candidate for some upgrading. The new brain transplant is the venerable ESP32 with an RTC for good measure. He created a custom PCB with QWIC connectors to daisy chain together the driver boards together. Each PCB has four TBD62083 for driving the digits, two MCP expanders to increase the address space. This allows the ESP32 to address all the various segments over I2C. By soldering different pads together, he can change the address of each MCP, giving a maximum of 16 digits (9 possible MCP’s each driving 2 digits).

A handsomely designed app accompanies the clock, making updating the RTC and setting the timezone a breeze. Currently, it is displaying a count down to the time when 2020 is officially over. While 2020 will certainly go down in the books as a tumultuous year, it was a great year for DIY clocks at Hackaday. Just in the past few weeks, we’ve seen big LED workshop clocks, esoteric domino clocks, and beautiful clocks that double as works of art. Come 2021, we’re quite confident that [Keenan] will still have a gorgeous clock on his wall ticking and clicking away.
Continue reading “Racing The Old Clock”

A Tiny LED Matrix Is Better With Friends

When we last heard from [lixielabs] he was building Nixie tube replacements out of etched acrylic and LEDs. Well he’s moved forward a few decades to bring us the Pixie, a chainable, addressable backpack for tiny LED matrix displays.

Each Pixie module is designed to host two gorgeous little Lite-On LTP-305G/HR 5×7 LED dot matrix displays, which we suspect have been impulse purchases in many a shopping cart. Along with the displays there is a small matrix controller and an ATTINY45 to expose a friendly electrical interface. Each module is designed to be mounted edge to edge and daisy chained out to 12 or more (with two displays each) for a flexible display any size you need. But to address the entire array only two control pins are required (data and clock).

[lixielabs] has done the legwork to make using those pins as easy as possible. He is careful to point out the importance of a good SDK and provides handy Arduino libraries for common microcontrollers and a reference implementation for the Raspberry Pi that should be easy to crib from to support new platforms. To go with that library support is superb documentation in the form of a datasheet (complete with dimensions and schematic!) and well stocked GitHub repo with examples and more.

To get a sense of their graphical capabilities, check out a video of 6 Pixie’s acting as a VU meter after the break. The Pixie looks like what you get when a hacker gets frustrated at reinventing LED dot matrix control for every project and decided to solve it once and for all. The design is clean, well documented, and extremely functional. We’re excited to see what comes next! Continue reading “A Tiny LED Matrix Is Better With Friends”

DIY ESP32 Video Doorbell Locks Out Big Brother

There’s no question that being able to see who’s at your front door from your computer or mobile device is convenient, which is why the market is currently flooded with video doorbells. Unfortunately, it’s not always clear who else has access to the images these devices capture. Organizations such as the Electronic Frontier Foundation have argued that by installing one of these Internet-connected cameras on their front door, consumers are unwittingly contributing to a mass surveillance system that could easily be turned against them.

Luckily, there’s a solution. As [Sebastian] shows in his latest project, you can build your own video doorbell that replicates the features of the commercial offerings while ensuring you’re the only one who has access to the data by leveraging open source, community developed projects such as ESPHome and Home Assistant. At the same time, modern manufacturing techniques like desktop 3D printing and low-cost PCB fabrication mean your DIY doorbell doesn’t have to look like you made it yourself.

The project starts with a custom PCB that combines the ESP32, a camera module, a capacitive touch sensor, a relay to optionally trigger an electronic door lock, and a DC-DC converter that will let you power the device from a wide range of input voltages. The board even has a spot where you can solder on an additional 8 MB of external PSRAM for the ESP32, which will enable the chip to capture higher resolution video.

The electronics are housed in a minimalistic 3D printed enclosure that would fit right in alongside similar gadgets from the likes of Ring and Arlo; especially if you have access to a CNC and can cut the front panel out of acrylic. The lighted touch sensor looks phenomenal, and really gives the device a professional feel. That said, it doesn’t look like the case would last very long if exposed to harsh weather and there are some obvious physical security issues with this approach. But to be fair, we’ve seen the same problem with commercial hardware.

Naturally with a project like this, the hardware is only half of the story. It takes a considerable amount of software poking and prodding to get things like mobile device notifications working, and as a special added annoyance, the process is different depending on which MegaCorp produced the OS your gadget is running. [Sebastian] has documented the bulk of the process in the video after the break, but the finer points will likely need some adjustment depending on how you want to set things up.

This is an exceptionally impressive project for sure, but if the whole slick futuristic look isn’t your style, you could always opt to go with the DIY video door bell that looks like it came from an alternate reality version of 1986.

Continue reading “DIY ESP32 Video Doorbell Locks Out Big Brother”