Analog To Digital Converter (ADC): A True Understanding

Back in the day where the microprocessor was our standard building block, we tended to concentrate on computation and processing of data and not so much on I/O. Simply put there were a lot of things we had to get working just so we could then read the state of an I/O port or a counter.

Nowadays the microcontroller has taken care of most of the system level needs with the luxury of built in RAM memory and the ability to upload our code. That leaves us able to concentrate on the major role of a microcontroller: to interpret something about the environment, make decisions, and often output the result to energize a motor, LED, or some other twiddly bits.

Often the usefulness of a small microcontroller project depends on being able to interpret external signals in the form of voltage or less often, current. For example the output of a photocell, or a temperature sensor may use an analog voltage to indicate brightness or the temperature. Enter the Analog to Digital Converter (ADC) with the ability to convert an external signal to a processor readable value.

Continue reading “Analog To Digital Converter (ADC): A True Understanding”

Open Furby Opens The Furby

Remember Furby? The cute reactive robot was all the rage a few years ago, when the strange chattering creature was found under many a Christmas tree. Most Furbys have been sadly neglected since then, but the Open Furby project aims to give the toy a new lease of life, transforming it into an open source social robot platform.

We’ve featured a few Furby hacks before, such as the wonderful Furby Gurdy and the Internet connected Furby but the Open Furby project aims to create an open platform, rather than creating a specific hack. It works by replacing the brains of the Furby with a FLASH controller that runs the Robot Operating System (ROS), making the Furby much easier to program and control. They have also replaced the eyes with small OLED screens, which means it can do things like show a weather forecast, facebook notification, etc.

It is still in the early stages, but it looks like an interesting project. Personally, I am waiting for the evil Furby that wants to kill you and eat your flesh with that nasty beak…

Continue reading “Open Furby Opens The Furby”

Mostly Non-Volatile Memory With Supercapacitors

Back in the days of old, computers used EPROMs to store their most vital data – usually character maps and a BASIC interpreter. The nature of these EPROMs meant you could write to them easily enough, but erasing them meant putting them under an ultraviolet light. Times have changed and now we have EEPROMs, which can be erased electronically, and Flash, the latest and greatest technology that would by any other name be called an EEPROM. [Nicholas] wanted an alternative to these 27xx-series EPROMs, and found his answer in supercapacitors.

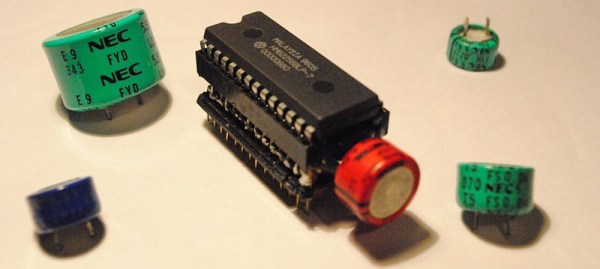
[Nick]’s creation is a mostly non-volatile memory built around an old 62256 32k SRAM. SRAM is completely unlike EPROMs or Flash, in that it requires power to keep all its bits in memory. Capacitor technology has improved dramatically since the 1980s, and by using a supercap and one of these RAM chips, [Nick] has created a substitute for a 27-series EPROM that keeps all its memory alive for days at a time.

The circuit requires a small bit of electronics tucked between the EPROM socket and the SRAM chip; just enough to turn the 12 Volts coming from the EPROM programming pin to the 5 Volts expected from the SRAM’s Write Enable pin. This is accomplished by a few LEDs in series, and a 0.1F 5.5V supercap which keeps the SRAM alive when the power is off.

As for why anyone would want to do this when modern technologies like Flash can be found, we can think of two reasons. For strange EPROM sizes, old SRAMs abound, but a suitable Flash chip in the right package (and the right voltage) might be very hard to find. Also, EEPROMs have a write lifetime; SRAMs can be written to an infinite number of times. It’s not the best solution in every case, but it is certainly interesting, and could be useful for more than a few vintage computing enthusiasts.

This project makes us think of another where an LED may have been supplying keep-alive power to some volatile memory.

Hackaday Links Column Banner

Hackaday Links: July 19, 2015

Everybody needs an external USB drive at some time or another. If you’re looking for something with the nerd cred you so desperately need, build a 5 1/4″ half height external drive. That’s a mod to an old Quantum Bigfoot drive, and also serves as a pretty good teardown video for this piece of old tech.

The Woxun KG-UV2D and KG-UV3D are pretty good radios, but a lot of amateur radio operators have found these little handheld radios eventually wear out. The faulty part is always a 24C64 Flash chip, and [Shane] is here to show you the repair.

Last year there was a hackathon to build a breast pump that doesn’t suck in both the literal and figurative sense. The winner of the hackathon created a compression-based pump that is completely different from the traditional suction-based mechanism. Now they’re ready for clinical trials, and that means money. A lot of money. For that, they’re turning to Kickstarter.

What you really need is head mounted controls for Battlefield 4. According to [outgoingbot] it’s a hacked Dualshock 4 controller taped to a bike helmet. The helmet-mounted controller has a few leads going to another Dualshock 4 controller with analog sticks. This video starts off by showing the setup.

[Jan] built a modeling MIDI synth around a tiny 8-pin ARM microcontroller.  Despite the low part count, it sounds pretty good. Now he’s turned his attention to the Arduino. This is a much harder programming problem, but it’s still possible to build a good synth with no DAC or PWM.

Injecting SD Card Bootloaders

[Frank] has a Ultimaker2 and wanted to install a new bootloader for the microcontroller without having physical access to the circuitry. That means installing a new bootloader for the ATMega2560 without an In System Programmer, and as is usual on AVRs, the bootloader can only be edited with an ISP. Additionally, modifying the bootloader in any way runs the risk of corruption and a bricked circuit. That’s okay, because [Frank] knows how to do it, and he’s here to show you how.

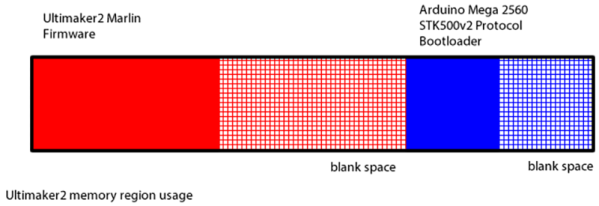
You can think of the memory layout of the ATMega in the Ultimaker as being split in half, with the printer firmware in the first half and the bootloader in the second half. There’s extra space in both halves, and that’s something that comes in very useful. When the circuit powers up, it jumps to the bootloader, does it’s thing, then jumps to the very beginning of the application code – a vector table – that starts up the actual firmware.

[Frank]’s trick to adding on to the bootloader is to place the SD card bootloader in the space normally reserved for applications, not where you would expect to find a bootloader. This code is accessed by the stock bootloader jumping into a modified vector table at the beginning of the application data that points to new executable code. That code is the actual SD card bootloader, but because it is in the application part of the memory, it can’t perform Flash writing or erasing. To fix that, a tiny bit of code is tacked onto the end of the bootloader for performing Flash writes and jumps back to the application part of memory.

Fixing Sega Cartridges With Old BIOS Chips

For one reason or another, [Dragao] has an old Sonic The Hedgehog cartridge that throws an illegal instruction somewhere in the Marble Zone stage. While the cause of this illegal instruction is probably cosmic rays, how to repair this cartridge isn’t quite as clear. It can be done, though, using BIOS chips from an old computer.

[Dragao] got the idea of repairing this cartridge from Game Boy flash carts. These cartridges use chips that are a simple parallel interface to the address and data lines of the Game Boy’s CPU, and Sega Genesis / Mega Drive flash cart would work the same way. The problem was finding old DIP flash chips that would work. He eventually found some 8-bit wide chips on the motherboard of an old computer, and by stacking the chips, he had a 16-bit wide Flash chip.

To program the chips, [Dragao] wired everything up to an Arduino Mega, put a ROM on the chip, and wired it up to the old Sega cartridge. Surprisingly or unsurprisingly, everything worked, and now [Dragao] has a fully functioning copy of Sonic The Hedgehog.

How Fast Is Your Flash?

What’s cooler than learning about timers and interrupts on AVRs? Well, if you’re like [Matt], you can use that learning experience to build something useful – in this case, a timer for various camera flashes.

There are two ways to measure the speed of a flash. The first is the lag between when a button is pressed and when the flash goes off. As long as this is consistent, everything’s okay. The second type of speed is the pulse width. When looking at a xenon flash as time vs. brightness, they have a large spike at the beginning followed by a significant amount of decay. LED flashes are pretty much one cycle of a square wave.

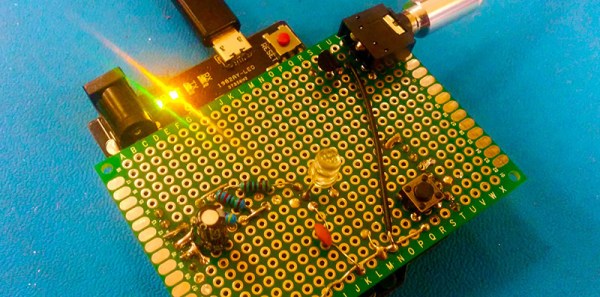
To measure both types of flash speed, [Matt] used a $0.50 photodiode an a 3.5mm jack that ties into the flash remote. These bits are wired up to an Arduino, a little bit of fun work with timers and interrupts happens, and [Matt] learns how fast his flash is.