Build A Super Cheap RC Trainer Plane With Foam

Once upon a time, RC planes were expensive models that took months to build and big money to equip with electronics. Since the 20th century though, powerful batteries have become cheap, as have servos and radio controllers. Combine them with a bit of old packing material and you can get a little RC trainer up and running for peanuts, as [Samm Sheperd] demonstrates.

[Samm] started referring to this as the “$5 trainer,” though he admits that it will cost more than that if you don’t have some bits and pieces laying around. He demonstrates how to cut cheap foamboard with a hot guitar string, and how to form it into a viable wing. That’s the most crucial part, with the fuselage and tail surfaces relatively simple by comparison. With that complete, it’s as simple as bolting on a motor, some servos, and control horns, and you’re up and running. You can even whip up a landing gear if you’re so inclined! Then, figure out your center of gravity, get it right, and then you’re pretty much ready to fly.

It’s a great primer on how to build a basic RC model, and if you do it right, it should have pretty forgiving handling, too. Plus, it’s so cheap that it should be easy to repair if you crash. Happy modelling! Video after the break.

Continue reading “Build A Super Cheap RC Trainer Plane With Foam”

Is This The World’s Smallest N-Scale Train Layout?

There’s just something about miniature worlds — they’re just so relaxing to look at and ponder. Think you don’t have ample room for a model train layout at your place? You may not be thinking small enough. [Peter Waldraff] knows a thing or two about hiding train layouts inside of furniture (that’s one solution), but this time, he’s built a track in plain sight that’s meant to sit on the bookshelf. The whole thing is just 5.5″ x 12″.

This N-scale layout was three years in the making, mostly because [Peter] was waiting for just the right little powered chassis to come along. For the layout, [Peter] started by creating custom flexible track by removing pieces with a sharp knife. He glued down the track to pink foam and used nails to hold it in place while the glue dried. He also built a wood frame around the base to stabilize it and hold some of the electronic components, including a switch made from an old ballpoint pen.

Then it was time to start decorating the thing, beginning with a couple of buildings made from more pink foam that are both lit up with LEDs. Eventually, [Peter] added a bunch of details like streetlights, animals, and garbage cans that really make the layout pop. As far as the engine goes, [Peter] picked up a Tomytec TM-TR02 on eBay and built a trolley out of two broken cars. [Peter]’s build is something you just have to see for yourself — fortunately for you, the build and demo video is after the break.

Like we said, [Peter]’s usual territory is hiding train layouts in end tables and coffee tables and the like, so it’s nice to see what he can do given different constraints.

Continue reading “Is This The World’s Smallest N-Scale Train Layout?”

Hackaday Links Column Banner

Hackaday Links: October 22, 2023

The second of three major solar eclipses in a mere six-year period swept across the United States last week. We managed to catch the first one back in 2017, and still have plans for the next one in April of 2024. But we gave this one a miss, mainly because it was “just” an annular eclipse, promising a less spectacular presentation than a total eclipse.

Looks like we were wrong about that, at least judging by photographs of last week’s “Ring of Fire” eclipse. NASA managed to catch a shot of the Moon’s shadow over the middle of the US from the Deep Space Climate Observer at Lagrange Point 1. The image, which shows both the compact central umbra of the shadow and the much larger penumbra, which covers almost the entire continent, is equal parts fascinating and terrifying. Ground-based photographers were very much in the action too, turning in some lovely shots of the eclipse. We particularly like this “one-in-a-million” shot of a jet airliner photobombing the developing eclipse. Shots like these make us feel like it was a mistake to skip the 10-hour drive to the path of annularity.

Continue reading “Hackaday Links: October 22, 2023”

Bridging The Gap Between Dissimilar Road Types With Foam

When you think of driving up or down an embankment, do you ever wonder how much foam you’re currently driving on? Probably not, because it hardly seems like a suitable building material. But as explained by [Practical Engineering] in the video below the break, using an expanded material to backfill an embankment isn’t as dense as it sounds.

In many different disciplines, mating dissimilar materials can be difficult: Stretchy to Firm; Soft to Hard; Light to Heavy. It’s that last one, Light to Heavy, that is a difficult match for roadways. A bridge may be set down in bedrock, but the embankments approaching it won’t be. The result? Over time, embankment settles lower than the bridge does, causing distress for cars and motorists alike. What’s the solution?

To mitigate this, engineers have started to employ less dirty materials to build their otherwise soil based embankments. Lightweight concrete is one solution, but another is Expanded Polystyrene (EPS) foam. Its light weight makes installation simple in anything but a strong breeze, and it’s inexpensive and durable. When used properly, it can last many years and provide a stable embankment that won’t settle as far or as quickly as one made of dirt. Because as it turns out, dirt is heavy. Who knew?

Aside from roadways and bespoke aircraft, EPS foam has also been used for making home insulation. What’s your favorite use for EPS foam? Let us know in the comments below.

Continue reading “Bridging The Gap Between Dissimilar Road Types With Foam”

Fixing A Hot Shop, With Science

We know that pretty much everybody in the Northern hemisphere has had a hellish summer, and there’s little room for sympathy when someone busts out with, “Oh yeah? You think THAT’s hot? Well, lemme tell you…” But you’ve got to pity someone who lives in north Texas and has a steel Quonset hut for a shop. That’s got to be just stupidly hot.

But stupid hot can be solved — or at least mitigated — with a little smarts, which is what [Wesley Treat] brought to bear with this cleverly designed shop door heat shield. When it pushes past 42°C — sorry, that sounds nowhere near as apocalyptic as 108°F — the south-facing roll-up door of his shop becomes a giant frying pan, radiating heat into his shop that the air conditioner has trouble handling. His idea was to block that radiant heat with a folding barrier, but to make sure it would be worth the effort, he mocked up a few potential designs and took measurements of the performance of each. His experiments showed him that a layer of extruded polystyrene (XPS) foam insulation covered with reflective Mylar did better than just the foam or Mylar alone.

The finished heat shield is an enormous tri-fold plywood beast that snugs up against the door when things get toasty in the shop. There’s a huge difference in temperature between the metal door and the inside surface of the shield, which will hopefully keep the shop more comfortable. We imagine that the air between the door and the shield will still heat up, and convection could still distribute all that hot air into the shop. But at least he’s giving the AC a fighting chance.

In addition to great shop tips like this and his custom storage bins, [Wesley] is a talented signmaker. He’s pretty funny too — or maybe that’s just the heat talking.

Continue reading “Fixing A Hot Shop, With Science”

Foam Cutter Moves Like A Hot Knife Through Butter

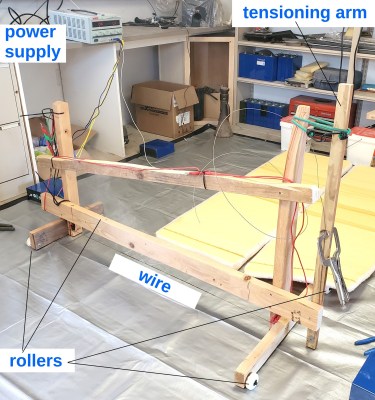
Make enough attempts to cut foam using whatever you’ve got — utility knife, hacksaw, serrated plastic knife — and you’ll wish hard for something that cuts cleaner, faster, and better. While there are all sorts of ways to build a hot wire foam cutter, this design from [jasonwinfieldnz] is both interesting and imitable.

If you don’t already know it, nichrome wire is nifty stuff that’s readily available in thrift store hair dryers and toasters. It stretches as it heats up, and shrinks as it cools back down.

The interesting part of this build is that instead of using a spring to keep tension on the nichrome wire, [jasonwinfieldnz] designed and 3D-printed a bow out of PLA that does the job elegantly. While [jason] was initially concerned that the bow might possibly melt, he found in practice that although the bow does get warm to the touch, it’s nowhere near hot enough to even warp.

One nice touch is the simple fence that rides along two slots and secures with wingnuts. We also like that [jason] made this foam cutter largely from scrap material, and rather than buy a spool of nichrome, he opted for a skinny heating element and pillaging the wire.

If you’re a nichrome noob, know that it doesn’t take much juice to do the job. Even though a computer power supply is what [jason] had lying around, it’s complete overkill, so you would definitely want to limit the current. Check out the build video after the break.

Still not portable enough for you? All you really need is a 18650, some nichrome, and a few bits and bobs to hold it all together.

Continue reading “Foam Cutter Moves Like A Hot Knife Through Butter”

Surprisingly Stomp-able Soft Switches

Competition sure brings out the brute in people, doesn’t it? So what do you do when you need a bunch of switches you can let people fist-pound or stomp on repeatedly without them taking damage? You could look to the guitar pedal industry and their tough latching switches, or you could simply build your own smash-resistant buttons as [wannabemadsci] has done.

The main thing about these switches is that they aren’t easily destroyed by shoes or angry fists. That’s because the shiny red push-me part of the button is made by cutting a foam ball in half.

Not easily crush-able Styrofoam, mind you — squishy, coated foam like an indoor football. This is mounted to the top of a sandwich made of hardboard and a couple pieces of easily-compressible foam from craft paintbrushes.

A brass washer is mounted to the middle of both pieces of hardboard, and these have wires soldered to them to read button presses. Then it’s just a matter of hooking it to a microcontroller like any other momentary.

There are all kinds of things you could cut in half for the top, like maybe tennis balls. Or, do what [Sprite_TM] did and use inverted plastic bowls.