Design And Testing Of The Form 2

Formlabs makes a pretty dang good SLA printer by all accounts. Though a bit premium in the pricing when compared to the more humble impact of FDM printers on the wallet, there’s a bit more to an SLA printer. The reasoning becomes a bit more obvious when reading through this two part series on the design and testing of the Form 2.

It was interesting to see what tests they thought were necessary to ensure the reliable operation of the machine. For example the beam profile of every single laser that goes into a printer is tested to have the correctly shaped spot. We also thought the Talcum powder test was pretty crazy. They left a printer inside a sandblast cabinet and blasted it with Talcum powder to see if dust ingress could cause the printer to fail; it didn’t.

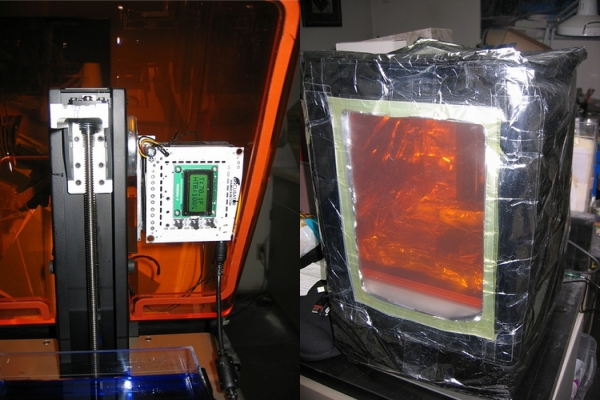
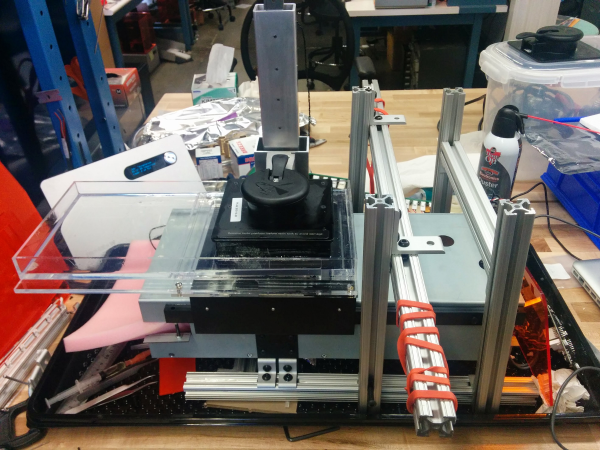
The prototyping section was a good read. Formlabs was praised early on for the professional appearance of their printers. It was interesting to see how they went from a sort of hacky looking monstrosity to the final look. They started by giving each engineer a Form 1 and telling them to modify it in whatever way they thought would produce a better layer separation mechanism. Once they settled on one they liked they figured out how much space they’d need to hold all the new mechanics and electronics. After that it was up to the industrial designer to come up with a look that worked.

They’re promising a third part of the series covering how the feedback from beta testing was directed back into the engineering process. All in all the Form 2 ended up being quite a good printer and the reviews have been positive. The resin from Formlab is a little expensive, but unlike others they still allow users to put the printer in open mode and use other resin if they’d like. It was cool to see their engineering process.

Formlabs Form 1+ API Now Available On Github

Since 2014, the Form 1+ has been serving a faithful community of avid resin-oriented 3D printer enthusiasts. With an API now released publicly on Github, it’s time for the Form 1+ to introduce itself to a crew of eager hardware hackers.

Exposing an interface to the printer opens the door to a world of possibilities. With the custom version of PreForm that arrives with this release, a whopping 39 different properties are open for tuning, according to the post on Reddit. Combining these newly-accessible parameters with a sufficient number of hackers, odds are good that the community will be able to quickly converge on stable settings for 3rd party resins. (We’re most excited to see the Homebrew PCBs community start exposing their UV-sensitive PCBs with this hardware setup.)

Heads-up: poking around in this brave new world is almost certain to void your warranty, but if you’re eager to get SpacewΛr up-and-running, it might just be worth it.

Extremely Thorough Formlabs Form 2 Teardown By Bunnie

[Bunnie Huang] recently had the opportunity to do a thorough teardown of the new Formlabs Form 2 printer. It’s a long read, so just head over there and immerse yourself in every detail. If you want the cliff notes, though, read this but still go look at all the pretty pictures.

First, it’s a major upgrade with pretty much every component. The CPU is a huge step up, the interface went from monochrome to full color touch screen, the connectivity has been upgraded with WiFi and Ethernet, the optics are much better and safer, the power supply is integrated, there are lots of little improvements that handle things like bed leveling, calibration, resin stirring, pausing jobs, and resin refilling during a print. Bunnie practically gushes at all the features and impressive engineering that went into the Form 2.

You can compare the teardown of the Form 2 to [Bunnie’s] teardown of the Form 1 printer back in 2013.

The Triumph Of Open Design And The Birth Of A FormLabs Aftermarket

Whilst designing hardware, it’s easy to shut the doors, close the blinds, and bury ourselves deeply into an after-hours design session. Although it’s tempting to fly solo, it’s likely that we’ll encounter bugs that others have handled, or perhaps we’ll realize that we forgot to add a handy feature that someone else could’ve noticed before we sent the darned PCB files out for fab. All that said, if we probe the community around us and ask for feedback, we can produce a project that’s far more functional and feature-complete in less time than if we were to design solo. Who knows? With enough eyes giving feedback on your project, maybe others will get excited enough to want one for themselves! [Andrew Werby] and [Zak Timan] on the FormLabs forums did just that: through months of iterative design and discussion on the FormLabs forums, they’ve created the first 3rd party glass resin tank that’s altogether sturdier, longer-lasting, more scratch-resistant, and less distorting than the original resin tank. And guess what? After months of trials through a few brave customers, you too can be the proud owner such a tank as they’re now up for sale on [Zak’s] website.
Continue reading “The Triumph Of Open Design And The Birth Of A FormLabs Aftermarket”

SpacewΛr Comes To Life From Bonus Formlabs Printer Parts

What might you do with a few extra stereolithographic 3D printer parts? Why not make a galvo display and resurrect a couple of classic vector graphic games of yore? That’s exactly what [Matt] did. With a few extra Formlabs components and a Haskell implementation of Spacewar, [Matt] can kick back and blast his extraterrestrial foes on the surface of his Formlabs cover.

[Matt’s] source code drives the Form 2 controller board to output laser graphics on the surface of a Form 1 case. These parts might be a commodity for this Formlabs Engineer, but the output is nothing short of spectacular, given the game and USB drivers were put together from scratch. In case you want to give the Haskell source code a try, [Matt’s] kindly included an alternative software-only display using OpenGL.

Unless you’ve just upgraded from Form 1 to Form 2, odds are pretty low that you can pull this one off without breaking either your printer or your wallet. Fortunately, [Alvaro] has paved the way with a stellar galvanometer display that began as a few parts from eBay. At last! Once our Formlab printer warranties expire, we’ll know where to start looking for parts for that mosquito killer we needed.

Continue reading “SpacewΛr Comes To Life From Bonus Formlabs Printer Parts”

3D Printed Plane Flies High

One of our avid readers, [Niklas Melton] loves RC planes. After getting into 3D printing, the next logical step was to start building is own planes… And now he’s done it!

He calls it the Air-Form 1 Micro RC plane, paying homage to the FormLabs resin printer he used. All of the parts except for the electronics were printed using a tough resin. It’s designed to take balsa wood wings into clips he designed into the parts. A 150mAh battery provides the power with a motor that exerts about 54g of thrust — not bad considering the entire thing only weighs 60g! Unfortunately he doesn’t have any video clips of it flying, though he assures us it does indeed fly — if you’re interested in building your own, he’s uploaded all the files to a page on Thingiverse.

As more advanced 3D printers come down in price, like the SLA technology, it becomes possible to design and 3D print even more complex parts. Some of the resins available have now some pretty amazing properties. One of our readers replaced a servo spline gear with one he printed — which works even better than the original!

Incubating Resin Prints Through The Chilly Months

FormLabs resins operate best between the comfortable temperature range of 18 – 28°C (64 – 82°F). For many of us experiencing the chillier weather these days, our garage workshops can easily drop below those temperatures and cause our prints to fail. Rather than hunker down for the freeze and wait for the world outside to defrost, [MarkStrohbehn] has discovered a budget heating technique that heats the print chamber from the inside instead.

This trick comes in two parts. First, to bring the temperature up, [Mark] installed an egg incubator inside the chamber using a powerful magnet attached to the fixture containing the lead screw. Next, to maintain the warm temperature, he’s taped together an insulating jacket composed of several layers of off-the-shelf mylar emergency blankets. Finally, he’s managed to slip the egg incubator power cable cleanly under the FormLabs lid without triggering the open-lid sensor. This hack is staggeringly simple but effective at reducing the odds of failed prints through the cold weather. Best of all, the modifications are far less invasive than other upgrades made to 3D printers, as it requires no modification of the Form1+. For those of us who haven’t seen the sun in a few months, rest assured that you can still churn out parts.