Retrotechtacular: Fundamentals Of AM And FM Radio Communication

How radios send and receive information can seem magical to the uninformed. For some people, this week’s Retrotechtacular video, “Frequency Modulation – Part 1 Basic Principles”, from the US Army Department of Defense 1964 will be a great refresher, and for others it will be their first introduction into the wonderful world of radio communications.

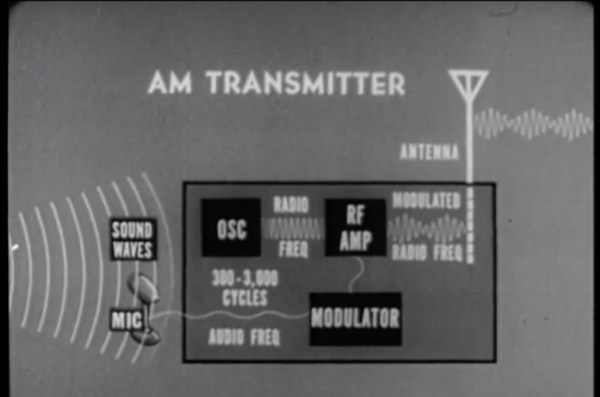
The stated objective is to teach why FM radio communication reduces interference which normally afflicts AM radio communications. Fundamentals of AM and FM is a better description, however, because the first part of the video nicely teaches the principles of AM and FM radio communications. It isn’t until later in the clip that it delves into interference, advantages of FM modulation, and detailed functioning of FM radio. The delivery is slow at times and admittedly long, yet the pace is perfect for a young ham to follow along with plenty of time to soak in the knowledge. If you’re still on the fence about becoming a ham here’s some words or encouragement.

Though the video isn’t aimed at ham radio users it does address core knowledge needed by amateur radio hobbyists. Amateur radio is full of many exciting communication technologies and you should have a clear understanding of AM and FM communication methodologies before getting on Grandpa’s information super highway. Once you have your ham license (aka ticket) you have privileges to create and test amazing ham related hacks, like [Lior] implementing full programmable control of a Baofeng UV5R ham radio using an Arduino.

Join us after the break to watch the video.

Continue reading “Retrotechtacular: Fundamentals Of AM And FM Radio Communication”

Visually Tune Your HF Antenna Using An Oscilloscope And Signal Generator

Lots of readers are into toying around with RF and ham radios. One thing that is always of concern is tuning the antenna. New equipment is never cheap, so whenever another option comes along that uses existing test gear it gets our attention. [Alan Wolke] aka [w2aew] covers a process he uses to tune his HF antenna using a signal generator and oscilloscope.

The process is more of a teaching aid than a practical replacement for commercial equipment mostly because proper signal generators and oscilloscopes are large items and sometimes not available or affordable. That said, if you do have such test gear you only need build a simple breakout board containing a form of wheatstone bridge where the unknown Rx is the antenna. Two oscilloscope probes are connected across the bridge balance nodes. Some special care needs to be taken matching probe cable length and 50 ohm input impedance to the oscilloscope. A couple of 1K probe coupling resistors are also needed to prevent affecting the impendence at the hookup points. Once the selected signal is injected you can adjust an antenna tuner until the two voltage waveforms match on the oscilloscope indicating your antenna network is tuned to 50 ohm impedance with no reactance.

Being able to tune your antenna visually can really help you understand what is going on in the turning process; matching not only input impedance but also phase shift indicating inductive or capacitive reactance. Join us after the break to see the video and for information on what’s presented in the second part of [Alan’s] presentation.

Continue reading “Visually Tune Your HF Antenna Using An Oscilloscope And Signal Generator”

Packing A Jeep Wrangler Full Of Hacks

Picking just one image to show off all of the hacks done on this Jeep Wrangler is a tough order. We decided to go with this custom ceiling console as it features the most work done in a confined area.

Give the video walk-around a bit of time before you decide it’s not for you. [Eddie Zarick] spends the first moments touting his “Oakley” branding of the vehicle in decals, emblems, embroidered seats, zipper pulls, and more. But after that you’ll get a look at the pressurized water system we previously saw. Pull open the back gate and there’s a nice cargo cover he built that includes a cubby hole which stores the soft sides when he wants to take the top off. There are several other interesting touches, like the police radar spoofer that he uses to scare the crap out of speeders. Ha!

The ceiling console we mentioned earlier was completely custom-built. It includes a CB, scanner, HAM, and seven-inch Android tablet. There is also a set of push buttons which control the various bells and whistles; well, spotlights and inverter actually. Just add a commode and he’s ready to live out of his car.

Continue reading “Packing A Jeep Wrangler Full Of Hacks”

Retrotechtacular: First Laser Transmitter Built 50 Years Ago

helium-neon-laser-transmitter

Most of the time we feature hokey film footage in our Retrotechtacular series, but we think this hack is as cool today as it was fifty years ago. [Clint] wrote in to tell us about Operation Red Line. It was an experiment performed May 3rd and 4th, 1963, which means the 50th anniversary just passed a few weeks ago. The hack involved sending data (audio in this case) over long distances using a laser. But back then you couldn’t just jump on eBay and order up the parts. The team had to hack together everything for themselves.

They built their own helium-neon laser tube, which is shown on the right. The gentlemen involved were engineers at a company called Electro-Optical System (EOS) by day, and Ham radio enthusiasts by night. With the blessing of their employer they were able to ply their hobby skills using the glass blowing and optical resources from their work to get the laser up and running. With that side of things taken care of they turned to the receiving end. Using a telescope and a photomultipler they were able to pick up the beam of light at a distance of about 119 miles. The pinnacle of their achievement was modulating audio on the transmitter, and demodulating it with the receiver.

[Clint] knows the guys who did this and wrote up a look back at the project on his own blog.

Hammond Organ Sends Messages Which Can Be Decoded By A Spectrogram

hammond-organ-encodes-messages-spectrogram

Here’s an interesting use for an old organ. Let it get in on your Ham radio action. [Forrest Cook]  is showing off his project which uses a Hammond Organ to encode messages which can be displayed by a Spectrogram. We’ve seen this type of message encoding before (just not involving a musical instrument). It’s rather popular with Hams in the form of the fldigi program.

An Arduino was connected to the organ via a UNL2003 darlington array chip. This chip is driving some reed relays which make the organ connections to create the sine wave tones. With that hardware in place it’s a matter of formatting data to generate the target audio. [Forrest] wrote his own Arduino sketch which takes characters from the serial port (pushed over USB by the laptop), maps then to a stored 5×7 character font set, then drives the pins to produce the tones. As you can see in the clip after the break the resulting audio can be turned into quite readable text.

Continue reading “Hammond Organ Sends Messages Which Can Be Decoded By A Spectrogram”

WSPR Transmitter Shows True Value Of Raspberry Pi For Hacking

wspr

Don’t get us wrong, we love our Raspberry Pi. But if you’re merely running a Linux image without adding a hardware hack into the mix you’re missing out on part of the power for which the platform was developed. This project is a great example of how to embrace the Raspberry Pi’s ability to deliver both low-level hardware access, and solid embedded Linux performance. [Dan Ankers] and [Threeme3] have developed a program which turns the RPi in to a WSPR transmitter. The GitHub readme shares many of the details on how it was done. But you’ll also want to dig through the .c file to see how they’re making use of the GPIO header pins.

[William Meara] sent in the tip for this. He’s been featured on Hackaday previously for his work with WSPR (Weak Signal Propagation Report). It’s an amateur radio protocol which lets you communicate over very long distances using relatively weak transmitters. The trick is to use computing power to find the signal hidden in all the noise. Be warned that you do need a HAM license to try this out, but otherwise all you need to connect to the board is a low-pass filter and an antennae.

[via SolderSmoke]

[Photo credit: WSPR hompage]

Hacking A Ham Radio

For Christmas, [Lior] received a Baofeng UV5R radio. He didn’t have an amateur radio license, so he decided to use it as a police scanner. Since the schematics were available, he cracked it open and hacked it.

This $40 radio communicates on the 136-174 MHz and 400-480 MHz bands. It uses a one-time programmable microcontroller and the RDA1846 transceiver. With the power traces to the MCU cut, [Lior] was able to send his own signals to the chip over I2C using an Arduino. He also recorded the signals sent by the stock microcontroller during startup, so that he could emulate it with the Arduino.

Once communication was working on an Arduino, [Lior] decided to get rid of the stock microcontroller. He desoldered the chip, leaving exposed pads to solder wires to. Hooking these up to the Arduino gave him a programmable way to control the device. He got his radio license and implemented transmission of Morse Code, and an Arduino sketch is available in the write up.

[Lior] points out that his next step is to make a PCB to connect a different microcontroller to the device. This will give him a $40 radio that is fully programmable. After the break, check out a video of the hacked radio in action.

Continue reading “Hacking A Ham Radio”