Robot arm is Soft

Soft And Squishy Silicone Robotics

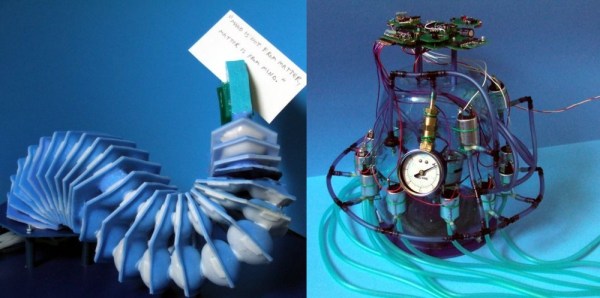
This robot arm and gripper is made almost entirely out of silicone. Casting the parts by hand, [Mike] assembled this working, remote controlled robot arm gripper.

We’ll let that sink in for a minute. He turned an oversized tooth-paste tube of silicone caulking… into a pneumatic robotic arm. Holy cow. We’ve seen lots of soft robotics before, but this is some really cool stuff!

You see, [Mike] is actually planning on building an inexpensive prosthetic robot hand using this technology. This was merely a test to see how well he could make silicone based air muscles — we’d say it was pretty successful! Each silicone disk in this robotic appendage has four sealed pockets inside of it. When air flows in through them, they inflate, causing the entire appendage to stretch on one side. With four of these, and varying amounts of pressure, it’s possible to move the appendage in any direction!

Continue reading “Soft And Squishy Silicone Robotics”

TeaSteeper

Automated Tea Maker

[Pariprohus] wanted to make an interesting gift for his girlfriend. Knowing how daunting it can be to make your own tea, he decided to build a little robot to help out. His automated tea maker is quite simple, but effective.

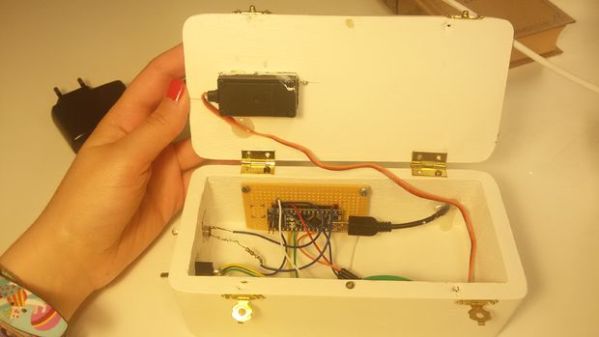
The device runs off of an Arduino Nano. The Nano is hooked up to a servo, a piezo speaker, an LED, and a switch. When the switch is turned to the off position, the servo rotates into the “folded” position. This moves the steeping arm into a position that makes the device easier to store and transport.

When the device is turned on to the “ready” position, the arm will extend outward and stay still. This gives you time to attach the tea bag to the arm and place the mug of hot water underneath. Finally the switch can be placed into “brew” mode. In this mode, the bag is lowered into the hot water and held for approximately five minutes. Each minute the bag is raised and lowered to stir the water around.

Once the cycle completes, the Nano plays a musical tune from the piezo speaker to remind you to drink your freshly made tea. All of the parameters including the music can be modified in the Nano’s source code. All of the components are housed in a small wooden box painted white. Check out the video below to see it in action. Continue reading “Automated Tea Maker”

LED necklace

IBling Is An LED Display Necklace

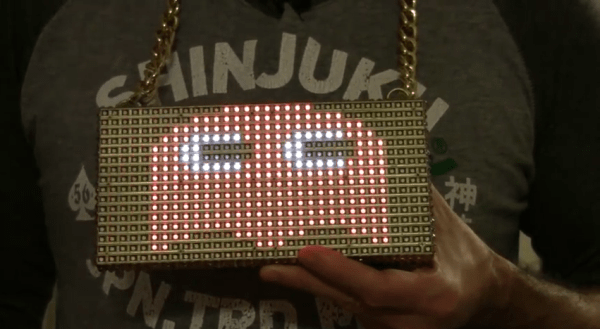
Are you tired of being ignored? Do you want a fashion accessory that says, “Pay attention to me!” If so, you should check out [Al’s] recent instructable. He’s built himself a necklace that includes a display made up of 512 individual LEDs.

This project was built from mostly off-the-shelf components, making it an easy beginner project. The LED display is actually a product that you can purchase for just $25. It includes 512 LEDs aligned in a 16 x 32 grid. The module is easily controlled with a Pixel maker’s kit. This board comes with built-in functionality to control one of these LED modules and can accept input from a variety of sources including Android or PC. The unit is powered from a 2000 mAH LiPo battery.

[Al] had to re-flash the firmware of the Pixel to set it to a low power mode. This mode allows him to get about seven hours of battery life with the 2000 mAH battery. Once the hardware was tested and confirmed to work correctly, [Al] had to pretty things up a bit. Some metallic gold spray paint and rhinestones transformed the project’s cyberpunk look into something you might see in a hip hop video, or at least maybe a Weird Al hip hop video.

The Pixel comes with several Android apps to control the display via Bluetooth. [Al] can choose one of several modes. The first mode allows for pushing animated gif’s to the display. Another will allow the user to specify text to scroll on the display. The user can even specify the text using voice recognition. The final mode allows the user to specify a twitter search string. The phone will push any new tweets matching the terms to the display as scrolling text.

Attiny PWM Generator And Servo Tester

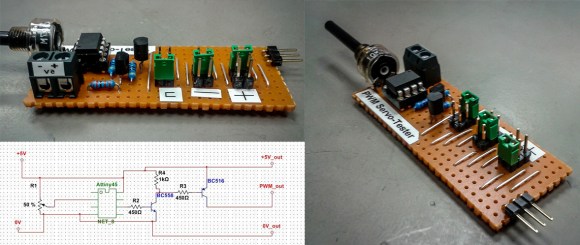
PWM-Servo-Tester

Having the right tool for the job makes all the difference, especially for the types of projects we feature here at Hackaday. [Jana Marie] must agree with this sentiment, one of her latest projects involves building a tool to generate a PWM signal and test servos using an Attiny25/45/85.

Tools come in all kinds of different shapes and sizes. Even if it might not be as widely used as [Jana’s] earlier work that combines an oscilloscope and signal generator, having a tool that you can rely upon to test servos and generate a PWM can be very useful. This well written Instructable provides all the details you need to build your own, including the schematic and the necessary code (available on GitHub). The final PWM generator looks great. For simple projects, sometimes a protoboard is all you need. It would be very cool to see a custom PCB made for this project in the future.

What tools have you build recently? Indeed, there is a tool for every problem. Think outside the (tool) box and let us know what you have made!

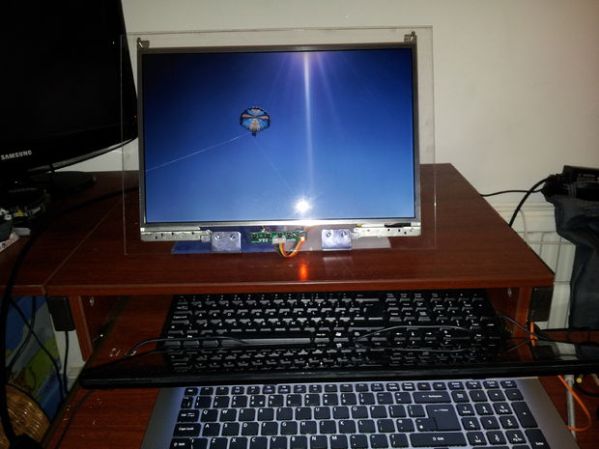
Turning A Broken Laptop’s LCD Into A Fancy Monitor

Seems like you can find broken laptops everywhere these days — so why not do something with them? [Damutsch] shows us how to make a rather cool looking monitor from a laptop’s LCD display.

First, you’ll need to salvage a working LCD from a dead laptop. Once you have the panel out you can identify the serial key and order a controller board off eBay, which will allow you to plug a normal video input such as VGA or HDMI into the panel. We browsed around a bit and it looks like you can get driver boards from around $15-$30, so not too bad price-wise. It wasn’t so long ago that salvaged LCD panels were basically unusable because of a lack of these driver boards. Continue reading “Turning A Broken Laptop’s LCD Into A Fancy Monitor”

Raspberry Pi Wall Calendar

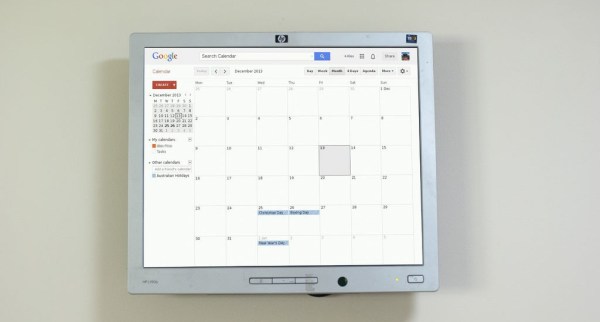
Do you let Google know every aspect of your personal and social life? Do you have a spare LCD monitor kicking around? Why not make your own Raspberry Pi Wall Calendar?

[Alex] recently bought his first home (congratulations!), which happened to have a TV wall mount in the kitchen. Personally, we don’t think TVs belong in the kitchen, and neither did [Alex]. Not wanting to tear the mount out of the wall (and thus require home renovations too soon), he devised a clever solution: why not make a digital calendar?

[Alex] connected a Raspberry Pi model B to the LCD monitor, which provides convenient access to his Google Calendar. His Instructable is both meticulous and approachable, so novice hackers should have no trouble replicating this build. The only improvement we can think to suggest is substituting a touchscreen LCD, which would allow him to interact with the schedule.

Whether you “let” Google know about your life— or it just knows—this is certainly a handy hack for the 21st century home!

Umbrella Turned Delta Kite

How many broken umbrellas have you thrown out in your life? [BigApe] has come up with a novel way to reuse them, by turning them into kites.

The beauty of the build is in the MacGyver-style material list. Apart from a few store bought 8mm aluminum and plastic tubes, the majority of the build is out of other scraps that you can easily find around the house. Spokes from a broken bicycle wheel, plastic from a CD case, elastic bands, yarn, some washers, an empty hair gel tube, the list goes on… We really have to give him credit on the creative material choices!

Now before you get too excited, this project does involve quite a bit of sewing, so a sewing machine would be quite handy. Other than that, only basic tools such as pliers, scissors, punches, matches, drill bits, and a saw, are required.

The finished product ends up being a bit heavier than most similar sized consumer-grade delta kites, but [BigApe] achieved some kite-like flight out of it in low wind speeds. He promises to post a test video when it gets a bit windier to prove his design.

On the topic of kites, earlier this year we covered a remote-controlled, autonomous, power generating kite!