If there’s one thing that never seems to suffer from supply chain problems, it’s litter. It’s everywhere, easy to spot and — you’d think — pick up. Sadly, most of us seem to treat litter as somebody else’s problem, but with something like this machine vision litter mapper, you can at least be part of the solution.
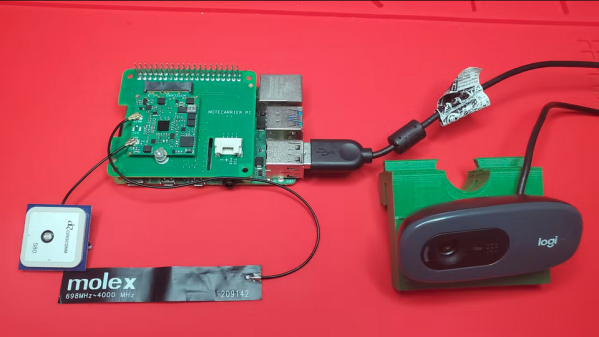
For the civic-minded [Nathaniel Felleke], the litter problem in his native San Diego was getting to be too much. He reasoned that a map of where the trash is located could help municipal crews with cleanup, so he set about building a system to search for trash automatically. Using Edge Impulse and a collection of roadside images captured from a variety of sources, he built a model for recognizing trash. To find the garbage, a webcam with a car window mount captures images while driving, and a Raspberry Pi 4 runs the model and looks for garbage. When roadside litter is found, the Pi uses a Blues Wireless Notecard to send the GPS location of the rubbish to a cloud database via its cellular modem.
Cruising around the streets of San Diego, [Nathaniel]’s system builds up a database of garbage hotspots. From there, it’s pretty straightforward to pull the data and overlay it on Google Maps to create a heatmap of where the garbage lies. The video below shows his system in action.
Yes, driving around a personal vehicle specifically to spot litter is just adding more waste to the mix, but you’d imagine putting something like this on municipal vehicles that are already driving around cities anyway. Either way, we picked up some neat tips, especially those wireless IoT cards. We’ve seen them used before, but [Nathaniel]’s project gives us a path forward on some ideas we’ve had kicking around for a while.
Continue reading “Machine Learning Does Its Civic Duty By Spotting Roadside Litter”


 Instantly, the Insteon subreddit has livened up. People, rightfully angry about being literally left in the dark, were looking for answers – as if mocking them, Insteon’s homepage claimed that all services were operational. Others, having expected the shutdown to eventually happen, started


