Reviewing The World’s 2nd Smallest Thermal Camera

A thermal camera is a very handy tool to have, and [Learn Electronics Repair] wanted to try out the Thermal Master P2 for electronic repair, especially since it claims to have a 15 X digital zoom and 1.5 degree accuracy. The package proudly states the device is the “World 2nd Smallest Thermal Camera” — when only the second best will do.

The camera is tiny and connects to a PC or directly to a tablet or phone via USB C. However, it did look easier to use on the end of a cable for probing things like a PC motherboard. The focus was fairly long, so you couldn’t get extremely close to components with the camera. The zoom somewhat makes up for that, but of course, as you might expect, zooming in doesn’t give you any additional resolution.

He also compares the output with that of a multimeter he uses that includes an IR camera (added to our holiday gift list). That multimeter/camera combo focuses quite closely, which is handy when picking out a specific component. It also has a macro lens, which can zoom up even more.

We’ve looked at — or, more accurately, through — IR cameras in the past. If you are on a tight budget and you have a 3D printer, you might try this method for thermal imaging, but it doesn’t use the printer the way you probably think.

Continue reading “Reviewing The World’s 2nd Smallest Thermal Camera”

World’s Cheapest And Possibly Worst IR Camera

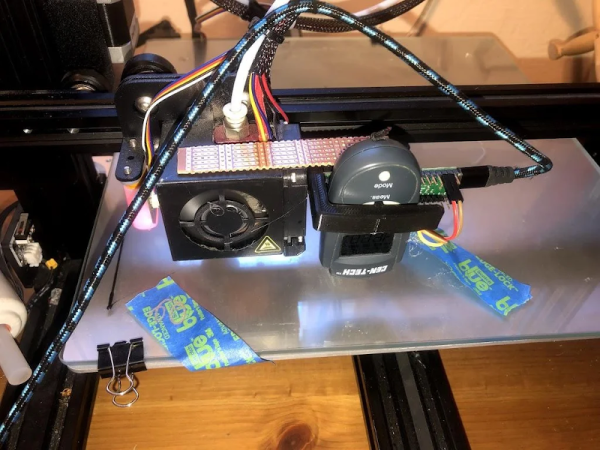
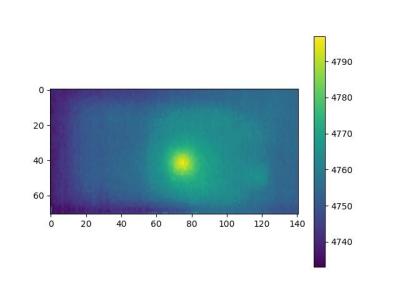
Don’t blame us for the title. [CCrome] admits it may well be the cheapest and worst IR camera available. The concept is surprisingly simple. Mount a cheap Harbor Freight non-contact thermometer on a 3D printer carriage and use it to scan the target. The design files are available on GitHub.

There is, of course, an Arduino to grab the data and send it to the PC. Some Python code takes care of converting it into an image.

Perhaps you don’t need a camera, but having a way to communicate with an $11 IR temperature sensor might come in handy someday. You do have to mash the measurement button down, so [CCrome] used the 3D printer to make a clamp for the button that also holds the POGO pins to the PCB. We would have been tempted to solder across the switch and also solder the wires to the pad. But, then again, you need a 3D printer for the project anyway.

Don’t expect the results you would get from a real thermal sensor. If you want that, you may have to build it yourself or open your wallet wide. If you need some inspiration for a use case, look at the thermal camera contest from a few years back.

See In The Dark, The Simple Way

Night vision googles used to be the exclusive preserve of the military, and then of the well-heeled. Image intensifier tubes were very expensive, and needed high-voltage power supplies to keep them going. Now that we have solid-state infra-red cameras the task of seeing in the dark had become much simpler, and [Alex Zidros] is here to show us just how easy that can be. His night vision goggles take a selection of off-the-shelf parts and a little bit of 3D printing to produce a complete set-up for a fraction of the cost of those night-vision goggles of old.

At its heart is a little NTSC/PAL LCD display in a 3D printed bracket. These used to be a small display of choice, but we see them rarely now because standalone displays and the microcontrollers to drive them have become so much more useful. Driving the display is a video camera with its IR filter removed, and providing illumination is an IR flashlight. In effect it’s a classic analogue CCTV system in miniature, but the most important thing is that it works.

We might have expected a Raspberry Pi Zero and NoIR camera, but it’s difficult to argue with a functioning night vision system. If you want to look at a project with an image intensifier tube though, we’ve covered one of those in the past.

Workbench Fume Extractor Sucks, But Has A Charming Personality

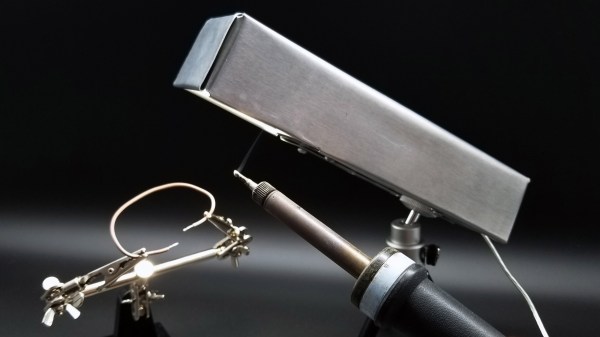
Shop safety is important regardless of what kind of work you do. For those of us soldering, that means extracting the noxious fumes released by heating up the solder flux used in our projects. [yesnoio] brings to us his own spin on the idea of a fume extractor, and it pulls out all stops with bells and whistles to spare.

The Workbench Assistant bot, as [yesnoio] describes it, is an integrated unit mounted atop a small tripod which extends over the working area where you’re soldering. Inside the enclosure are RGBW lights, an IR camera, and an Adafruit ItsyBitsy M4 Express driving the whole show. Aside from just shining a light onto your soldering iron though, the camera senses thermal activity from it to decide when to ramp up the server-grade fan inside which powers the whole fume extraction part of the project.

But the fun doesn’t stop there, as [yesnoio] decided to go for extra style points. The bot also comes with an amplified speaker, playing soundbites whenever actions such as starting or stopping the fan are performed. These soundbites are variations on a theme, like classic Futurama quotes or R2-D2’s chattering from Star Wars. The selectable themes are dubbed “performers”, and they can be reprogrammed easily using CircuitPython. This is a neat way to give your little desktop assistant some personality, and a fun way to break up the monotony of soldering up all those tiny SMD components on your next prototype.

If even after all this you still need more than just a cute little robotic voice beeping at you to convince you to get a fume extractor for your bench, then maybe some hands-on results could give you that little push you need. And if you’re already convinced and want to build your own, there is no shortage of DIY solutions we’ve seen around here at Hackaday. Check out this one in action after the break!

Continue reading “Workbench Fume Extractor Sucks, But Has A Charming Personality”

Making A Birthday Party Magical With Smart Wands

Visitors to the Wizarding World of Harry Potter at Universal Studios are able to cast “spells” by waving special interactive wands in the air. Hackers like us understand that there must be some unknown machinations happening behind the scenes to detect how the wands are moving, but for the kids wielding them, it might as well be real magic. So when his son asked to have a Harry Potter themed birthday party, [Adam Thole] decided to try recreating the system used at Universal Studios in his own home.

Components used in the IR streaming camera

The basic idea is that each wand has a reflector in the tip, which coupled with strong IR illumination makes them glow on camera. This allows for easy gesture recognition using computer vision techniques, all without any active components in the wand itself.

[Adam] notes that you can actually buy the official interactive wands from the Universal Studios online store, and they’d even work with his system, but at $50 USD each they were too expensive to distribute to the guests at the birthday party. His solution was to simply 3D print the wands and put a bit of white prismatic reflective tape on the ends.

With the wands out of the way, he turned his attention to the IR imaging side of the system. His final design is a very impressive 3D printed unit which includes four IR illuminators, a Raspberry Pi Zero with the NoIR camera module. [Adam] notes that his software setup specifically locks the camera at 41 FPS, as that triggers it to use a reduced field of view by essentially “zooming in” on the image. If you don’t request a FPS higher than 40, the camera will deliver a wider image which didn’t have any advantage in this particular project.

The last part of the project was taking the video stream from his IR camera and processing it to detect the bright glow of a wand’s tip. For each frame of the video the background is first removed and then any remaining pixel that doesn’t exceed a set brightness level if ignored. The end result is an isolated point of light representing the tip of the wand, which can be fed into Open CV’s optical flow function to show [Adam] what shape the user was trying to make. From there, his software just needs to match the shape with one of the stock “spells”, and execute the appropriate function (such as changing the color of the lights in the room) with Home Assistant.

Overall, it’s an exceptionally well designed system considering the goal was simply to entertain a group of children for a few hours. We almost feel bad for the other parents in the neighborhood; it’s going to take more than a piñata to impress these kids after [Adam] had them conjuring the Dark Arts at his son’s party.

It turns out there’s considerable overlap between hacker types and those who would like to have magic powers (go figure). [Jennifer Wang] presented her IMU-based magic wand research at the 2018 Hackaday Superconference, and in the past we’ve even seen other wand controlled light systems. If you go all the way back to 2009, we even saw some Disney-funded research into interactive wand attractions for their parks, which seems particularly prescient today.

Continue reading “Making A Birthday Party Magical With Smart Wands”

Nintendo Switch Gets Making With Labo

Over the years, Nintendo has had little trouble printing money with their various gaming systems. While they’ve had the odd misstep here and there since the original Nintendo Entertainment System was released in 1983, overall business has been good. But even for the company that essentially brought home video games to the mainstream, this last year has been pretty huge. The release of the Nintendo Switch has rocketed the Japanese gaming giant back into the limelight in a way they haven’t enjoyed in a number of years, and now they’re looking to keep that momentum going into 2018 with a killer new gaming accessory: a cardboard box.

Some of the contraptions feature surprisingly complex internal mechanisms.

Well, it doesn’t have to be a box, necessarily. But no matter which way you fold it, it’s definitely a piece of cardboard. Maybe a few bits of string here and there. This is the world of “Nintendo Labo”, a recently announced program which promises to let Switch owners create physical objects which they can interact with via specially designed software for the console.

The Labo creations demonstrated in the bombastic announcement video make clever use of the very unique Switch hardware. The removable Joy-Con controllers are generally still used as input devices, albeit in less traditional ways. Twisting and tilting the cardboard creations, which take varied forms such as a fishing rod or motorcycle handlebars, relays input to the appropriate game thanks to the accelerometers and gyroscopes they contain.

Many of the more complex contraptions rely on a less-known feature of the controller: the IR depth camera. By pointing the controller’s camera inside of the devices, the motion of internal components, likely helped along by IR-reflective tape, can be tracked in three dimensions. In the video, the internal construction of some of the devices looks downright intimidating.

Which leads into the natural question: “Who exactly is this for?”

Clearly some of the gadgets, not to mention the folded cardboard construction, are aimed at children, an age group Nintendo has never been ashamed to appeal to. But some of the more advanced devices and overall concept seems like it would play better with creative teens and adults looking to push the Switch in new directions.

Will users be empowered to create their own hardware, and by extension, associated software? Will hackers and makers be able to 3D print new input devices for the Switch using this platform? This is definitely something we’ll be keeping a close eye on as it gets closer to release in April.

The popularity of the Switch has already given rise to a surprising amount of hacking given how new the console is. It will be interesting to see if the introduction of Labo has any effect on the impressive work already being done to bend the console to the owner’s will.

Continue reading “Nintendo Switch Gets Making With Labo”

DIY Grid Eye IR Camera

Tindie is a great place to find uncommon electronic components or weird/interesting boards. [Xose Pérez] periodically “stroll the isles” of Tindie to keep up on cool new components, and when he saw Panasonic’s Grid_EYE AMG88 infrared sensor, [Xose] knew that he had to build something with it. The awesome find is an 8×8 IR array sensor on a breakout board… the hack is all in what you do with it.

Already taken by “LED fever,” [Xose’s] mind immediately fixated on an 8×8 IR array with an 8×8 LED matrix display. With a vision, [Xose] threw together an IR sensor matrix, a LED matrix, a small microcontroller, a Li-Ion battery, a charger, and a step-up to power the LEDs. What did he end up with? A bulky but nice camera that looks fantastic.

While commercially available IR Cameras have thousands of pixels and can overlay a normal image over an IR image among other fancy stuff, they are sometimes prohibitively expensive and, to quote [Xose], “waaaaaay less fun to build”. Like any engineer, [Xose] still has ideas for how to improve his open source camera. From more color patterns to real time recording, [Xose] is only limited by the memory of his microcontroller.

Moreover, [Xose’s] camera is inspired by the Pibow cases made by Pimoroni and this is only one project in a series that uses a stack of laser cut pieces of MDF and acrylic for the project enclosure. What’s not to love: short fabrication times and a stunning result. Want more project enclosures? We’ve got plenty.