The Operator Input Device in a Minuteman II Missile Silo computer

Nuclear Missile Silo Keyboard Re-Launched In USB

When [jns] and their colleague came across an industrial or possibly military grade keyboard/trackball combo on eBay, their minds did the same backflips that yours or mine might. Enthralled by the specialty key caps, the custom layout, and companion trackball adorned with its own keys rather than buttons [jns] and his workmate they did the only thing that infatuated hackers can do: They each bought one! [jns]’s goal? Make it work via USB.  Everything’s been documented in both software and in a very well done video that you can see below the break.

The OID in its natural habitat, a Minuteman Missile installation
The OID its its natural habitat, a Minuteman III installation (U.S. Air Force photo)

After doing some digging, they found that the keyboard and trackball combination was used in Minuteman III nuclear missile silos beginning in the early 1990’s, when the REACT program replaced aging cold war era computers and communications systems with simpler, more flexible systems.

Since the eBay auction came with only the keyboard and trackball, and not the entire Minuteman III outfit, using the new keyboard in its native habitat and wielding nuclear launch capabilities was right out the door. Instead, [jns] focused on reverse engineering the keyboard and trackball, collectively known as the OID (Operator Input Device) for use via USB.

In the video, [jns] goes into more detail about the discovery of reed switched keys, the RS422 protocol being used, blowing up an Arduino Pro Micro, and even repairing the aging trackball. Success was had, and he’s graciously shared the software and hardware design with the world.

If industrial and military grade control hardware gets your hacker juices flowing, you’ll not want to miss that time we covered a control console from a nuclear power plant for sale. Have you been working on any tantalizing, weird, obscure keyboards or equipment with far too many buttons and blinkenlights for your own good? Be sure to let us know about it via the Tip Line!

Continue reading “Nuclear Missile Silo Keyboard Re-Launched In USB”

N-Gage Controller Uses All The Buttons

If there’s anything you can guarantee about a video game system, it’s that in 20 years after one suffers a commercial failure there will be a tiny yet rabid group of enthusiasts obsessed with that system. It’s true for the Virtual Boy, the Atari Jaguar, and of course, the Nokia N-Gage. For those not familiar, this was a quirky competitor of the Game Boy Advance that was also a cell phone. And for that reason it had more buttons than a four-player arcade cabinet, which has led to things like this custom controller.

Most N-Gage gaming these days takes place on emulators, this build is specifically built for the emulator experience. The original system had so many buttons that it’s difficult to get even a standard 102-key keyboard mapped comfortably to it, so something custom is almost necessary. [Lvaneede], the creator of this project, took some parts from an existing arcade cabinet he had and 3D printed the case in order to craft this custom controller. The buttons he chose are a little stiff for his liking, but it’s much better than using a keyboard.

In the video below, [Lvaneede] demonstrates it with a few of the N-Gage’s games. It seems to hold up pretty well. With backing from Sony and Sega, it’s a shame that these gaming platforms weren’t a bigger hit than they were, but there are plenty of people around with original hardware who are still patching and repairing them so they can still play some of these unique games.

Thanks to [Michael] for the tip!

Continue reading “N-Gage Controller Uses All The Buttons”

Slick Keyboard Built With PCB Magic

Sometimes a chance conversation leads you to discover something cool you’ve not seen before, and before you know it, you’re ordering parts for yet another hardware build. That’s what happened to this scribe the other day when chatting on some random discord, to QMK maintainer [Nick Brassel aka tzarc] about Djinn, a gorgeous 64-key split mechanical keyboard testbed. It’s a testbed because it uses the newest STM32G4x microcontroller family, and QMK currently does not have support for this in the mainline release. For the time being, [Nick] maintains a custom release, until it gets merged.

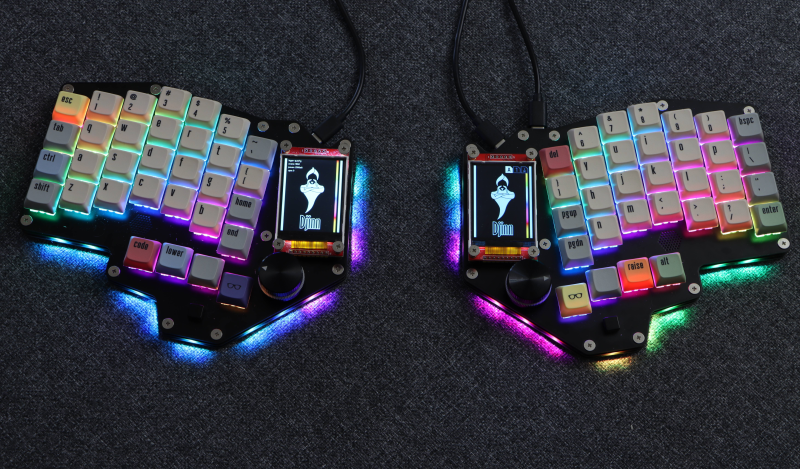
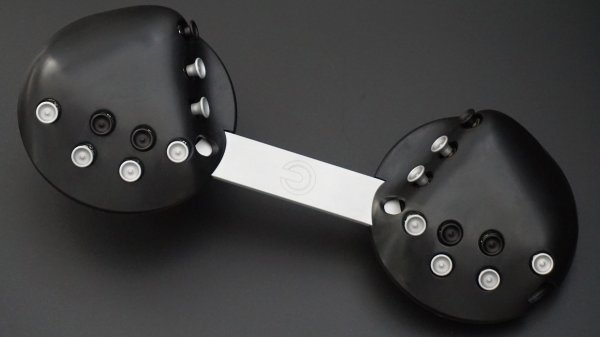
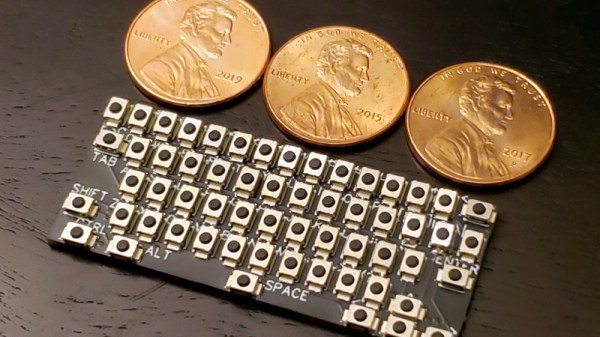
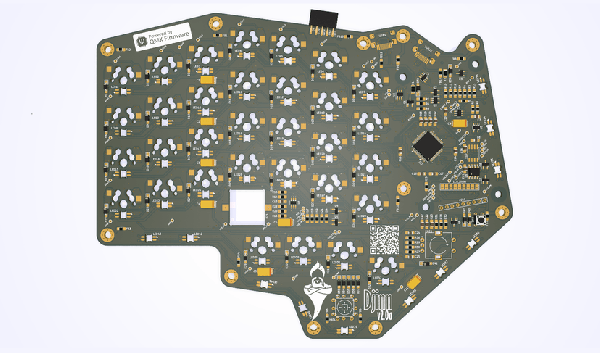
Hardware-wise, the design is fabulous, with a lot of attention to detail. We have individual per-key RGB LEDs, RGB underglow, a rotary encoder, a five-way tactile thumb switch, and a 240×320 LCD per half. The keyboard is based on a three PCB stack, two of which are there purely for structure. This slick design has enough features to keep a fair few of us happy.

Interestingly, when you look at the design files (KiCAD, naturally) [Nick] has chosen to take a mirrored approach to the PCB. That means the left and right sides are actually the same PCB layout. The components are populated on different sides of the PCB depending on which half you’re looking at! By mirroring footprints on both PCB sides, and hooking everything up in parallel, it’s possible to do it all with a single master layout.

This is a simple but genius idea that this scribe hadn’t come across before (the shame!) Secondarily it keeps costs down, as your typical Chinese prototyping house will not deal in PCB quantities below five, so you can make two complete keyboards on one order, rather than needing two orders to make five. (Yes, there are actually three unique PCBs, but we’re simplifying the situation, ok?)

Now, if only this pesky electronics shortage could abate a bit, and we could get the parts to build this beauty!

Obviously, we’ve covered many, many keyboards over the years. Here’s our own [Kristina’s] column all about the things. If you need a little help with your typing skills, this shocking example may be the one for you. If your taste is proper old-school clackers, there’s something for everyone.

A monoblock split keyboard with the all-important num pad.

Back-to-the-Office Ergo Brings A Bit Of Home Sweet Home

We sure do love a good one-piece split keyboard, and it’s not just because you never have to worry about the halves drifting too far apart throughout the day, though that’s a big plus. For one thing, the angles are always just right without having to mess with anything, so muscle memory gets you back to the home row every time. Usually, the only thing missing from these mono-block splits is the num pad. Well, not on the SuperLyra.

This is [Malevolti]’s back-to-the-office build, and it’s sure to start a few conversations. While we don’t have a lot of details, there will be plenty forthcoming on the Black Cat Plasticworks website. As soon as next year, [Malevolti] plans to sell fully-assembled SuperLyras, kits, and bare-bones PCBs. We really appreciate that it allows for either MX-type switches or Chocs, depending on the hot swap sockets installed.

As much as we love the Maltron-esque num pad in the middle, we imagine that it would be more comfortable to use if it were canted at 45° angle relative to the user’s dominant hand. Fortunately, some enterprising redditor had the same idea. They’ve already mocked this up in Photoshop and are inviting comments on another thread.

Want to go split, but don’t know which is right for you? Check out this Split Keyboard Finder.

A Hackable Keyboard That Even Has Screens

There are a huge number of available keyboards out in the world these days, catering to all of the plainest and the most advanced desires. However, if you want something that’s just right, sometimes it pays to build your own. [Zach] did just that.

One of the key features of [Zach]’s build is that it diverges away from the Cherry MX switch form factor. The design uses low-profile switches instead, which help with keeping the keyboard low enough to avoid it causing wrist problems. The keyboard also uses IO expanders to hook up all the key switches, helping to reduce the incidence of ghost keys. The board can also be split in half, allowing it to be repurposed as a smaller macropad when desired.

It’s all wrapped up in a cool 3D printed case, and there are even three OLED displays on the right-hand side. They’re soldered to the PCB on special cutouts that allow the displays to flex and trigger tactile switches, acting as giant pressable buttons.

[Zach] does a great job explaining all the nifty engineering decisions he made to cram maximum functionality into the design. We’ve seen some other great DIY ergonomic designs too. Video after the break.

Continue reading “A Hackable Keyboard That Even Has Screens”

A sandbox for ergonomic keyboard makers.

Dactyl Chimera Leaves The Learning Out Of The Curve

Have you been wanting to build your own keyboard, ergonomic or otherwise, but are hesitant to spend all that time and filament on something that may not be a good fit for your hands? Glad as we are that the dactyl is open-source, to get in there and really mess around with it requires intimate knowledge of either OpenSCAD or Clojure.

Well, not anymore. [WolfIcefang]’s dactyl chimera is an ergo sandbox, a test bench for column curvature, stagger, and height that should keep you from having to iterate all day and night. It was designed in FreeCAD and has three parts — the rack, the tenting foot, and the arches. The rack acts like a bottom plate and has slots for holding the columns (arches) in place. Underneath that is the tenting foot, which changes the lateral inclination. Thirdly are the arches, the business part where the switches go.

[WolfIcefang] says it’s sturdy but not portable, and for some reason feels the need to apologize for the looks. We think it’s beautiful, but then again are easily captivated by such practicality. It’s not quite a keyboard yet, as [WolfIcefang] has neither wired it up nor burned in any firmware. This is still in the early stages, and [WolfIcefang] wants to open it up to collaborators. Plans for the future include interchangeable thumb clusters and a complete build guide.

Even if you aren’t that fluent in OpenSCAD, you’ll have fun messing around on the keycap modeling playground.

Via r/ErgoMechKeyboards

The Pi 400 As A PC Peripheral

The Raspberry Pi 400 all-in-one computer is a neat little unit that is powerful enough to take on most humdrum computing tasks while doing an excellent job of freeing up valuable desktop space. But what about those moments when both the Pi and a PC are needed on the same desktop? How can the Pi and the bulky PC keyboard share the same space?

[Gadgetoid] may have the answer, with a clever bit of software that presents the Pi’s mouse and keyboard as peripherals on its USB-C power port. If your PC has a high-power USB socket that can run the Pi then it can use the small computer’s input devices just as well as the Pi itself can. It’s fair to say that the Pi 400’s keyboard is not it’s strongest point, but we can see some utility in the idea.

Running it is simply a case of running an executable from the Pi. Control can be wrested back to Raspberry Pi OS with a simple keystroke. Perhaps it’s not the ultimate desktop experience, but if you’re a die-hard Pi-head there’s plenty of appeal.

Within a few weeks, it’s a year since the launch of the Pi 400. We’ve not seen as many of them as the other Pi models, but you might find our original review to be of interest.

Thanks [Itay] for the tip.