PS/2 wireless dongle

The Wireless PS/2 Keyboard That Never Was

The PS/2-style port was once about as ubiquitous on PCs as USB connectors are today, and more than a few of us accumulated a fair collection of keyboards and mice that sported the 6-pin mini-DIN plug. They’re not nearly as common today, but when you need one, you need one, so if your stockpile of PS/2 keyboards has dwindled to nothing, you might want to look at rolling your own PS/2 remote keyboard dongle.

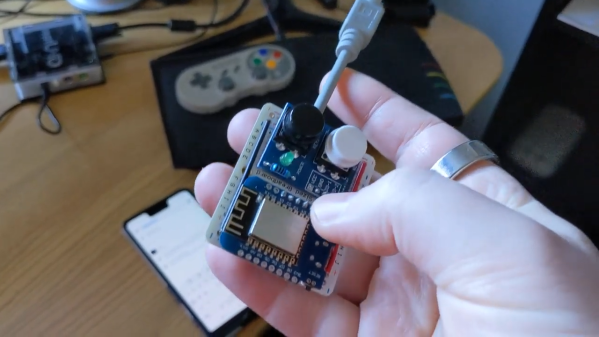
That backstory on [Remy Sharp]’s build starts with his acquisition of a neptUNO, a 160€ FPGA retrocomputer that gives you access to just about every Z80 and 6502 computer of yesteryear. While the box supports USB keyboards, [Remy] had trouble getting one to work. So out came a Wemos D1 Mini, which was wired up to a stub of PS/2 cable. The microcontroller is powered by the PS/2 port, and connects to the WiFi network on boot-up and starts a WebSocket server. It also served up a page of HTML, which lets him connect with any device and send keystrokes to the neptUNO. He also added a couple of hardware buttons to the dongle, to access menus on the neptUNO directly. The video below shows it in action.

Perhaps unsurprisingly, [Remy] says he took inspiration for this build from [Ben Eater]’s excellent PS/2 deep dive. We’d like to think he saw that here first, but either way, it’s a valuable reference on how keyboards used to work.

Continue reading “The Wireless PS/2 Keyboard That Never Was”

Jet tools air scrubber

It’s A Hack: Air Scrubber Controlled Using The Room Lighting

Some products just seem to be designed to be annoying. [hardmar] discovered the air filtration system installed in his son’s basement woodshop was orientated for the best airflow, but rather poorly positioned to actually turning the thing on and off. For some reason the unit has its single line-of-sight IR receiver on one side, which when mounted in some positions, forces the user to be the completely wrong position to use the supplied remote.

We find it a little unhelpful sometimes that devices specifically designed to be mounted with varying orientations don’t come fitted with IR receivers in different locations to ensure good controllability. It would get annoying really fast to have to contort oneself into some specific position just to turn something on, and some people just might not bother at all.

Proper control of dust is paramount for continued good health, and essential in any workspace or shared area. When you work wood, it produces a lot of dust. It cannot be avoided and gets into everything, your lungs included. PPE is not enough.  Even in your own shop you still really should manage dust production as best you can. Options are varied from centralised extraction, per machine solutions, and often augmented with air scrubbers mounted on the ceiling to grab those fine particulates.

Instead of solving the IR placement issue, [hardmar] wanted to have the unit tied to the lighting system so that it would power on as soon as someone turned on the appropriate light and would then stay on for a fixed amount of time after the user left in order to continue scrubbing the air some more. His simple hack was to first record and analyse the IR protocol used by the remote, and program an Arduino to be able to send it on/off commands. Next, he hooked up a phototransistor aimed at the light, in order to provide the necessary ‘user present’ trigger to tell the Arduino when to activate the scrubber. Super simple and effective. We love this non-invasive approach of adapting off-the-shelf equipment to our specific requirements, without even showing it a screwdriver.

As [hardmar] admits, the hack is not elegantly implemented, it’s just enough to make it work, and that’s just fine, sometimes you just have a job to do and no more.

The Simplest Way To Spot 2.4GHz RF

When the cool kids are showing off their SDRs it’s easy to forget that a radio receiver can be very simple indeed. The crystal set is one of the earliest forms of radio receiver, a tuned circuit and a diode that would pick up those AM broadcast stations no problem. But lest you imagine that these receivers can only pick up those low frequencies, here’s Hackaday alum [Ted Yapo] with a handy 2.4GHz receiver that picks up strong WiFi and microwave oven leakage.

It’s about as simple as it gets, an LED with a UHF diode in reverse across it. The clever part lies in the wire leads, which are cut to resonate as a dipole at 2.4 GHz. The resulting RF voltage is rectified by the UHF diode, leaving enough DC for the LED to flash. If you are wondering why the LED alone couldn’t do the job as a rectifier you would of course be on to something, however its much worse high frequency performance would make it not up to the job at this frequency.

The glory days of analogue broadcasting may now be in the past, but it’s still possible to have fun with a more conventional crystal radio. If you are adventurous, you can even make one that works for the FM, band too.

Fail Of The Week: Magnetic Levitation

We are big fans of the little desktop magnetic levitation setups that float a small object on a magnet. As [3D Printed Life] points out, they look like magic. He was surprised that the commercial units use analog electronics. He decided to build a digital version but didn’t know what he was getting into. He details his journey in the video you can see below.

Along with a custom control board, he decided to wind his own electromagnets. After finding that tedious he built a simple coil winder to automate some of the work.

Continue reading “Fail Of The Week: Magnetic Levitation”

Several frames from Bad Apple

PineTime Smartwatch And Good Code Play Bad Apple

PineTime is the open smartwatch from our friends at Pine64. [TT-392] wanted to prove the hardware can play a full-motion music video, and they are correct, to a point. When you watch the video below, you should notice the monochromatic animation maintaining a healthy framerate, and there lies all the hard work. Without any modifications, video would top out at approximately eight frames per second.

To convert an MP4, you need to break it down into images, which will strip out the sound. Next, you load them into the Linux-only video processor, which looks for clusters of pixels that need changing and ignores the static ones. Relevant pixel selection takes some of the load off the data running to the display and boosts the fps since you don’t waste time reminding it that a block of black pixels should stay the way they are. Lastly, the process will compress everything to fit it into the watch’s onboard memory. Even though it is a few minutes of black and white pictures, compiling can take a couple of hours.

You will need access to the watch’s innards, so hopefully, you have the developer kit or don’t mind cracking the seal. Who are we kidding, you aren’t here for intact warranties. The video resides in the flash chip and you have to transfer blocks one at a time. Bad Apple needs fourteen, so you may want to practice on a shorter video. Lastly, the core memory needs some updating to play correctly. Now you can sit back and…watch.

Pine64 had a rough start with the single-board computers, but they’re earning our trust with things like soldering irons and Google-less Linux mobile phones.

Continue reading “PineTime Smartwatch And Good Code Play Bad Apple”

Where You Are Influences What You Invent

[Timon] just bought a new PCB holder setup for his desk. It’s one of those spring-loaded jobbies that uses strong magnets to hold it up off of a work surface, and is made of metal so that you can reflow solder with it. It might be a clone of the PCBite, but frankly I’ve seen similar projects everywhere — it’s hard to say who is copying whom these days. And anyway, that’s not the point.

What struck me about the holders was their tops: they’re repurposed 3D printer nozzles. That’s a fantastic idea because they’re non-magnetic, heat tolerant, relatively uniform, and probably dirt cheap in Shenzhen, where the designer of this board almost certainly lives. Maybe he or she even works in a 3D printer factory? Who knows? But the designer almost certainly looked around for something that would fit the bill, and found the nozzles.

Indeed, there’s been a lot of innovation in all things board-holding coming out of China over the last decade. I can remember when the state of the art was a vise-like affair. (I still like my homebrew Stickvise clone for low, square jobs.)

But with cell phone repairs requiring the ability to hold and reflow ever stranger board shapes, there’s been a flourishing of repositionable holders. The pawn-pillar designs are cool, but their utility rests firmly in how strong the magnets are. (I wouldn’t buy the one linked, for instance, without trying it first-hand.) I really like the look of these jobbies, which have springs to maintain tension. (Will the 3D-printed plastic jaws hold up to multiple reflows?) Anyway, it’s no coincidence that the inventors of these devices are in the cellphone-repair capital of the universe.

The old saying is that necessity is the mother of invention. But what if, like with real estate, it’s location, location, location? You dream up solutions to problems around you, using parts that you’ve got on-hand. If that sounds a little fatalistic, consider that you can also change your surroundings, either physical or even virtual. Are you in the middle of the right challenges and opportunities?

PCB fluorescent 7-segment display

Unique Seven-Segment Display Relies On FR-4 Fluorescence

It’s interesting what you see when you train a black light on everyday objects. We strongly suggest not doing this in a hotel room, but if you shine UV light on, say, a printed circuit board, you might see what [Sam Ettinger] did, which led him to build these cool low-profile seven-segment fluorescent PCB displays.

UV light causing FR4 to fluoresceAs it turns out, at least some FR-4 PCBs fluoresce under UV light, giving off a ghostly blue-green glow. Seeing the possibilities, [Sam] designed a PCB with cutouts in the copper and solder mask in the shape of a traditional seven-segment display. The backside of the PCB has pads for UV LEDs and current-limiting resistors, which shine through the board and induce the segments to glow. Through-slots between the segments keep light from one segment from bleeding over into the next; while [Sam] left the slots unfilled, they could easily be filled with solder. The fluorescent property of FR-4, and therefore the brightness and tint of the segments, seems to vary by board thickness and PCB manufacturer, but it looks like most PCBs will show pretty good results.

We’d say the obvious first improvement might be to cover the back of the display with black epoxy, to keep stray light down, and to improve contrast. But they look pretty great just as they are. We can also see how displays with other shapes, like icons and simple symbols. Or maybe even alphanumeric characters — say, haven’t we seen something like that before?