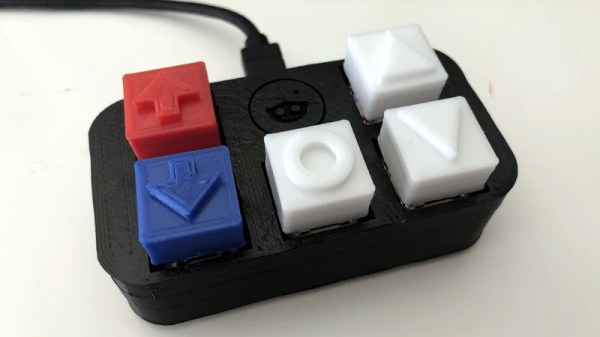
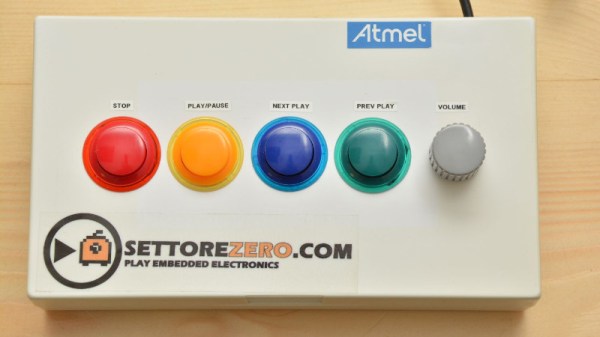
Inputs Of Interest: My First Aggressively Ergonomic Keyboard

Ever since my RSI surgery, I’ve had to resort to using what I call my compromise keyboard — a wireless rubber dome affair with a gentle curvature to the keys. It’s far from perfect, but it has allowed me to continue to type when I thought I wouldn’t be able to anymore.

This keyboard has served me well, but it’s been nearly three years since the surgery, and I wanted to go back to a nice, clicky keyboard. So a few weeks ago, I dusted off my 1991 IBM Model M. Heck, I did more than that — I ordered a semi-weird hex socket (7/32″) so I could open it up and clean it properly.

And then I used it for half a day or so. It was glorious to hear the buckling springs singing again, but I couldn’t ignore the strain I felt in my pinkies and ring fingers after just a few hours. I knew I had to stop and retire it for good if I wanted to keep being able to type.

Continue reading “Inputs Of Interest: My First Aggressively Ergonomic Keyboard”

MIL-SPEC Keyboard Now Salutes USB

When [easyjo] picked up this late ’80s Marconi mil-spec keyboard for cheap, he knew it wouldn’t be easy to convert it to USB — just that it would be worth it. Spoiler alert: those LEDs aren’t a mod, they’re native. They get their interesting shape from the key traces, which are in the four corners.

Despite having way-cool buttons such as WPNS HOLD, and the fact that Control is on the home row where it belongs, this keyboard does not look fun to type on at all for any length of time. Of course, the point of this keyboard is not comfort, but a reliable input device that keeps out dust, sweat, liquids, and the enemy.

This is probably why the controller is embedded into the underside of the key switch PCB instead of living on its own board.  [easyjo] tried to analyze the signals from the existing 26-pin connector, but it didn’t work out.

So once he was able to decode the matrix, he removed the controller chip and wired the rows and columns directly to an Arduino Leonardo. Fortunately, the LEDs were just a matter of powering their columns from the front side of the board.

The availability of certain kinds of military surplus can make for really interesting modernization projects, like adding POTS to a field telephone.

Via r/duino

Acrylic Mold Makes For Professional-Looking Silicone Keyboards

The border between consumer electronics and DIY projects is getting harder and harder to define. First it was PCBs, which quickly went from homemade to professional with quick-turn services. Then low-cost CAD/CAM packages and high-end fabrication services gave us access to enclosures that were more than black plastic boxes with aluminum covers. Where will it end?

That’s a question [arturo182] begins to answer with this custom-molded silicone keyboard for a handheld device. There’s no formal writeup, but the Twitter thread goes into some detail about the process he used to make the tiny qwerty keypad. The build started by milling a two-part mold from acrylic. Silicone rubber was tinted and degassed before injecting into the mold with a baster. The keys are connected by a thin membrane of silicone, and each has a small nub on the back for actuating a switch.

There’s clearly room for improvement in this proof of concept – tool marks from the milling process mar the finish of the keys slightly, for instance. There may be tips to be had from this article on silicone keyboard refurbishment to improve the process, but overall, we’d say [arturo182] is well on his way here.

Replacing A Non-Replacable Laptop Keyboard

Spilling a drink on a laptop is a terrifying experience. If you’re lucky you’ll ruin just a keyboard, and if not, your entire machine could go up in smoke. Assuming you’ve just suffered the latter, you can still be out of luck, as many laptops come with fancy integrated keyboards that are not designed to be removable. It’s not always the case however, as this ingenious hack from [InsideMyLaptop] bears out.

The hack begins with removing the top case assembly from a HP Pavilion laptop. The keyboard is riveted into the top plate assembly, along with the trackpad, which would normally necessitate their replacement as a total unit. However, if properly armed with a soldering iron, these plastic rivets can be melted to allow the backing plate and keyboard to be removed. A replacement part can then be sourced, and the remaining rivet stubs can be remelted to hold the new part in place.

It’s a simple hack, but one that goes to show one shouldn’t always take “No User Servicable Parts Inside” as an answer. We’ve seen other useful work from [InsideMyLaptop] before – like this power jack repair way back in 2011.

Arcade Buttons Make A Great Multimedia Keyboard

[Giovanni Bernardo] has a very important job – managing the audio for several Christmas events. Desiring a simple and effective control interface, he designed a dedicated media keyboard to run the show.

The project began with an Arduino Leonardo, commonly used in projects that aim to create a USB Human Interface Device. [Giovanni] then installed the HID-Project library from [Nicohood]. This was used to enable the device to emulate media buttons typically found on keyboards, something the standard Arduino HID libraries were unable to do. It’s a useful tool, and one that can be implemented on even standard Arduino Unos when used in combination with the HoodLoader2 bootloader.

For ease of use and a little bit of cool factor, arcade buttons were used for the media functions. Simple to wire up, cheap, and with a great tactile feel, they’re a popular choice for fun human interface projects. It’s all wrapped up in a neat plastic box with Dymo labels outlining the functions. It’s a neat and tidy build that should make running the Christmas show a cinch!

If You Can’t Buy The Keyboard You Want, Build It Instead

The great thing about being a maker is that when the market fails to meet your needs, you can strike out on your own. [GuzziGuy] did just that, building a bespoke mechanical keyboard that’s stylish to boot.

The aim was to create a keyboard well suited to working without a mouse, and with a keypad on the opposite side to suit a left-hander’s predilections. The case consists of an aluminium top plate with an attractive walnut base, both cut on a Workbee CNC machine. Keycaps are sourced from YDMK and Amazon, with the parts chosen giving the build a striking early 1980s workstation look.

The keys are handwired to a series of DuPont connectors for easy disassembly. These hook up to an Elite-C controller, a USB-C remix of the popular Arduino Pro Micro. Based on the ATmega32U4, it’s got native USB HID functionality, making it perfect for keyboard builds.

The fit and finish is what really makes this project, going to show that a few hours well spent on the CNC can turn you out a beautiful project. As far as mechanical keyboards go, your imagination really is the limit!

Optical Keyboards Have Us Examining Typing At Light Speed-ish

There’s a newish development in the world of keyboards; the optical switch. It’s been around for a couple years in desktop keyboards, and recently became available on a laptop keyboard as well. These are not replacements for your standard $7 keyboard with rubber membrane switches intended for puttering around on your raspberry pi. Their goal is the gamer market.

The question, though, is are these the equivalent of Monster Cables for audiophiles: overpriced status symbols? Betteridge would be proud; the short answer is that no, there is a legitimate advantage, and for certain types of use, it makes a lot of sense.

Continue reading “Optical Keyboards Have Us Examining Typing At Light Speed-ish”