Metronome Flashes And Vibrates To The Beat

Annoying though they can be, if you play any kind of instrument, you will definitely benefit from using a metronome. While many of them thock or otherwise tock, the VRRVRR metronome from [Turi] works a little differently.

In addition to flashing LEDs, the VRRVRR contains a small vibrating motor. If you’re wondering about the name, it comes from the fact that it vibrates and makes a sort of vrr vrr sound. Need to be quiet? A small switch on the side shuts off the vibrations.

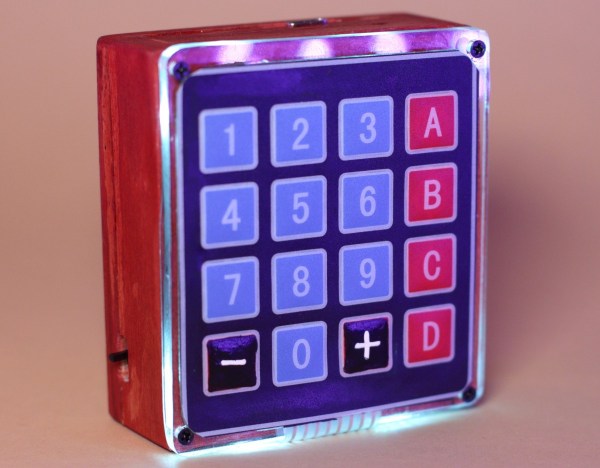
The 4×4 keypad really allowed [Turi] to cram in a bunch of features using both short and long press to do different things. On short press, the digits set the tempo. When not typing in a tempo, zero can be used to enter a tempo by tapping. The letters load preset tempos, and the +/- keys increase and decrease it.

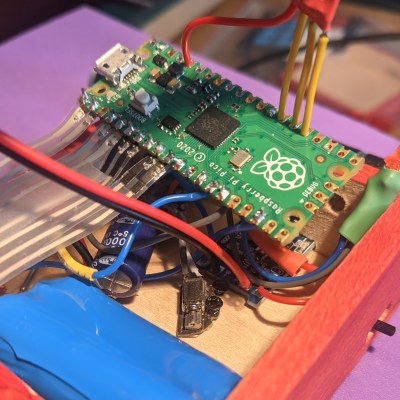
Inside the basswood enclosure is a Raspberry Pi Pico, the vibration motor, and various other bits and bobs that make it go. There’s even an LED to indicate that it’s time to charge the lithium battery. If you want to build your own, head on over to GitHub, but be sure to take the brief VRRVRR tour after the break.

We don’t see too many metronomes around here, but we do have this nice teardown to offer you.

Continue reading “Metronome Flashes And Vibrates To The Beat”

Keypad Interface Module Reverse Engineers Pinouts So You Don’t Have To

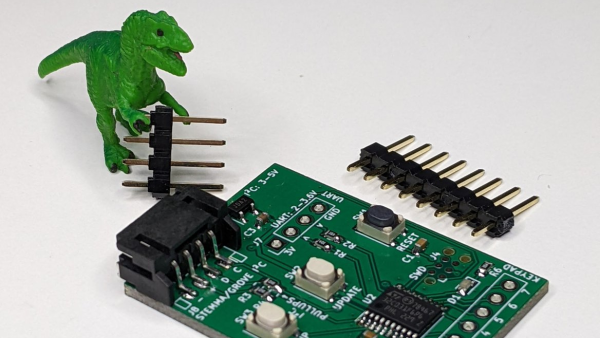
If you’ve scavenged some random keypads and want to reuse them in a project without the hassle of figuring out the pinouts, then [Cliff Biffle] has an interface module for you. The Keypad Go connects to the mystery keypad via an 8-pin 0.1 inch header, and talks to your own project using I2C and/or serial.

You could categorize the mechanism at work as machine learning of a sort, though it’s stretching definitions a bit, as there is no ChatGPT or GitHub Copilot wizardry going on here. But you must teach the module during an initial calibration sequence, assigning a 7-bit ASCII character to each key as you press it. Once trained, it responds to key presses by sending the pre-assigned character over the interface. Likewise, key releases send the same character but with the 8th bit set.

The heart of the board is either an STM32G030 or STM32C011/31, depending on parts availability we presume. I2C connectivity is over a four-pin STEMMA connector, and logic-level serial UART data is over a four-pin 0.1 inch pin header. [Cliff] plans to release the firmware and schematics as open source soon, after cleaning up the code a bit. The device is also for sale on Tindie, though it looks like they won’t be back in stock until later on in the month.

Longtime readers might recognize [Cliff] from his impressive m4vga project which we covered back in 2015, where he manages to generate 800×600 VGA signals at 60 Hz from an STM32F4-family microcontroller.

Continue reading “Keypad Interface Module Reverse Engineers Pinouts So You Don’t Have To”

Students 3D Print Low Cost Braille Keypad

Numerical keypads are common entry devices for everything from home security systems to phones and more. Unfortunately, a great deal of them are difficult to use if you’re visually impaired. This high-contrast Braille keypad aims to solve those issues with simple design choices.

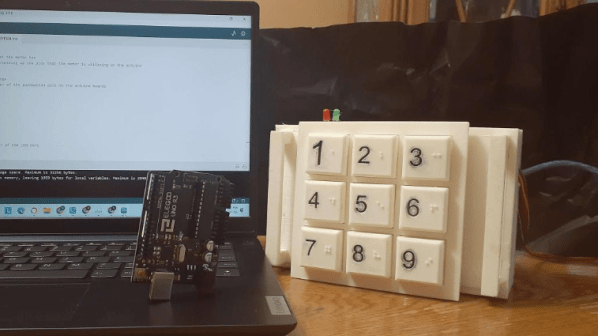
The keypad was developed as a school project by students [Nicholas Nguyen] and [Daniel Wang]. It uses a regular layout, with 1 at the top left and 9 at the bottom right. The keypad itself is 3D printed with large buttons for easier use. Each button has its numeral inlaid on the face which allows it to be easily filled in with paint for high-contrast readability.

The real neat feature, though, is that each individual button features its relevant number in Braille. The pips are directly 3D printed into the shape of each button. For those that familiar with the tactile writing system, this makes the keypad much easier to use. It obviates the need to guess at the keypad’s orientation, and we’re honestly surprised we don’t see this on more devices out in the wild.

We’ve featured a variety of neat Braille hacks over the years, including this neat tactile display.

Continue reading “Students 3D Print Low Cost Braille Keypad”

Deepdeck: Going Beyond The Macro Pad

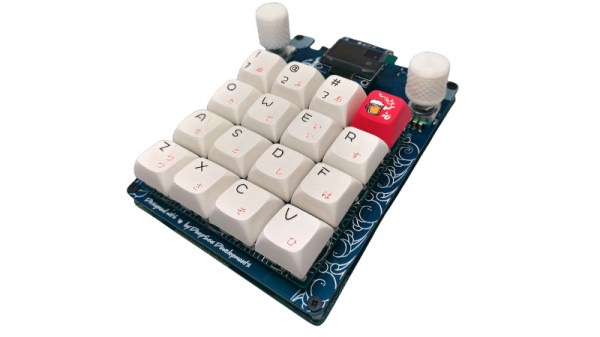
We’re used to the idea of a macropad, a small extension keyboard for your computer whose keys can be programmed to the functions of your choice. They can be made in many ways, but they all follow a similar functionality. Deepdeck from [Nick Velasquez] is another matter, an attempt to make a macropad with functionality that goes way beyond simply pressing keys.

At its heart is an ESP32 module, and it makes full use of both Bluetooth and wireless networking capabilities. It can use Bluetooth when connecting to the host computer, and the wireless connection hosts both the configuration interface via a web server and an Internet connection from which it derives those special powers.  This is a macropad with programmable keys just like all the others, but it also has the ability to connect to online APIs programmed by the user. This allows it to automate complex queries involving other sources into a keypress, which gives it many more possibilities.

A tool such as this one is one of those things which requires a bit of thought as to exactly how it might be used. A normal API connected device might display the weather on a screen for instance, but how often does one need to type the weather forecast? However we can see that this extra online dimension will find as yet unseen applications, and we look forward to the idea being taken up with other macropads.

Odd Inputs And Peculiar Peripherals: A MacroPad With A Handy Layout Screen

The idea of a macro keypad is a great one, a set of keys programmable with frequent but complex tasks. But once programmed, how can the user keep track of which key does what? To save the world from grubby, hand-written sticky labels, here’s [Andreas Känner] with the Badger 2040 keypad — a macro pad with a display to show keymap info that’s fully programmable using CircuitPython.

At its heart is a Pimoroni Badger 2040 e-ink screen and RP2040 board which sits in a 3D-printed enclosure which in turn magnetically attaches to a 3D-printed keyboard enclosure. Inside is an I/O expander board, which is hand-wired to the switches. The firmware allows for easy configuration and even extension of the keypad itself, and presents itself to the host computer through USB. It’s even possible to have multiple different layouts on the same device.

Full details can be found in a comprehensive write-up on his website, and all the files are in a GitHub repository. If this doesn’t satisfy your need for customisable input goodness, then it’s not the first macro keypad we’ve shown you.

Number Like It’s 1234 AD With This Cistercian Keypad

Don’t feel bad if you don’t know what Cistercian numbers are. Unless you’re a monk of the Order of Cistercia, there’s really no reason for you to learn the cipher that stretches back to the 13th-century. But then again, there’s no reason not to use the number system to make this medieval-cool computer number pad.

If you haven’t been introduced to the Cistercian number system, it’s actually pretty clever. There are several forms of it, but the vertical form used here by [Tauno Erik] is based on a vertical stave with nine glyphs that can be attached to or adjacent to it. Each glyph stands for one of the nine numerals — one through nine only; there’s no need for a zero glyph. There are four quadrants around the stave — upper right, upper left, lower right, and lower left — and where the glyph lies determines the multiplier for the glyph. So, if you wanted to write the number “1234”, you’d overlay the following glyphs into a single symbol as shown.

[Tauno]’s Cistercian keypad, admittedly more of an art and history piece than a useful peripheral, somehow manages to look like it might have been on the desk of [Theodoric of York, Medieval Accountant]. Its case is laser-cut birch plywood, containing a custom PCB for the 20 keyboard switches and the Xiao RP2040 MCU that runs the show. Keycaps are custom made from what looks like oak combined with a 3D-printed part, similar to his previous wooden keycap macro pad. Each of the nine Cistercian glyphs is hand-carved into the keycaps, plus an imaginary glyph for zero, which wasn’t part of the system, as well as operators and symbols that might have baffled the medieval monks.

The native Cistercian system is limited to numbers between 1 and 9,999, so we’ll guess that the keypad just outputs the Arabic numeral corresponding to the Cistercian key pressed and doesn’t actually compose full Cistercian numbers. But the code to do that would be pretty easy, and the results pretty cool, if a bit confusing for users. Even if it’s just for looks, it’s still a cool project, and we doff the hood of our monkish robe to [Tauno] for this one.

Improved Technique For Resistive Divider Keypads

[Lauri Pirttiaho] from the [Swiss Knife of Electronics] channel explains how to simplify your resistive divider keypad design on Hackaday.io.

The usual method involves building a resistive ladder that gives unique and equally spaced voltages for each keypress. If you have just four or five discrete buttons, it isn’t terribly difficult, but if you have a 12- or 16-keypad matrix, things get complicated. [Lauri] looked into the past to come up with a better way, specifically a 646 page, 1 kg textbook from 1990 — Analogue Ic Design: The Current-Mode Approach by Toumazou, Lidgey, and Haigh. He learned that sometimes what’s hard to do in the voltage domain is easy in the current domain.

Normally you’d throw in some resistors to form different voltage dividers depending on which key is pressed, and read the resulting voltage off of a voltage divider with an ADC. But that means using the voltage divider equation, and the difference in voltage between keys can get very small. Dropping the voltage divider and measuring the current through a current mirror generates a linear voltage across its output load resistor that can be easily read by your microprocessor. And [Lauri] has posted an example of just such a program on his GitHub repository for an Arduino.

Heavy analog electronics, for sure, but something to keep in mind if you’re reading more than 12 keys. Do you have any examples of solving problems by looking into old and/or less-common techniques? Let us know in the comments below.

Continue reading “Improved Technique For Resistive Divider Keypads”