Virtual Physical Rehab With Kinect

Web sites have figured out that “gamifying” things increases participation. For example, you’ve probably boosted your postings on a forum just to get a senior contributor badge (that isn’t even really a badge, but a picture of one). Now [Yash Soni] has brought the same idea to physical therapy.

[Yash]’s father had to go through boring physical therapy to treat a slipped disk, and it prompted him into developing KinectoTherapy which aims to make therapy more like a video game. They claim it can be used to help many types of patients ranging from stroke victims to those with cerebral palsy.

Patients can see their onscreen avatar duplicate their motions and can provide audio and visual feedback when the player makes a move correctly or incorrectly. Statistical data is also available to the patient’s health care professionals.

Continue reading “Virtual Physical Rehab With Kinect”

Husband Uses MRI Images To 3D Print Wife’s Skull And Tumor

[Michael Balzer] shows us that you are your own best advocate when it comes to medical care – having the ability to print models of your own tumors is a bonus. [Michael’s] wife, Pamela, had been recovering from a thyroidectomy when she started getting headaches. She sought a second opinion after the first radiologist dismissed the MRI scans of her head – and learned she had a 3 cm tumor, a meningioma, behind her left eye.  [Michael], host of All Things 3D, asked for the DICOM files (standard medical image format) from her MRI.  When Pamela went for a follow-up, it looked like the tumor had grown aggressively; this was a false alarm. When [Michael] compared the two sets of DICOM images in Photoshop, the second MRI did not truly show the tumor had grown. It had only looked that way because the radiologist had taken the scan at a different angle! Needless to say, the couple was not pleased with this misdiagnosis.

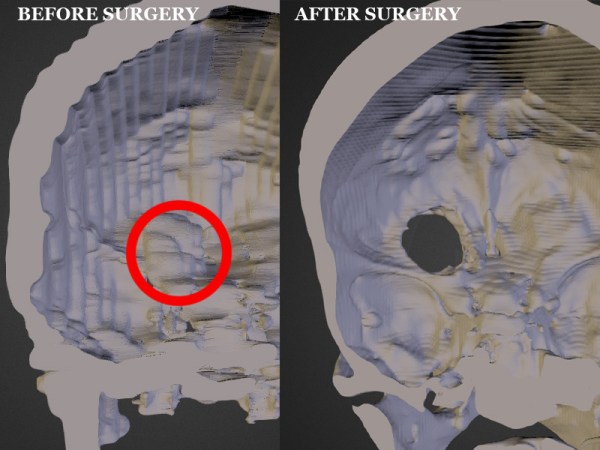
However, the meningioma was still causing serious problems for Pamela. She was at risk of losing her sight, so she started researching the surgery required to remove the tumor. The most common surgery is a craniotomy: the skull is sawed open and the brain physically lifted in order to access the tumor below it. Not surprisingly, this carries a high risk of permanent damage to any nerves leading to loss of smell, taste, or sight if the brain is moved the wrong way. Pamela decided to look for an alternative surgery that was less invasive. [Michael] created a 3D print of her skull and meningioma from her MRIs. He used InVesalius, free software designed to convert the 2D DICOM files into 3D images. He then uploaded the 3D rendered skull to Sketchfab, sharing it with potential neurologists. Once a neurologist was found that was willing to consider an alternative surgery, [Michael] printed the skull and sent it to the doctor. The print was integral in planning out the novel procedure, in which a micro drill was inserted through the left eyelid to access the tumor. In the end, 95% of the tumor was removed with minimal scarring, and her eyesight was spared.

If you want to print your own MRI or CT scans, whether for medical use or to make a cool mug with your own mug, there are quite a few programs out there that can help. Besides the aforementioned InVesalius, there is DeVIDE, Seg3D, ImageVis3D, and MeshLab or MeshMixer.

heartbeat sensor

Simple And Inexpensive Heartbeat Detector

There are many ways to detect a heartbeat electronically. One of the simpler ways is to take [Orlando’s] approach. He’s built a finger-mounted pulse detector using a few simple components and an Arduino.

This circuit uses a method known as photoplethysmography. As blood is pumped through your body, the volume of blood in your extremities increases and decreases with each heartbeat. This method uses a light source and a detector to determine changes in the amount of blood in your extremities. In this case, [Orlando] is using the finger.

[Orlando] built a finger cuff containing an infrared LED and a photodiode. These components reside on opposite sides of the finger. The IR LED shines light through the finger while the photodiode detects it on the other side. The photodiode detects changes in the amount of light as blood pumps in and out of the finger.

The sensor is hooked up to an op amp circuit in order to convert the varying current into a varying voltage. The signal is then filtered and amplified. An Arduino detects the voltage changes and transmits the information to a computer via serial. [Orlando] has written both a LabVIEW program as well as a Processing program to plot the data as a waveform. If you’d rather ditch the PC altogether, you might want to check out this standalone heartbeat sensor instead.

Micro-Scallop Robot

Nanobots Swim Like Scallops In Non-Newtonian Fluids

The idea of using nanobots to treat diseases has been around for years, though it has yet to be realized in any significant manner. Inspired by Purcell’s Scallop theorem, scientists from the Max Planck Institute for Intelligent Systems have created their own version . They designed a “micro-scallop” that could propel itself through non-Newtonian fluids, which is what most biological fluids happen to be.

The scientists decided on constructing a relatively simple robot, one with two rigid “shells” and a flexible connecting hinge. They 3D-printed a negative mold of the structure and filled it with a polydimethylsiloxane (PDMS) solution mixed with fluorescent powder to enable detection. Once cured, the nanobot measured 800 microns wide by 300 microns thick. It’s worth noting that it did not have a motor. Once the mold was complete, two neodymium magnets were glued onto the outside of each shell. When a gradient-free external magnetic field was applied, the magnets make the nanobot’s shells open and close. These reciprocal movements resulted in its net propulsion through non-Newtonian media. The scientists also tested it in glycerol, an example of a Newtonian fluid. Confirming Purcell’s Scallop theorem, the nanobot did not move through the glycerol. They took videos of the nanobot in motion using a stereoscope, a digital camera with a colored-glass filter, and an ultraviolet LED to make the fluorescent nanobot detectable.

The scientists did not indicate any further studies regarding this design. Instead, they hope it will aid future researchers in designing nanobots that can swim through blood vessels and body fluids.  We don’t know how many years it will be before this becomes mainstream medical science, but we know this much: we will never look at scallops the same way again!

Continue reading “Nanobots Swim Like Scallops In Non-Newtonian Fluids”

An Open Hardware Platform For ECG, EEG And Other Measurements

[Eric] tipped us about the OpenHarwareExG project which goal is to build a device that allows the creation of electrophysiological signal processing applications. By the latter they mean electrocardiography (ECG, activity of the heart), electroencephalography (EEG, signals on the scalp), electromyography (EMG, skeletal muscles activity), electronystagmography and electrooculography (ENG & EOG, eye movements) monitoring projects. As you can guess these signals are particularly hard to measure due to their small amplitude and therefore susceptibility to electrical noise.

The ADS1299 8-channel 24-bit analog front end used in this platform is actually electrically isolated from the rest of the circuit so the USB connection wouldn’t perturb measurements. An Arduino-compatible ATSAM3X microcontroller is used and all the board is “DIY compatible” as all parts can be sourced in small quantities and soldered by hand. Even the case is open source, being laser cut from acrylic.

Head to the project’s website to download all the source files and see a quick video of the system in action.

Interested in measuring the body’s potential? Check out an ECG that’s nice enough to let you know you have died, or this Android based wireless setup.


Hacking A Reader For Medical Test Strips

med

[Rahul] works at a startup that produces cutting edge diagnostic test cards. These simple cards can test for enzymes, antibodies, and diseases quickly and easily. For one test, this greatly speeds up the process of testing and diagnosis, but since these tests can now be administered en masse, health services the world over now have the problem of reading, categorizing, and logging thousands of these diagnostic test cards.

The normal solution to this problem is a dedicated card scanner, but these cost tens of thousands of dollars. At a 24-hour hackathon, [Rahul] decided to bring down the cost of the card scanners by whipping up his own, built from a CD drive and an Arduino.

The card [Rahul] used, an A1c card that tests for glucose bound to hemoglobin, has a few lines on the card that fluoresce with different intensify depending on the test results. This can be easily read with a photodiode connected to an Arduino. The mechanical part of the build consisted of an old CD drive with a 3D printed test strip adapter. Operation is very simple – just put the test strip in the test strip holder, press a button, and the results of the test are transmitted over Bluetooth.

Not only is [Rahul]’s build extremely simple, it’s also extremely useful and was enough to net him the ‘Most Innovative Project’ prize at the hackathon in his native Singapore.

Pulse Oximeter Displays Blood Oxygen Levels On A PC

The last time you were in the emergency room after a horrible accident involving a PVC pressure vessel, a nurse probably clipped a device called a pulse oximeter onto one of your remaining fingers. These small electronic devices detect both your pulse and blood oxygen level with a pair of LEDs and a photosensor. [Anders] sent in a great tutorial for building your own pulse oximeter using a fancy ARM dev board, but the theory behind the operation of this device can be transferred to just about any microcontroller platform.

The theory behind a pulse oximeter relies on the fact that hemoglobin absorbs red and infrared light differently based on its oxygenation levels. By shining a red and IR LED through a finger onto a photoresistor, it’s possible to determine a person’s blood oxygen level with just a tiny bit of math.

Of course a little bit of hardware needs to be thrown into the project; for this, [Anders] used an EMF32 Gecko starter kit, a great looking ARM dev board. After connecting the LEDs to a few transistors and opamps, [Anders] connected his sensor circuit to the ADC on the Gecko board. From here it was very easy to calculate his blood oxygen level and even display his pulse rate to a PC application.

Yes, for just the price of a dev board and a few LEDs, it’s possible to build your own medical device at a price far below what a commercial pulseox meter would cost. FDA approval not included.