3D Printed Fan Filter Takes Cues From Costume Scene

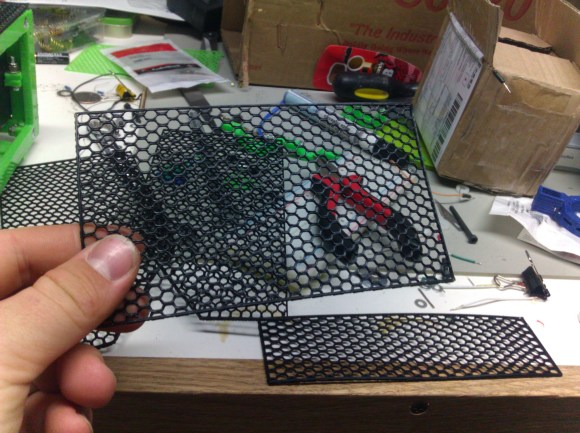
This custom fan filter created by [Kolomanschell] is a clever application of a technique used to create wearable 3D printed “fabrics”, which consist of printed objects embedded into a fine mesh like a nylon weave. The procedure itself is unchanged, but in this case it’s done not to embed 3D printed objects into a mesh, but to embed a mesh into a 3D printed object.

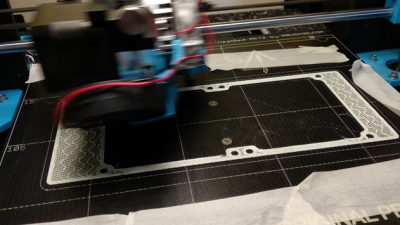
The basic idea is that a 3D print is started, then paused after a few layers. A fine fabric mesh (like tulle, commonly used for bridal veils) is then stretched taut across the print bed, and printing is resumed. If all goes well, the result is 3D printed elements embedded into a flexible, wearable sheet.

The beauty of this technique is that the 3D printer doesn’t need to be told a thing, because other than a pause and resume, the 3D print is nothing out of the ordinary. You don’t need to be shy about turning up the speed or layer height settings either, making this a relatively quick print. Cheap and accessible, this technique has gotten some traction in the costume and cosplay scene.

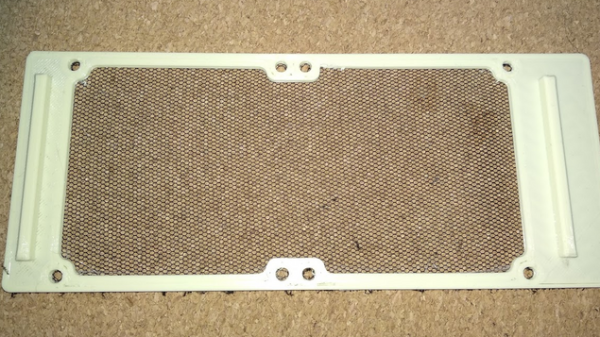
As [Kolomanschell] shows, the concept works great for creating bespoke filters, and the final result looks very professional. Don’t let the lack of a 3D model for your particular fan stop you from trying it for yourself, we’ve already shared a great resource for customizable fan covers. So if you’ve got a 3D printer and a bit of tulle, you have everything you need for a quick afternoon project.

Friday Hack Chat: Making Modular Hardware

The future of wireless is decentralized. Mesh-type networks are slowly making their way into the WiFi standard, and soon enough we’ll be dealing with decentralized phones. That’s wireless, but what about electronics? For most embedded work, we’re dealing with masters and slaves, but what if we didn’t have to deal with that? This is the challenge of modular electronics, and this week’s Hack Chat is going to be talking all about that.

Our guest for this week’s Hack Chat is [Asaad Kaadan], an electronics engineer from Seattle. [Asaad] holds a Masters and PhD in Electrical Engineering from the University of Oklahoma. For his day job, he builds high-end camera controllers for Freefly Systems. By night, he designs Hexabitz electronics prototyping modules. What are Hexabitz? That’s where this is about to get interesting.

Hexabitz are, as you would expect, tiny little hexagons packed with electronics. Every hexagon has a microcontroller on board, and these hexagons connect together through solder pad connectors along the edges of the board. Before you ask, yes, there are pentagonal Hexabitz, so yeah, you can do that.

During this Hack Chat, we’re going to be talking all about modular electronics and [Assad]’s Hexabits. We’re going to be covering questions like:

  • How to design connectors for testing boards
  • What the protocol for mesh electronics looks like
  • How to use modular electronics together in a system

You are, of course, encouraged to add your own questions to the discussion. You can do that by leaving a comment on the Hack Chat Event Page and we’ll put that in the queue for the Hack Chat discussion.join-hack-chat

Our Hack Chats are live community events on the Hackaday.io Hack Chat group messaging. This week is just like any other, and we’ll be gathering ’round our video terminals at noon, Pacific, on Friday, July 27th.  Need a countdown timer? Yes you do.

Click that speech bubble to the right, and you’ll be taken directly to the Hack Chat group on Hackaday.io.

You don’t have to wait until Friday; join whenever you want and you can see what the community is talking about.

Hackaday Prize Entry: A Community Mesh Network

While the Internet of Things is here to stay, and will kill us all, there are a few places left on the planet that will remain unscathed during the robot uprising. These underserved communities still have a need for communications and networking, leading [hlew] to create a Community Engagement Mesh Network as an entry for The Hackaday Prize.

While there are many, many options available for DIY networking solutions out there today, [hlew] is leaning on some work done by some of [Bruce Land]’s students at Cornell. This project used simple and cheap nRF24 radio modules for a true mesh network with multi-node communication, dynamic route discovery, and dynamic route reconfiguration.

The CEMN will rely on this network to provide communications to underserved communities. The primary goal of this network is to broadcast information like crop reports and health advisories, but it can also be used for peer to peer communications between individuals.

Which Wireless Tech Is Right For You?

It seems these days all the electronics projects are wireless in some form. Whether you choose WiFi, Bluetooth Classic, Bluetooth Low Energy, ZigBee, Z-Wave, Thread, NFC, RFID, Cell, IR, or even semaphore or carrier pigeon depends a lot on the constraints of your project. There are a lot of variables to consider, so here is a guide to help you navigate the choices and come to a conclusion about which to use in your project.

We can really quickly reduce options down to the appropriate tech with just a few questions.

Continue reading “Which Wireless Tech Is Right For You?”

Header of the Project Byzantium website

Meshing Pis With Project Byzantium

If internet service providers go down, how are we going to get our devices to communicate? Project Byzantium aims to create an “ad-hoc wireless mesh networking for the zombie apocalypse.” It’s a live Linux distribution that makes it easy to join a secure mesh network.

[B1tsh1fter] has put together a set of hardware for running Byzantium on Pis in emergency situations. A Raspberry Pi 2 acts as a mesh node, using a powerful USB WiFi adapter for networking. Options are provided for backup power, including a solar charger and a supercapacitor based solution.

The Pi runs a standard Raspbian install, but uses packages from the ByzPi repository. This provides a single script that gets a Byzantium node up and running on the Pi. In the background, OLSR is used to route packets through the mesh network, so that nodes can communicate without relying on a single link.

The project has a ways to go, but the Raspberry Pi based setup makes it cheap and easy to get a wide area network up and running without relying on a single authority.

Converting CTs And MRIs Into Printable Objects

People get CT and MRI scans every day, and when [Oliver] needed some medical diagnostic imaging done, he was sure to ask for the files so he could turn his skull into a printable 3D object.

[Oliver] is using three different pieces of software to turn the DICOM images he received from his radiologist into a proper 3D model. The first two, Seg3D and ImageVis3D, are developed by the University of Utah Center for Integrative Biomedical Computing. Seg3D stitches all of the 2D images from an MRI or CT scan into a proper 3D format. ImageVis3D allows [Oliver] to peel off layers of his flesh, allowing him to export a file of just his skull, or a section of his entire face. The third piece of software, MeshMixer, is just a mesh editor and could easily be replaced with MeshLab or Blender.

[Oliver] still has a lot of work to do on the model of his skull – cleaning up the meshes, removing his mandible, and possibly plugging the top of his spinal column if he would ever want to print a really, really awesome mug. All the data is there, though, ready for digital manipulation before sending it off to be printed.

Continue reading “Converting CTs And MRIs Into Printable Objects”

Easily 3D Print Mesh Screens

easy-way-to-3d-print-mesh-screens

If you need a way to make openings in your project enclosures look nice just head on over to the 3D printer. In the image above [Alfred] is showing off the result of his Slic3r hack for printing mesh grills.

It’s important to note that you need to make sure you’re using Slic3r version 0.9.8. This won’t work with newer versions because starting with 0.9.9 the software will add a raft to the bottom of your design.

The grill can be in any shape you desire. It starts by modelling this outline, then extruding the edges downward the same distance as your desired mesh thickness. After importing the design file into Slic3r [Alfred] uses the support material settings to choose this honeycomb design. He then sets the fill density to zero. This means the design will not be printed at all, only the fill material, resulting in these honeycomb screens.

Slic3r’s a fantastic piece of software. Check out this interview with Slic3r’s lead developer.