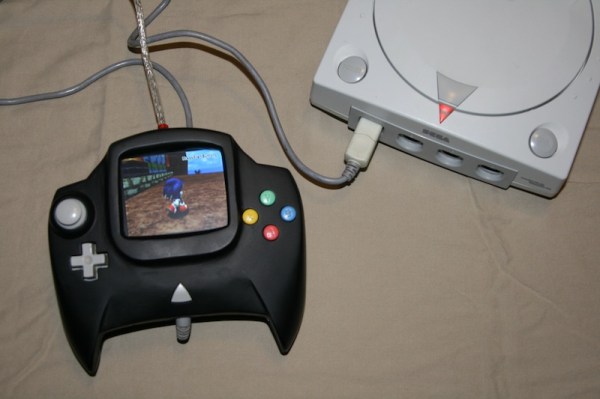
Alarm1

Adding WiFi And SMS To An Alarm System

[Don] wanted to bring his alarm system into the modern age. He figured that making it more connected would do the trick. Specifically, he wanted his alarm system to send him an SMS message whenever the alarm was tripped.

[Don] first had to figure out a way to trigger an event when the alarm sounds. He found a screw terminal that lead to the siren. When the alarm is tripped, this screw terminal outputs 12V to enable the siren. This would be a good place to monitor for an alarm trip.

[Don] is using an Arduino nano to monitor the alarm signal. This meant that the 12V signal needed to be stepped down. He ran it through a resistor and a Zener diode to lower the voltage to something the Arduino can handle. Once the Arduino detects a signal, it uses an ESP8266 WiFi module to send an email. The address [Don] used is the email-to-SMS address which results in a text message hitting his phone over the cell network.

The Arduino also needed power. [Don] found a screw terminal on the alarm system circuit board that provided a regulated 12V output. He ran this to another power regulator board to lower the voltage to a steady 5V. This provides just the amount of juice the Arduino needs to run, and it doesn’t rely on batteries. [Don] provides a good explanation of the system in the video below. Continue reading “Adding WiFi And SMS To An Alarm System”

NES RetroPi

Original NES Guts Upgraded With RetroPie

If you have an old broken NES lying around and have no idea what to do with it, you may want to check out [snoius’s] latest project. He replaced the guts of his old NES with a Raspberry Pi. [snoius] started out by removing most of the electronics from his original NES to make room for the Pi. He left the original control panel board so he would be able to use the original power button and power LED. The NES power switch is an on/off toggle switch. [snoius] decided to just route the 5V USB power input directly through this switch. The result is a hard power switch for the tiny computer. The original power LED is wired up to the Pi’s 3.3V GPIO header through a 330 ohm resistor. Now when the Pi has power, the LED lights up.

The next step was controllers. It looks like [snoius] is using some USB SNES controller clones. He wanted to use the original NES controller ports but obviously the NES did not utilize USB. [snoius] used a saw to cut the backs off of the controller ports, leaving a flat surface. He then used a utility knife to carve out a hole in the shape of a female USB port. He mounted some ports in place and then wired the inside up to some short USB cables with male ends. These were plugged into a USB hub that is hidden inside of the NES case.

The Pi is also hooked up to a short HDMI cable and a short power cable. The loose ends of the cables are mounted to a small block of wood. Notches are cut out of the wood to better fit the cable ends. The rear of the NES has two holes cut out where the original connectors used to be in order to accommodate the new connectors.

With all of the hardware taken care of, [snoius] still needed a way to actually play his games. That’s where RetroPie saved the day. RetroPie is a Linux distribution for the Raspberry Pi that is specifically created to make it easy to play old video games. It includes emulators for many old systems including NES, SNES, SEGA Genesis, Gameboy, etc. [snoius] installed RetroPie onto an 8GB SD card and copied over all of the ROMs he could find. The end result is what appears to be an original NES at a glance, but is in fact multiple retro gaming systems in one. It also contains hundreds of video games in on board memory instead of requiring a large library of physical cartridges.

[via reddit]

Bench Power Supply Constant Current EZ-SET

constant_current_mod3

Here is a nice hack you may find very useful if you have a cheaper bench power supply that supports constant current limit protection (CC mode) and the only way to set or check your max current limit is to disconnect your circuit, short the power supply outputs and then check or set your limit. Yes, what a pain! [Ian Johnson] was enduring this pain with a couple of Circuit Specialist bench power supplies and decided to do something about it. After finding a download of the circuit diagram for his CSI3003X-5 supply he was able to reverse engineer a hack that lets you press a new button and dial-in the max current setting. Your first guess is that he simply added a momentary button to short the power supply outputs, but you would be wrong. [Ian’s] solution does not require you to remove the load, plus the load can continue running while you set your current limit. He does this by switching the current display readout from using 0–3 volts off an output shunt resistor to using the 0-3 volts output from a digital potentiometer which is normally used to set the power supplies’ constant current limit anyway. So simple it’s baffling why the designers didn’t include this feature.

Granted this is a simple modification anybody can implement, however [Ian] still wasn’t happy. A comment by [Gerry Sweeney] set him on the path to eliminate the tedious multi-button pressing by implementing a 555 momentary signal to switch the circuit from current load readout to current set readout. This 2nd mod means you just start pressing your up-down CC set buttons and it momentarily switches over the display to read your chosen max current and a few moments later the display switches back to reading actual load current. Brilliant! Just like the expensive big boy toys.

[Ian] doesn’t stop with a simple one-off hack job either. He designed up a proper PCB with cabling and connectors, making an easy to install kit that’s almost a plug-in conversion kit for Circuit Specialist bench power supplies (CSI3003X-5, CSI3005X5, CSI3003X3, CSI3005XIII). It is not a 100% plug-in kit because you do have to solder 3 wires to existing circuit points for signal and ground, but the video covering that task seemed trivial.

This hack could very well work with many other power supplies on the market being Circuit Specialist is just rebadging these units. For now, only the models listed after the break are known to work with this hack. If you find others please list in the comments.

After the break we will link to all three progressive mod videos incase you want to learn how to mod your own power supply or you could just order a prebuilt kit from [Ian].

Continue reading “Bench Power Supply Constant Current EZ-SET”

Beautiful Modded NES For The 25th Anniversary Of Mega Man, Plus Bonus Interview!


Today I had the pleasure of interviewing [PlatinumFungi] about this fantastic NES mod he did. This year is the 25th anniversary of the first Mega Man video game. Unhappy with the current celebratory actions of capcom, [PlatinumFungi] set out to create something he felt was worthy. He managed to pull that off pretty well.

The NES you can see in the video is fantastic looking. It has a beautiful shiny automotive finish, supplied by [Custom NES Guy] and a pixel perfect backlit Mega Man on top. Additional enhancements are stylized decals on the front of the game bay and matching labels on the sides and back. The cartridge is even illuminated while it is in place.

Check out some pictures after the break!

Continue reading “Beautiful Modded NES For The 25th Anniversary Of Mega Man, Plus Bonus Interview!”

MOD Player For The Stellaris Launchpad

[Ronen K.] wrote in to tell us about the MOD playing Stellaris Launchpad project he recently completed. A MOD is a sound file for the computers of days long gone. But you’ll certainly recognize the sound of the 8-bit goodness that is coming out of this device.

To understand how a MOD file stores samples you might want to glance at the Wikipedia page. There are a ton of these files out there, but this implementation is meant for files with only four channels. For now the only external hardware used is an audio jack which needs a ground connection and a PWM signal on each of the two audio channels. [Ronen] is storing the files in flash memory rather than using an SD card or other external storage. This leaves 213k of space for up to six files that can be selected by the user buttons which cycle forward or backward through the list. See this demonstrated after the break.

The project ports existing code from an STM32 application. Since that is also an ARM microcontroller there’s not a ton of work that needed to be done. But he did have to write all of the PWM functionality for this chip. This PWM tutorial turned out to be very helpful during that process.

Continue reading “MOD Player For The Stellaris Launchpad”

Announcing: International Hack Day, August 11th.

There is no single and definitive definition of what hacking is. We all have different versions of similar ideas in our head, but depending on your background and area of enthusiasm, hacking means something different. While dictionary.com has many definitions of the word itself, none seem to cover what we see on a daily basis.

We set out to define “hacking” ourselves. We tossed around words like “modify”, “kludge”, “explore”, and “create”. Each time we committed an increasingly vague definition onto the page, we decided it was too narrow and tossed it in the proverbial trash. The variations were just too many.

What we do know is that “hacking” seems to breed advancement and innovation. Much like mutations in an evolutionary chain, each hack pushes the topic in a slightly new direction, inspiring others and thereby perpretuating the evolutary event. In a very short time we’ve witnessed hacking bring forth the evolution of wagons to cars, kites to airplanes, and the creation of the computer.

We at Hackaday would like to declaire August 11th to be “International Hack Day”. A day to celebrate hacking in all of its diverse forms. From soldering to sewing, coding to carbonating, knitting to knurling, we want you to keep on hacking. Take August 11th as a day to show pride in your hacking. Waive your hacker flag high and educate those around you.

We have asked many of our friends to contribute their personal definition of hacking. Here they are, in the order they were received.

Continue reading “Announcing: International Hack Day, August 11th.”

Chiptune Player Uses Preprocessed .MOD Files

[Kayvon] just finished building this chiptune player based on a PIC microcontroller. The hardware really couldn’t be any simpler. He chose to use a PIC18F2685 just because it’s big enough to store the music files directly and it let him get away with not using an external EEPROM for that purpose. The output pins feed a Digital to Analog Convert (DAC) chip, which in turn outputs analog audio to an LM386 OpAmp. The white trimpot sandwiched between the chips controls the volume.

The real work on this project went into coding a program which translates .MOD files into something the PIC will be able to play. Because of the memory limits of the chip it is unable to directly use all of the instrument samples from these files. [Kayvon] wrote a program with a nice GUI that lets him load in his music and page through each instrument to fine-tune how they are being re-encoded. The audio track from the video after the break doesn’t do the project justice, but you will get a nice look at the hardware and software.

Continue reading “Chiptune Player Uses Preprocessed .MOD Files”