Print Flexible PCBs With A 3D Printer

Let’s get it out of the way right up front: you still need to etch the boards. However, [Mikey77] found that flexible plastic (Ninjaflex) will adhere to a bare copper board if the initial layer height is set just right. By printing on a thin piece of copper or conductive fabric, a resist layer forms. After that, it is just simple etching to create a PCB. [Mikey77] used ferric chloride, but other etchants ought to work, as well.

Sound simple, but as usual, the devil is in the details. [Mikey77] found that for some reason white Ninjaflex stuck best. The PCB has to be stuck totally flat to the bed, and he uses spray adhesive to do that. Just printing with flexible filament can be a challenge. You need a totally constrained filament path, for one thing.

Continue reading “Print Flexible PCBs With A 3D Printer”

3D Printed Door Latch Has One Moving Part – Itself!

A group at the Hasso-Plattner Institute in Germany explored a curious idea: using 3D printed material not just as a material – but as a machine in itself. What does this mean? The clearest example is the one-piece door handle and latch, 3D printed on an Ultimaker 2 with pink Ninjaflex. It is fully functional but has no moving parts (besides itself) and has no assemblies. In other words, the material itself is also the mechanism.

The video (embedded below) showcases some similar concept pieces: door hinges, a pair of pliers, a pair of walker legs, and a pantograph round out the bunch. Clearly the objects aren’t designed with durability or practicality in mind – the “pliers” in particular seem a little absurd – but they do demonstrate different takes on the idea of using a one-piece item’s material properties as a functional machine in itself.

Continue reading “3D Printed Door Latch Has One Moving Part – Itself!”

Zizzy The Personal Robot Uses 3D Printed Artificial Muscles Instead Of Hobby Servos

Zizzy is a personal robot designed to help those with limited mobility. Rather than being assisted by a nightmare creature, Zizzy would offer a more appealing and friendly option.

The coolest part about Zizzy is the 3D printable pneumatic artificial muscles. Project creator, [Michael Roybal] said it took over a year of development to arrive at the design.

The muscles are hollow bellows printed out of Ninjaflex with carefully calibrated settings. A lot of work must have gone into the design to make sure that they were printable. After printing the muscles are painted with a mixture of fabric glue and MEK solvent. If all is done correctly the bellows should be able to hold 20 PSI without any problem.

This results in a robot with very smooth and precise movement. It has none of the gear noise and can also give when it collides with a user, a feature typically found only in very expensive motor systems. If [Michael] can find a quiet compressor system the robot will be nearly silent.

3D Printed Kinetic Art

Artificial muscles and soft robotics don’t get the respect they deserve, but [mikey77] is doing some very interesting work with artificial muscles that can be made on just about any 3D printer.

Like other artificial muscles and soft robotic actuators we’ve seen – like this walking sea slug and this eerie tentacle – [mikey77]’s muscles are powered by air. Instead of the usual casting method, he’s printing these muscles from Ninjaflex, a flexible plastic that is compatible with most 3D printers.

As they come off the printer, these 3D printed pneumatic muscles leak, and that means [mikey77] has to seal them. For that, he created a sealant out of Loctite fabric glue thinned with MEK. The addition of MEK dissolves the outer layer of Ninjaflex, allowing the glue to bond very, very well to the printed muscle.

So far, [mikey77] has created a pneumatic flower that blooms when air is added. He’s also created a muscle that can lift more than four pounds of weight with the help of a 3D printed skeleton. It’s a great way to experiment with flexible robots and pneumatic muscles, and we can’t wait to see what weird creatures can be created with these actuators.

Thanks [Lloyd] for sending this one in.

Walk Like A Xenomorph

[James Bruton] is busy working on his latest project, a “scrap metal sculpture”-inspired Alien Xenomorph suit.  However, he wanted to get a boost in height as well as a digitigrade stance. To that end, [James] 3D-printed a pair of customized stilts. Each stilt consisted of a lifter with several parts laminated together using acetone. He bolted an old pair of shoes onto the stilts, adding straps across the toes to keep the shoes from lifting up.

While the stilts worked very well, [James] wanted to add soles to them to give him some traction as he walked – falling while in a Xenomorph costume composed of sharp plastic sounds painful enough! He decided to hybrid print the soles using ABS and Ninjaflex. The ABS part of the sole was then acetone-welded to the bottom of the stilts.

[James] hopes to add some claws for effect, so long as they don’t impede his walking too much. He has already completed a good amount of the 3D-printed suit. We know the finished project is going to be amazing: [James] has created everything from Daleks to Iron Man!

Continue reading “Walk Like A Xenomorph”

Make Flexible PCBs With Your 3D Printer

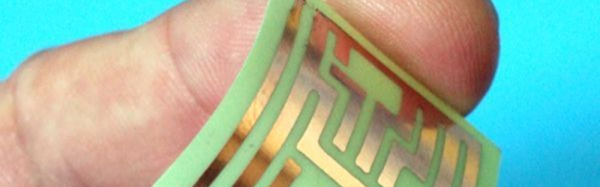
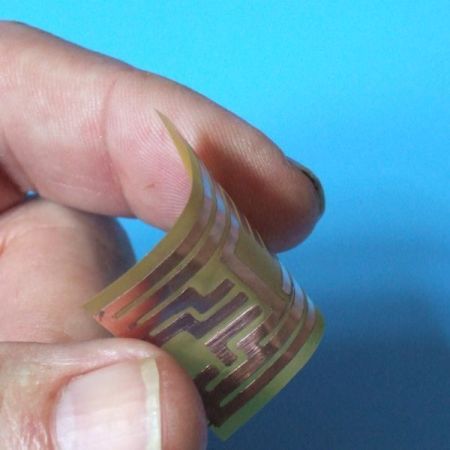
The last few years have seen great strides in budget printed circuit board manufacturing. These days you can have boards made in a week for only a few dollars a square inch. Flexible PCBs still tend to be rather expensive though. [Mikey77] is changing that by making flex circuits at home with his 3D printer. [Mikey77] utilized one of the properties of Ninjaflex Thermoplastic Elastomer (TPE) filament – it sticks to bare copper!

The TPE filament acts as an etch resist, similar to methods using laser printer toner. For a substrate, [Mikey77] lists 3 options:

.004″ thick “Scissor cut” copper clad board from Electronics Goldmine

.002″ thick pure copper polyester taffeta fabric from lessEMF.com

<.001″ Pyralux material from Adafruit, which is one of the materials used to make professional flex PCBs.

A bit of spray adhesive will hold the Flex PCB down on the printer’s bed. The only issue is convincing the printer to print a few thousandths of an inch higher than the actual bed level. Rather than change the home position on his Z axis, [Mikey77] used AutoDesk 123D to create 3D PCB designs. Each of his .stl files has a “spacer bar”, which sits at the bed level. The actual tracks to be printed are in the air a few thousandths of an inch above the bed – exactly the thickness of the substrate material. The printer prints the spacer bar on the bed, then raises its Z height and prints on the flexible PCB material. We’re sure that forcing the printer to print in mid-air like this would cause some printer software to throw errors, but the system worked for [Mikey77] and his Makerbot.

Once the designs have been printed, the boards are etched with standard etching solutions such as ferric chloride. Be careful though – these thin substrates can etch much faster than regular PCB.

3D Printed Virtual Reality Goggles

gaming-loop

Oculus, as we know, was acquired by Facebook for $2 billion, and now the VR community has been buzzing about trying to figure out what to do with all this newly accessible technology. And adding to the interest, the 2nd iteration of the development kits were released, causing a resurgence in virtual reality development as computer generated experiences started pouring out from of every corner of the world. But not everyone can afford the $350 USD price tag to purchase one of these devices, bringing out the need for Do-It-Yourself projects like these 3D printed wearable video goggles via Adafruit.

The design of this project is reminiscent of the VR2GO mobile viewer that came out of the MxR Lab (aka the research environment that spun out Palmer Lucky before he created Oculus). However, the hardware here is more robust and utilizes a 5.6″ display and 50mm aspheric lenses instead of a regular smart phone. The HD monitor is held within a 3D printed enclosure along with an Arduino Micro and 9-DOF motion sensor. The outer hood of the case is composed of a combination of PLA and Ninjaflex printing-filament, keeping the fame rigid while the area around the eyes remain flexible and comfortable. The faceplate is secured with a mounting bracket and a pair of aspheric lenses inside split the screen for stereoscopic video. Head straps were added allowing for the device to fit snugly on one’s face.

At the end of the tutorial, the instructions state that once everything is assembled, all that is required afterwards is to plug in a 9V power adapter and an HDMI cable sourcing video from somewhere else. This should get the console up and running; but it would be interesting to see if this design in the future can eliminate the wires and make this into a portable unit. Regardless of which, this project does a fantastic job at showing what it takes to create a homemade virtual reality device. And as you can see from the product list after the break, the price of the project fits under the $350 DK2 amount, helping to save some money while still providing a fun and educational experience.

Continue reading “3D Printed Virtual Reality Goggles”