Minimal MQTT: Networked Nodes

Last time on Minimal MQTT, we used a Raspberry Pi to set up an MQTT broker — the central hub of a home data network. Now it’s time to add some sensor and display nodes and get this thing running. So pull out your ESP-8266 module of choice, and let’s get going.

DSCF8443For hardware, we’re using a WeMos D1 Mini because they’re really cute, and absolutely dirt cheap, but basically any ESP module will do. For instance, you can do the same on the simplest ESP-01 module if you’ve got your own USB-serial adapter and are willing to jumper some pins to get it into bootloader mode. If you insist on a deluxe development board that bears the Jolly Wrencher, we know some people.

NodeMCU: Getting the Firmware

We’re using the NodeMCU firmware because it’s quick and easy to get running. But you’re not stuck with NodeMCU if you want to go it alone: MQTT has broad support. [TuanPM] ported over an MQTT library to the native ESP8266 SDK and of course there’s espduino, a port for an Arduino-plus-ESP combo. He also ported the MQTT module to NodeMCU that we’ll be using today. Thanks, [TuanPM]!

Continue reading “Minimal MQTT: Networked Nodes”

Hackaday Links: May 15, 2016

The Hackaday Overlords (or Hackaday family) are running a series of AMAs on SupplyFX. What is SupplyFX? It’s a social network for EEs. Who’s in the first AMA? [Brady Forrest], the guy who runs Highway1, a Bay Area hardware accelerator. They’re the accelerator responsible for the lustworthy Keyboardio, and the startup that is purely mechanical and has shipped zero lines of code, CoolChip. If you want to talk about hardware startups, [Brady] is your man. The AMA is tomorrow, May 16th, at 13:00 Pacific.

Makerbot is dead, or at least they will be soon. Whatever. Nothing of value was lost. Lulzbot, on the other hand, is going gangbusters. They saw eight hundred percent growth over the last two years. and $15M in revenue in 2015. They did this all with open source hardware and software, and using 3D printing in a manufacturing context. They’re the jewel of the Open Hardware movement, and a shining example of what Free Software can do.

The current generation of software defined radios started with the ubiquitous TV tuner dongles, and quickly graduated to the HackRF. You can only get so much bandwidth out of a USB 2.0 socket, and the newest and bestest SDR is the LimeSDR. They’re about halfway through their crowdfunding campaign (and halfway funded), and have finally changed out the USB A connector to a USB micro B connector. Good choice.

The ESP8266 is quickly becoming the go-to device for when you want a cheap way to put a sensor on the Internet. The only problem is programming it. No problem – here’s a bunch of Lua scripts that do 90% of everything. Need to read a PIR sensor? Light up a few LEDs? Put the data from a temperature and humidity on the Internet? There you have it.

The Vintage Computer Festival West is back on this year. We’ve gone to VCF East in New Jersey for a few years now, and had a few occasional outings to the southeast and midwest Vintage Computer Festivals over the years. This is the first time the west coast has had a Vintage Computer Festival in several years. It’s in Mountain View, on August 6th and 7th. Yes, that’s the same weekend as DEF CON.

E3D, makers of fine hot ends and 3D printer paraphernalia, have released a new kind of filament. It’s called Edge, it’s based on PET, and it prints as easily as PLA, with better mechanical properties than ABS. A few sample prints made from Edge were at this year’s Midwest RepRap Festival, and the Edge’s bridging ability is crazy. You need a heated bed for Edge and it’s sensitive to moisture, but it has some very interesting properties that can be cleverly exploited.

In other filament news, Colorfabb released a filament to print clear parts. Yes, that’s very weird. Clear parts require 100% infill, meaning it will use a lot of filament. It’s still very advanced wizardry, and I’m very interested in seeing the first print of a sanded and polished convex lens.

Holy Crap it’s the 3D printing edition of the links post. [Prusa] just released the latest version of the i3. It’s now bigger: 250x210x200mm build volume. The heated bed – [Prusa] was one of the first to experiment with PCB heated beds – is now vastly improved when looking at it through a FLIR. The Mk. 42 heated bed doesn’t have a hot center or cool corners. PEI sheet removes the need for blue painters tape, glass, aqua net, or glue sticks. The printer has self-test capabilities. The mechanics of the printer, especially the Z axis, are improved. [Prusa] will be selling this as a kit for ~19000 Czech Crowns or $699 USD, but he’s RepRap to the core. Buy a spool and start printing your next printer.
 

Light Up Your Day With This LED Clock

We love clocks, and [Chris] got our attention with the internet enabled Light Clock. Time is displayed via RGB LED strip in a number of different ways around a 3D printed white disk. All the modes are based on two selectable colors to indicate hours and minutes, either in a gradient fashion or a hard stop.

Light is provided by a 144 LED neopixel strip and is powered by a beefy 4 amp 5 volt power supply, which also powers the controller. Brains are provided by a ESP8266 powered NodeMCU-12E board, and software is written using ESP8266 for Arduino core.

Being a WiFi enabled micro controller it is a simple matter of connecting to the clock using WiFi and using the embedded web pages to select your local timezone, color palette, and display mode. The correct time is set by network and will never be wrong. While there is a Kickstarter for selling the finished project, instructions and software are provided for making your own if you wish.

Join us after the break for the promotional Kickstarter and demonstration video

Continue reading “Light Up Your Day With This LED Clock”

Hello RAMPS, Meet ESP8266

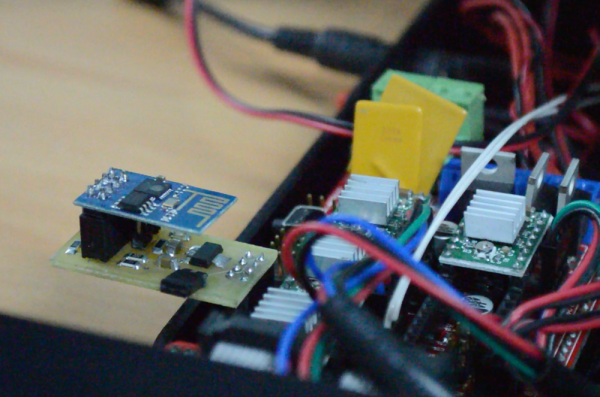
The proliferation of  DIY 3D printers has been helped in large measure by the awesome open-source RepRap project. A major part of this project is the RAMPS board – a single control board / shield to which all of the other parts of the printer can be easily hooked up. A USB connection to a computer is the usual link of choice, unless the RAMPS board has the SD-Card option to allow the 3D printer to operate untethered. [Chetan Patil] from CreatorBot built a breakout board to help attach either the ESP8266 WiFi or the HC-05 Bluetooth module to the Aux-1 header on the RAMPS board. This lets him stream G-code to the printer and allow remote control and monitoring.

While the cheap ESP8266 modules are the current flavor of the season with Hackers, getting them to work can be quite a hair tearing exercise. So [Chetan] did some hacking to figure out the tool chain for developing on the ESP module and found that LUA API from NodeMcu would be a good start. The breakout board is nothing more than a few headers for the ESP8266, the HC-05 and the Aux-1 connections, with a few resistors, a switch to set boot loader mode and a 3.3V regulator. If you’re new to the ESP8266, use this quick, handy, guide by [Peter Jennings] to get started with the NodeMCU and Lualoader. [Chetan]’s code for flashing on the ESP8266, along with the Eagle board design files are available via his Github repo. Just flash the code to the ESP8266 and you’re ready to go.

One gotcha to be aware of is to plug in the ESP module after the printer has booted up. Otherwise the initial communication from the ESP module causes the printer to lock up. We are sure this is something that can be taken care of with an improved breakout board design. Maybe use a digital signal from the Arduino Mega on the RAMPS board to keep the ESP module disabled for a while during start up, perhaps? The video after the break gives a short overview of the hack.

Continue reading “Hello RAMPS, Meet ESP8266”

The Internet Of Soldering Irons

The Internet of Things needs — well — things. Do you really need your paper shredder hooked up to the Internet? Maybe. But [Vegard Paulsen] put something on the network that every hacker can relate to: his soldering iron.

In typical hacker fashion, fixing a broken digital display on the soldering station turned into a development project that allows [Vegard] to monitor the temperature of his soldering iron on his phone. He found a handy source of power on the station’s PC board and connected a NodeMCU WiFi device (that uses the ubiquitous ESP8266 and an onboard Lua interpreter).

internet-of-soldering-irons-meterThe data pushes out to the Thingspeak server which handles pushing data out to the bigger network, and data representation (like the cool Google gauge in the picture). The best part: [Vegard] gets a phone notification when he accidentally leaves his soldering iron on. How perfect is that?

One unique challenge he faced was soldering the power wires to the soldering station. This could be a problem because the iron tip is grounded so making the joint while the iron was energized would probably blow a fuse (or worse). Luckily, [Vegard] thought ahead and devised a plan that apparently worked.

We’ve seen other examples of how easy NodeMCU and Thingspeak work to put the mundane on the Internet. It seems particularly appropriate to hack a soldering iron, though.

Review: HUZZAH Is The ESP8266 WiFi Setup You Need

A little board that adds WiFi to any project for a few hundreds of pennies has been all the rage for at least half a year. I am referring to the ESP8266 and this product is a marrige of one of those WiFi modules with the support hardware required to get it running. This week I’m reviewing the HUZZAH ESP8266 Breakout by Adafruit Industries.

If you saw the article [cnlohr] woite for us about direct programming this board you will know that a good chunk of that post covered what you need to do just to get the module into programming mode. This required adding a regulated 3.3V source, and a way to pull one of the pins to ground when resetting the power rail. Not only does the HUZZAH take care of that for you, it turns the non-breadboard friendly module into a DIP form factor while breaking out way more pins than the most common module offers. All of this and the price tag is just $9.95. Join me after the break for the complete run-down.

Continue reading “Review: HUZZAH Is The ESP8266 WiFi Setup You Need”

Switch Mains Power With An ESP8266

Before we begin, we must begin with an obligatory disclaimer: handling mains voltage can be very dangerous. Do not do so unless you are qualified! You could burn your house down. (Without the lemons.) That being said, [TJ] has created an interesting dev board for controlling mains voltage over WiFi with the now-ubiquitous ESP8266 module. At only 50mm x 25mm, it is easily small enough to fit inside a junction box!

Called the MPSMv2, the core of the project is the ESP8266 module. The dev board itself can support anything with GPIO pins, whether it’s an Arudino, Raspberry Pi, or anything else with those features. Flashing the NodeMCU firmware is pretty much all that needs to be done in order to get the device up and running, and once you get the device connected to your WiFi you’ll be able to control whatever appliances you want.

The device uses a triac to do the switching, and is optically isolated from mains. Be sure to check out the video after the break to see the device in action. All in all, this could be a great way to get started with home automation, or maybe just do something simple like build a timer for your floor lamp. Anything is possible!

Continue reading “Switch Mains Power With An ESP8266”