Hacked Together NAS In A Box

hacked-together-nas-in-a-box

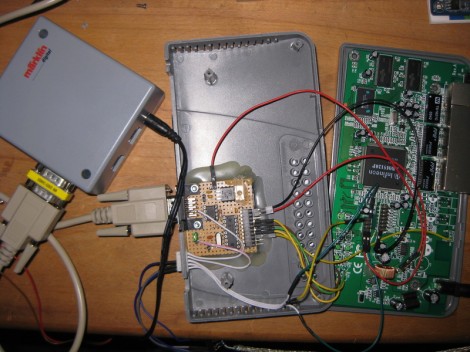
[David] is serving up files on his home network thanks to this Frankenstein’s monster of a Network Attached Storage device. It looks like he raided all the good bits from his parts bin to bring it all together.

The case is a tin box which may have been for a card/board game or some holiday treats. The hardware started with an NS-K330 server which he picked up from Deal Extreme. It has a NIC and a couple of USB ports but it tends to run really hot so he added a heat sinks to the board’s main chips. The hard drives are both 2.5″ form factor from old laptops. He uses some 2.5″ to 3.5″ mounting adapters to attach them to the tin box. A pair of USB to IDE adapters shed their cases and were solder directly to the wires which make a connection with the server’s USB ports.

There is a Linux distro specifically for this hardware but [David] wasn’t impressed with it. He ended up compiling OpenWRT for it and is satisfied with the functionality that provides.

I/O Extender Board And Case For A Cheap WiFi Router

This 3d printed case houses the already small [TP-Link TL-WR703N] but also makes room for a custom expansion board. The expansion board is designed to make the device more hacker friendly, and who doesn’t need a nice case to hold it?

Since the router board already has a USB port (intended for use with USB 3G modems) the add-on acts as a USB hub. The stock USB connector is replaced by a pin header which mates with a DIL socket on the underside of the expansion board. Through the use of an FTDI chip the expander offers three USB ports and a 2×10 pin header to break out the GPIO pins from the router’s processor. Only two USB ports are visible in the image above. That’s because the third is recessed, and an opening has not been added to the enclosure. This struck us as odd until we read that the port is meant to be used with a low-profile thumb drive, essentially adding internal storage for the device.

[Thanks buZz]

Putting Scores Of Arduinos On The Internet With One Router

Like many hackers of late, [Rick] has been experimenting with connecting Arduinos to the Internet with a disused WiFi router and an installation of OpenWRT. Unlike his fellow makers, [Rick] thought it would be wasteful to dedicate a single router to one Arduino project, so he used a small, low power wireless module to connect up to 30 Arduinos to the Internet.

Just as in a few recent builds (1, 2), [Rick] found an old Fonera router sitting in a box at his local hackerspace. After installing OpenWRT, [Rick] connected a very small wireless module to the router’s GPIO pins and patched the firmware to put an SPI bus on the router.

Now, whenever [Rick] wants to connect an Arduino project to the Internet, all he needs is a $4 radio module. This radio module connects to the router, and the router handles the networking requirements of up to 30 DIY projects.

If you’re looking to build an Internet-enable sensor network, we honestly can’t think of a better or cheaper way of going about it. Nice job, [Rick].

Router Controlling Choo-choos Over The CAN Bus

This setup is used to control a model railroad. Well, not entirely this setup. [Gerhard Bertelsmann] already has a proper railroad controller, and it just happens to offer CAN bus communications. He’s using OpenWRT and a cheap router to connect the bus to the network.

Originally he wanted to use a Raspberry Pi board for the project, but the incredible backorder  situation with that hardware led him to grab an old router. After loading OpenWRT he started working out how to connect a couple of ICs (MCP2515 and MCP2551) that will take care of the CAN bus communications. The hardware connections end up being pretty simple, with five data lines (and their pull-up resistors) connecting to the router’s serial header. From there it was a matter of mapping the device in software so that the hardware can be controlled over the network.

We like this example since CAN is used is a lot of other applications.

Nah, You Don’t Need An Ethernet Module For Your Arduino

[Andy] needed a cheap Internet connection between a data-gathering Arduino and his home server. An Ethernet shield would suffice, but he couldn’t run CAT5 to the Arduino’s location. Wireless shields are hideously expensive, and after looking over the popular Zigbee modules, [Andy] had a few concerns about range and build complexity.

The obvious solution to this problem was getting a cheap WiFi router, flashing OpenWRT firmware on the device, and piping sensor data through the Arduino’s USB port, through the router, and over a WiFi connection to the server.

[Andy] used a TP-Link TL-WR703N wireless ‘travel router’ available on eBay £15 (~$30 USD when we checked). After flashing the router with OpenWRT, [Andy] had a wireless connection from a remote data-collecting Arduino directly to his server.

Attentive Hack a Day readers will note this is the third ‘wireless router + OpenWRT as a dev board’ build this week (first one, second one) . No, we don’t know what’s going on, or why the collective unconscious of makers around the globe decided to latch onto this type of build so suddenly. OpenWRT is available for hundreds of different routers, and anything that keeps disused routers out of the landfill (with the bonus of doing something useful) is alright in our book, so if you have another similar build, send it in and we’ll get around to it sometime.

Adding A Router And Wireless Camera To A Remote Controlled Helicopter

Last Christmas, [bonafide] received a WiFi enabled remote control helicopter from his employer. The heli is an interesting bit of kit, able to be controlled with an Android or iDevice. Being the good tinkerer he is, [bonafide] took a screwdriver to his Wi-Fli Bladerunner Helicopter and reengineered the toy to use an off-the-shelf wireless router.

The protocol used by the Wi-Fli helicopter is closed source, but a few people have had their hand at reverse engineering this cool toy. Instead of simply controlling the helicopter over WiFi, [bonafide] wanted to add a few unsupported features like sending images from a webcam. This isn’t supported in the toy’s firmware, so after a valiant attempt at flashing new firmware, [bonafide] decided to replace the electronics with a WiFi router.

In the stock configuration, the helicopter receives commands from an RT5350F-based WiFi module. This module communicates to the servos and motors with a serial connection. [bonafide] replaced the WiFi module with a very small router capable of running OpenWRT. The new router was easily configured to send commands to the motors, and allowed [bonafide] to add a small keychain webcam to stream video back to his desktop.

Interestingly, the makers of the WiFli helicopter, Interactive Toy Concepts, are putting out a streaming-video version of this toy next fall. The current version of the WiFli helicopter may hit the Toys ‘r Us clearance bin before that, so if you’d like your own unmanned aerial drone [bonafide]’s may be worth looking over.

Special thanks to [MS3FGX] for sending this one in. Also, the non-coral cache version of [bonafide]’s site is here, but try not to turn his server into a pile of molten slag.

Complete Guide To Compiling OpenWRT

Regular reader [MS3FGX] recently wrote a guide to compiling OpenWRT from source. You may be wondering why directions for compiling an open source program warrant this kind of attention. The size and scope of the package make it difficult to traverse the options available to you at each point in the process, but [MS3FGX] adds clarity by discussion as much as possible along the way.

OpenWRT is an open source alternative firmware package that runs on may routers. It started as a way to unlock the potential of the Linksys WRT54G. But the versatility of the user interface, and the accessibility of the Linux kernel made it a must-have for any router. This is part of what has complicated the build process. There are many different architectures supported and you’ve got to configure the package to build for your specific hardware (or risk a bad firmware flash!).

You’ll need some hefty hardware to ease the processing time. The source package is about 300 MB but after compilation the disk usage will reach into the Gigabyte range. [MS3FGX] used a 6-core processor for compilation and it still took over 20 minutes for a bare-bones distribution. No wonder pre-built binaries are the only thing we’ve ever tried. But this is a good way to introduce yourself to the inner workings of the package and might make for a frustrating fun weekend project.