USB-Parallel-GRBL

USB To DB25 Adapter Uses GRBL For Parallel Port CNC Communication

With the continuing manufacture of new computers, there is a clear and obvious trend of the parallel port becoming less and less common. For our younger readers; the parallel port is an interface standard used for bi-directional communication between a computer and a variety of peripherals. The parallel port’s demise is partially due to the invention of the USB standard.

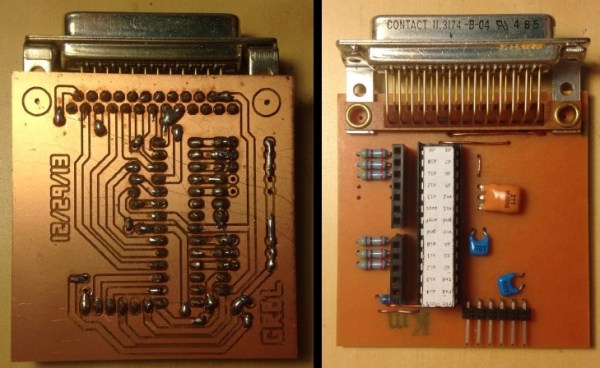
If tinkering with CNC Machines is one of your hobbies then you are familiar with the parallel port interface being fairly popular for CNC control board connections. So what do you do if your new fancy computer doesn’t have a parallel port but you still want to run your CNC Machine? Well, you are certainly not stuck as [Bray] has come up with a USB to Parallel Port Adapter solution specifically for CNC use.

A cheap off-the-shelf USB to DB25 adapter may look like a good idea at first glance but they won’t work for a CNC application. [Bray’s] adapter is Arduino-based and runs GRBL. The GRBL code is responsible for taking the g-code commands sent from the computer, storing them in a buffer until they are ready to be converted to step and direction signals and sent to the CNC controller by way of the parallel port DB25 connector. This is a great solution for people needing to control a CNC Machine but do not have a parallel port available.

[Bray] is using a Raspberry Pi running GRBLweb to control his adapter board. However, there are other programs you can use to communicate with GRBL such as Universal G-Code Sender and GRBL Controller.

The board has been created in Eagle PCB Software and milled out using [Bray’s] CNC Router. The design is single-sided which is great for home-brew PCBs. He’s even made a daughter board for Start, Hold and Reset input buttons. As all great DIYers, [Bray] has made his board and schematic files available for others to download.

Bit Banging Through A USB Parallel Port Adapter

If you’ve ever looked into low-level parallel port access you may have learned that it only works with actual parallel port hardware, and not with USB parallel port adapters. But here’s a solution that will change your thinking. It borrows from the way printers communicate to allow USB to parallel port bit banging without a microcontroller (dead link, try Internet Archive).

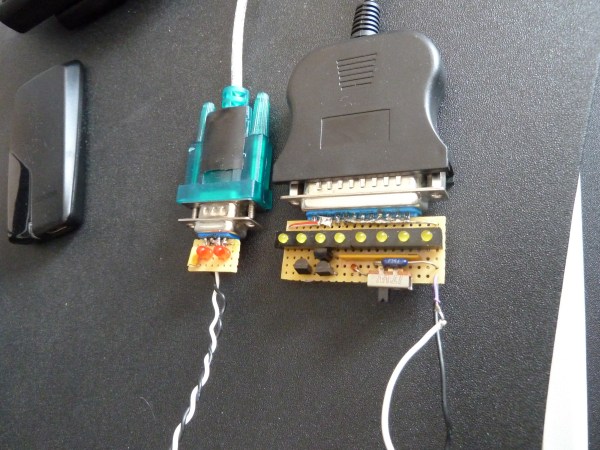
Sure, adding a microcontroller would make this dead simple. All you need to do is program the chip to emulate the printer’s end of the communications scheme. But that’s not the approach taken here. Instead the USB to RS232 (serial) converter also pictured above is used as a reset signal. The strobe pin on the parallel port drives an inverter which triggers a thyristor connected to the busy pin. Thyristors are bistable switches so this solution alone will never clear the busy pin. That’s where the serial connection comes into play. By alternating the data transmitted from the computer between the bit-bang values sent to LP0 and 0xF0 sent to the serial connector the eight parallel data bits become fully addressable. See the project in action in the clip after the break.

Hackaday Links: November 4, 2012

Wait, you’re using a Dremel to cut PCBs?

Cutting copper-clad board or – horrors – depanelizing PCBs is a pain if you don’t have the right tool. Over at Hub City Labs they’re using a small, cheap metal shear & break. Bonus: it can cut and bend sheet metal, so the Hub City folks can also make enclosures.

Color Codes? Yes, Color Codes.

[Joe] sent in a cool utility he whipped up called resisto.rs. Plug in a resistor value, and it’ll spit out the 4-band, 5-band, and surface mount labels for that resistor value. Pretty neat.

Parallel Ports

Parallel ports may be a dying breed, but that didn’t stop [Electroalek] from putting together a VU meter that connects to his LPT port. It’s an extremely simple design; just connect some LEDs and resistors to the pins of a parallel port, and you can easily control them via software on a computer. Playing around with an LPT port used to be common knowledge, so we’re glad to see [Electroalek]’s work here.

The power is out, but Radio Shack is still open

[Jason] is stuck in New Jersey without power and needed a way to charge his phone. He whipped up a cell phone charger using an RC car battery and an LM317 voltage regulator. It’s an easy circuit to piece together, and judging from [Jason]’s picture will hopefully keep his cell phone charged until the power comes back on.

Shooting 50 Nerf darts all at once

If [Rob]’s project log is to be believed, it looks like they’re having a lot of fun over in the Sparkfun warehouse. They decided to have a full-scale Nerf gun war for a summer intern’s last day. [Rob] came up with a DIY Nerf shotgun that shoots 50 darts across the room, just waiting to be found sometime in the next decade.

There’s a great video of [Rob] firing the single barrel (yeah, they made a trident-shaped one as well) gun at well prepared but unsuspecting coworkers. Be sure to check out the comments of this post to see Hackaday readers frothing at the mouth because PVC pipe isn’t a pressure vessel guys. You’ll all surely die.

Hacking A Parallel Port Flash Memory Programmer

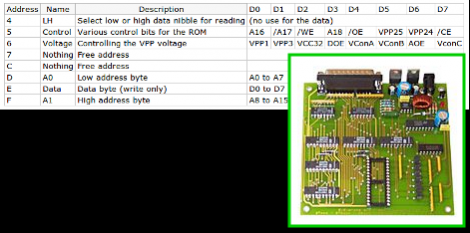
[Pulko Mandy] doesn’t use his flash ROM programmer very often, but he does use it. When he tried to get support for a new chip and the manufacturer suggested he just buy a newer version he decided to hack the programmer and it’s software instead.

This device connects to the parallel port and was intended for use with MS-DOS systems (no wonder there’s no longer support from the company). The board uses logic chips to add read and write function. So the first step was to analyze how they connect together and come up with a set of commands. While at it he also made some changes to the board to bring the voltage more in spec and ensure the logic levels on the parallel port met the correct voltages.

His plan was to use the board with a Linux system so the parallel port interface can stay. He used what he learned from the hardware inspection to write his own interface in C++. It works with a chip he was able to use under the MS-DOS software, but he hasn’t gotten it to work with the chip that sparked this adventure. If you’re familiar with how the AT29C040A works please consider lending a hand.

Accessing An SD Card Through A Parallel Port, Just Because

[Vinod] sent in a very cool build he says is somewhat of a ‘mad project’: he mounted an MMC and SD card under Linux using the parallel port on his computer. Even though parallel ports are getting rarer these days, we absolutely love [Vinod]’s dedication and willingness to dig around the Linux kernel.

The hardware portion of the build is very simple – just an SD/MMC header and a few resistors wired up to a parallel port. The software side of the hack gets pretty interesting with [Vinod] building a kernel module, something we rarely see on Hackaday.

We’d have to agree with [Vinod]’s ‘mad project’ sentiment, if only because of the terrible throughput of [Vinod]’s adapter; it takes him more than a minute to transfer a 1.5 MB file onto the SD card – terribly slow, to put it mildly. Nevertheless, we’ve got to respect [Vinod] for pushing the limits of uselessness and still building something cool in the process.

Using The Parallel Port As A Logic Sniffer

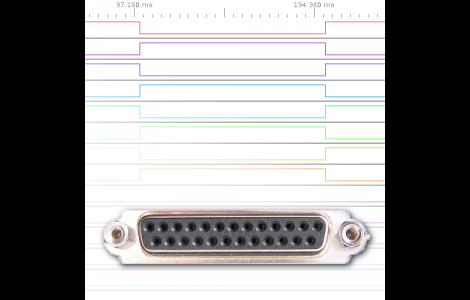
[Fernando] wrote in to share his take on building a logic analyzer. He’s using the parallel port to capture data and feed it to the display software of your choice.

The method depends on a custom kernel which alters the way the parallel port works. The kernel he compiled includes a method of intercepting the signals coming in from the hardware, passing that data to the /dev/parport* as it should, but also sending a copy to /dev/parportsnif*. It also creates a log file which is in the OpenBench Logic Sniffer format for easy use with various display software.

Of course this is easiest to use with a Linux system, but can also be run as a virtual machine under Windows. We’d plan on using a virtual machine within Linux as well since this is a custom kernel and will probably only see occasional use.

Who Couldn’t Use A Little More Screen Space?

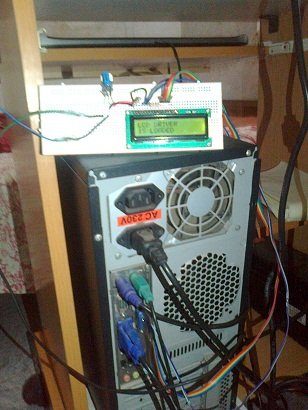
Text LCD’s are handy for any occasion, a printer port on your PC is also darn handy as well. Mix together and add in a splash of linux and you get a very handy Linux device driver for a 16×2 LCD connected to the parallel port.

Electrically the LCD is wired up in a typical 4 bit mode, this allows the parallel port to use its 8 bit data register to write data, but also control the Register Select and Enable pins. Next is to make a module for linux to use, it seems like pretty standard fair for this type of screen.

Make the driver, insert the module so it can be loaded, and add a node so you know where to find it later, and your only an “echo Hello > /dev/my_lcd” away from finding all sorts of creative uses for your new external display.