DIY Injection Molder Built From A Cheap Pneumatic Press

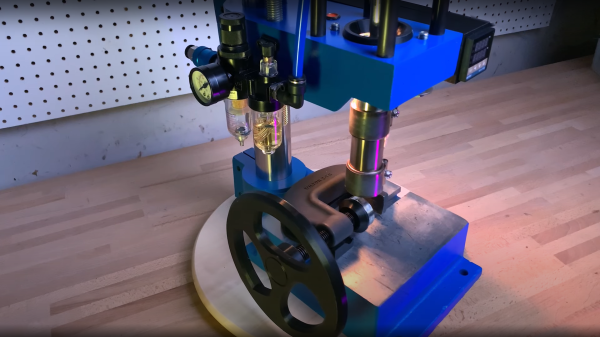
[Kurt Schaefer] was watching YouTube videos of people making molds for injection molding purposes using what he considered to be the toy 3018 CNC machines, and looking at the results, decided he needed a piece of the action. However, once you have molds, the next obvious issue to address is lack of access to an injection molding machine. But these things are expensive. As luck would have it, you can get a nice-looking pneumatic press for less than $350, and with a little more money spent, [Kurt] found he could convert it into a functional injection molding machine (video, embedded below), and get some half-decent results out of it.

After ordering the press on eBay, what eventually arrived was quite a mess, having clearly been inadequately packed for its weight, and had sustained some damage in transit. Despite this, it seemed the functional bits were fine, so [Kurt] decided to press on with the build. The first obvious change is the requirement of a heated chamber to deal with the feedstock material. Using an off-the-shelf injection molding chamber by buster beagle 3D, only a few standoffs and a support bracket needed machining in order to complete the mechanics. A common PID controller available from the usual suppliers, with some heat bands wrapped around the chamber, dealt with the injection temperature requirements, and some 3D printed enclosures wrapped it all up neatly.

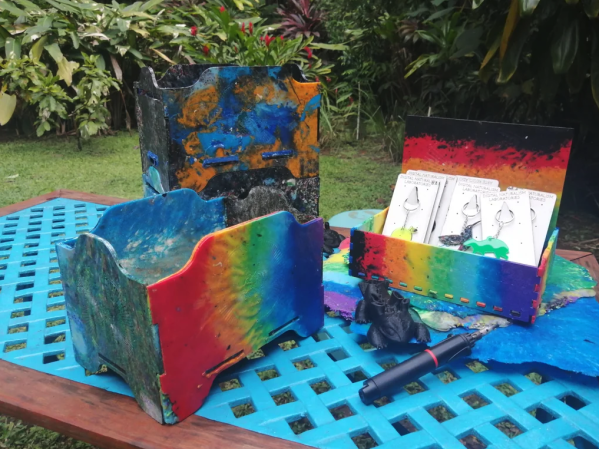
After some initial wobbles, and a couple of hacks to the design, [Kurt] got some pretty good results out of this simple setup, and it appears to be pretty tune-able and repeatable, which will help maintain the quality of those results. In short, a neat hack of easy to get parts, and perhaps a welcome addition to a hackerspace near you?

3D printed parts are available on the Thingiverse page, as well as a Fusion360 CAD model. The shopping list for parts can be found in the video description, if you want to have a go at reproducing this.

We’ve seen a few DIY injection molding attempts over the years, like this slick plastic molding setup. Here’s one with 3D-printed molds, and if you just need something the right shape, you could just injection mold with a hot glue.

Continue reading “DIY Injection Molder Built From A Cheap Pneumatic Press”

Retrotechtacular: Understanding The Strength Of Structural Shapes

Strength. Rigidity. Dependability. The ability to bear weight without buckling. These are all things that we look for when we build a mechanical structure. And in today’s Retrotechtacular we take a closer look at the answer to a question: “What’s in A Shape?”

As it turns out, quite a lot. In a wonderful film by the prolific Jam Handy Organization in the 1940’s, we take a scientific look at how shape affects the load bearing capacity of a beam. A single sided piece of metal, angle iron, C-channel, and boxed tubing all made of the same thickness metal are compared to see not just just how much load they can take, but also how they fail.

The concepts are then given practical application in things that we still deal with on a daily basis: Bridges, cars, aircraft, and buildings. Aircraft spars, bridge beams, car frames, and building girders all benefit from the engineering discussed in this time capsule of film.

None of the concepts in this video are suddenly out of date, because while our understanding of engineering has certainly progressed since this film was made, these basic concepts remain the same. As such, they will apply to any structural or mechanical devices that we make, be it 3d printed, CNC routed, welded, glued, vacuum formed, zip tied, duct taped, bailing wired, or hot glued.

Keep your eyes open for a wonderful sights and sounds of a rare Boeing 314 Clipper landing on water and a 1920’s Buffalo Springfield Steam Roller demonstrating how wonderful the film’s sponsor, Chevrolet, makes their automobile frames.

Continue reading “Retrotechtacular: Understanding The Strength Of Structural Shapes”

The Wanhao Duplicator CNC Heat Sealer

One custom, compliant heat exchanger, coming right up!

[Thane Hunt] needed to find a way to make a variety of different heat-seal patterns on a fluid heat exchanger made from polyolefin film, and didn’t want all the lead time and expense of a traditional sealing press machined from a steel plate. Pattern prototyping meant that the usual approach would not allow sufficient iteration speed and decided to take a CNC approach. Now, who can think of a common tool, capable of positioning in the X-Y plane, with a drivable Z axis and a controlled heat source? Of course, nowadays the answer is the common-or-garden FDM 3D printer. As luck would have it, [Thane] had an older machine to experiment with, so with a little bit of nozzle sanding, and a sheet of rubber on the bed, it was good to go!

Custom seal path made in Onshape

Now, heat sealing is usually done in a heated press, with a former tool, which holds the material in place and gives a flat, even seal. Obviously this CNC approach isn’t going to achieve perfect results, but for proof-of-concept, it is just fine. A sacrificial nozzle was located (but as [Thane] admits, a length of M6 would do, in a pinch) and sanded flat, and parallel to the bed, to give a 3mm diameter contact patch. A silicone rubber sheet was placed on the bed, and the polyolefin film on top. The silicone helped to hold the bottom sheet in place, and gives some Z-axis compliancy to prevent overloading the motor driver. Ideally, the printer would have been modified further to move this compliancy into the Z axis or the effector end, but that was more work. With some clever 3D modelling, Cura was manipulated to generate the desired g-code (a series of Z axis plunges along a path) and a custom heated indenter was born!

This isn’t the first such use of a 3D printer we’ve seen, here’s an earlier failure, and like everything, there’s more than one way to do it – here’s a method of making inflatable bladders with a defocused CO2 laser.

(warning! Two minutes of a 3D printer head-banging into the bed!)

Continue reading “The Wanhao Duplicator CNC Heat Sealer

The Metabolizer Is Turning Trash Into Treasure Even Faster Now

Do you remember [Sam Smith]’s Metabolizer from a few years back? In case you’ve forgotten, this baby takes trash and turns it into printed plastic objects, and it’s solar-powered to boot. Although the Metabolizer didn’t win the 2018 Hackaday Prize, [Sam] and his machine won many achievements that year, including the Open Hardware Challenge. It’s fantastic to see the project still improving.

To recap, the sun hits the solar panels and charge up the battery bank. Once there’s enough power to start the reaction, it gets dumped into a heating element that turns biomass into biochar. This smoke is cooled, collected, refined, and fed into a small gas generator, which produces DC power to run a 3/4-horsepower shredder and the trash printer.

[Sam] likens this beast to a Rube Goldberg machine in that it performs an overly-complicated chain reaction to do a simple task. We certainly see his point, but we think that this machine is worth so much more than those classic machines, which tend to do nothing useful at all and tend to consume many resources in the process.  On the contrary, the Metabolizer’s chain reaction starts with sunshine and ends with useful objects that keep plastic out of landfills. Honestly, it’s more akin to a compost heap with a PhD in Biology and a handful of steroids and a 3D printer attached.

Unfortunately, [Sam] couldn’t get a prototype working in time for the Prize, and he turned to Patreon to gain support after the $1,000 ran out. Three years and a ton of improvements later, [Sam] has a working prototype that’s cheaper, more efficient, and easier to build. But can it be built relatively easily by someone other than [Sam]? Consider the gauntlet thrown down.

Not happy with your standard-style compost pile? You need a DIY trommel to sift out the bad stuff.

Vacuum Forming With 3D Printed Buck Tutorial

[Matterhackers] has a nice video tutorial on using vacuum forming to create plastic items. Sure, you have a 3D printer, but vacuum forming has some advantages if you are making thin and flexible items quickly. But don’t feel bad. The master item in the process is from a 3D printer. Like a mold, the forming won’t produce a duplicate of the master, called a buck. Rather, the buck provides something like a die that the plastic wraps around.

While obvious vacuum-formed items include such things as take-out food containers and plastic blister packaging for retail items, you can also make more substantial items. Apparently, all theStar Wars movies in the original trilogy used vacuum forming to create stormtrooper armor.

Continue reading “Vacuum Forming With 3D Printed Buck Tutorial”

A Plastic Injection Machine You Can Use At Home

3D printing is all well and good if you want one of something, but if you want lots of plastic parts that are all largely identical, you should consider injection molding. You can pay someone to do this for you, or, in true hacker fashion, you can build an entire injection molding setup in your own garage, as [Action BOX] did.

The build relies on a pair of beefy 3hp motors to drive the screw-based injection system. These are responsible for feeding plastic pellets from a hopper and then melting them and filling the injection reservoir, before then forcing the hot plastic into the mold. Further stepper motors handle clamping the mold and then releasing it and ejecting the finished part. A Raspberry Pi handles the operation of the machine, and is configured with a custom Python program that is capable of proper cycle operation. At its peak, the machine can produce up to 4 parts per minute.

It’s an impressive piece of industrial-type hardware. If you want to produce a lot of plastic things in your own facility, a machine like this is very much the way to go. It’s not the first machine of its type we’ve seen, either! Video after the break.  Continue reading “A Plastic Injection Machine You Can Use At Home”

Discarded Plastic Laser-Cut And Reassembled

The longevity of plastic is both a blessing and a curse. On the one hand, it’s extremely durable, inexpensive, and easy to work with, but it also doesn’t biodegrade and lasts indefinitely in the environment when not disposed of properly. While this can mean devastating impacts to various ecosystems, it can also be a benefit if you happen to pick this plastic up and also happen to have a laser cutter around.

After cleaning and sorting plastic that they had found from various places, including scraps from a 3D printing facility, the folks at [dinalab] set about turning waste plastic into something that would be usable once more. After sorting it they shredded it and then melted it into sheets. They found that a sandwich press yielded the best results, as it kept the plastic at a low enough temperature to keep it from burning. Once its off of the press and properly cooled, the flat sheets of plastic can be sent to the laser cutter to be made into whatever useful thing they happen to need.

Not only does this process reuse plastic that would otherwise end up in the landfill (or worse, the ocean), it can also reuse plastic from itself since the scraps can be re-melted back into sheets. Plastic does lose some of its favorable material properties with repeated heat cycles, but we’d have to imagine this is negligible for the types of things that [dinalab] is creating. Of course, you can always skip the heat cycles entirely and turn waste plastic directly into 3D printer filament instead.

Continue reading “Discarded Plastic Laser-Cut And Reassembled”