If you’ve purchased a piece of consumer electronics in the last few years, there’s an excellent chance that you were forced to use some proprietary application (likely on a mobile device) to unlock its full functionality. It’s a depressing reality of modern technology, and unless you’re willing to roll your own hardware, it can be difficult to avoid. But [krishnan793] decided to take another route, and reverse engineered his DDPAI dash camera so he could get a live video stream from it without using the companion smartphone application.
Like many modern gadgets, the DDPAI camera creates its own WiFi access point that you need to connect to for configuration. By putting his computer’s wireless card into Monitor mode and running Wireshark, [krishnan793] was able to see that the smartphone was communicating with the camera using some type of REST API. After watching the clear-text exchanges for awhile, he not only discovered a few default usernames and passwords, but the commands necessary to configure the camera and start the video stream.
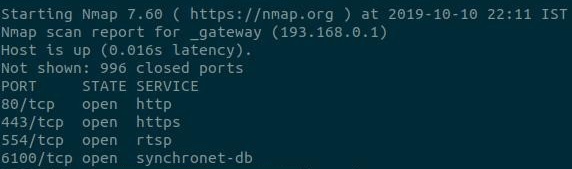 After hitting it with the proper REST messages, an
 nmap scan confirmed that several new services had started up on the device. Unfortunately, he didn’t get any video when he pointed VLC to the likely port numbers. At this point [krishnan793] checked the datasheet for the camera’s Hi3516E SoC and saw that it supported H.264 encoding. By manually specifying that as the video codec when invoking VLC, it was able to play a video stream from port 6200. A little later, he discovered that port 6100 was serving up the live audio.
Technically that’s all he wanted to do in the first place, as he was looking to feed the video into OpenCV for other projects. But while he was in the area, [krishnan793] also decided to find the download URL for the camera’s firmware, and ran it through binwalk to see what he could find out. Not surprisingly the security turned out to be fairly lax through the entire device, so he was able to glean some information that could be useful for future projects.
Of course, if you’d rather go with the first option and build your own custom dash camera so you don’t have to jump through so many hoops just to get a usable video stream, we’ve got some good news for you.