Zip Tie Quadcopter Frame Is As Cheap As They Come

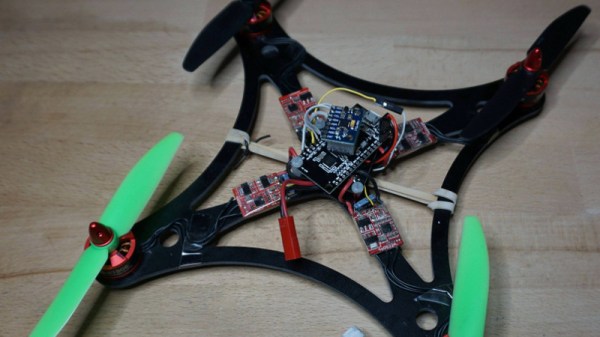
We’ve seen some cheap quadcopter builds over the years, but this one takes the cake. After seeing somebody post a joke about building a quadcopter frame out of zip ties and hot glue, [IronMew] decided to try it for real. The final result is a micro quadcopter that actually flies half-way decently and seems to be fairly resistant to crash damage thanks to the flexible structure.

The first attempts at building the frame failed, as the zip ties (unsurprisingly) were too flexible and couldn’t support the weight of the motors. Eventually, [IronMew] realized that trying to replicate the traditional quadcopter frame design just wasn’t going to work. Rather than a body with arms radiating out to hold the motors, the layout he eventually came up with is essentially the reverse of a normal quadcopter frame.

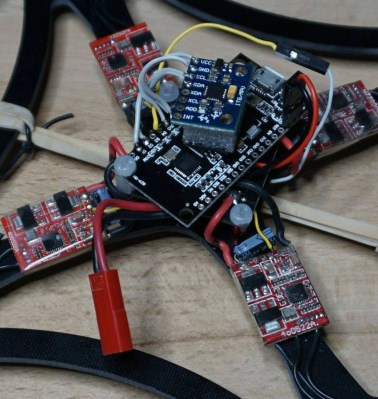
Zip ties reinforced with a healthy coating of hot glue are arranged into a square, with a motor at each corner. Then four zip ties are used to support the central “pod” which holds the battery and electronics. No attempt is made to strengthen this part of the frame, and as such the heavy central pod hangs down a bit in flight. [IronMew] theorizes that this might actually be beneficial in the end, as he believes it could have a stabilizing effect when it comes time to record FPV video.

He mentions that he’s still struggling to get the PID values setup properly in the flight computer, but in the video after the break you can see that it’s flying fairly well for a first attempt. We wouldn’t recommend you tear into a bag of zip ties when it comes time to build your first quadcopter, but it does go to show that there’s plenty of room for experimentation.

We’ve covered a number of unique quadcopter frames if you’re looking for something to set your next build apart from the rest. If you’ve got a big enough bed you can 3D print a very nice frame, but if you’ve got more time than equipment, you could always cut one out of a piece of plywood.

Continue reading “Zip Tie Quadcopter Frame Is As Cheap As They Come”

3D Printing A Better Quadcopter Frame

Before you smash the “Post Comment” button with the fury of Zeus himself, we’re going to go ahead and say it: if you want to build a decent quadcopter, buy a commercial frame. They are usually one of the cheaper parts of the build, they’re very light for how strong they are, and replacement parts are easily available. While you could argue the cost of PLA/ABS filament is low enough now that printing it would be cheaper than buying, you aren’t going to be able to make a better quadcopter frame on a 3D printer than what’s available on the commercial market.

The frame features a surprisingly low part count.

Having said that, [Paweł Spychalski] has recently shown off his 3D printed FPV racing quadcopter frame with some surprising results. The frame ended up being surprisingly stiff, and while the weight is a bit high, it’s actually lighter than he expected. If you’re looking to build a quad with the absolute minimum of expense his design might be something to look into.

Of course, [Paweł] is hardly the first person to think about printing a quad frame. But he did give his design some extra consideration to try and overcome some of the shortcomings he noticed in existing 3D printed designs. For one, rather than have four separate arms that mount to a central chassis, his design has arms that go all the way across with a thick support that goes between the motors. The central chassis is also reassuringly thick, adding to the overall stiffness of the frame.

The key here is that [Paweł] printed all the parts with 2 mm thick walls. While that naturally equates to longer print times and greater overall weight, it’s probably more than worth it to make sure the frame doesn’t snap in half the first time it touches the ground.

Beyond the printed parts, all you need to assemble this frame are about a dozen M3 nuts and bolts. Overall, between the hardware and the plastic you’re looking at a total cost of under $5 USD. In the video below [Paweł] puts the frame through its paces doing some acrobatic maneuvers, and it looks like 5 bucks well spent to us.

If you want to go all-in on 3D printed quadcopter parts, you can pair this frame with some printed propellers. Perhaps even a printed camera gimbal while you’re at it. Continue reading “3D Printing A Better Quadcopter Frame”

3D Printed Propellers Take To The Skies

In the world of drones, propeller choice is key to performance. Selecting the right props can have a major effect on things like flight time, vibration, and a whole host of other factors. Thinking it might be fun to experiment, [RCLifeOn] decided to 3D print some props and head out for a flight.

The props are a fairly simple 3-bladed design, which were printed in both PETG and PLA. No major difference is noted between the two materials, and the quadcopter under test is able to fly with either. It was noted that the props perform particularly poorly in a crash, with all props failing even in the softest of crashes. We would recommend some eye (and body) protection when spinning these props up for the first time.

If you’re keen to try them out yourself, the STL file can be had here. The video notes that when printing 4 props, 2 must be reversed in the Y-axis to print a counter-rotating set of 4. The instructions used for creating propellers in Fusion3D are available here.

It’s a worthy experiment, and something we’d like to see more of. With a 3D printer, it’s possible to experiment with all manner of propeller designs, and we’d love to see the best and worst designs that are still capable of flight. We’ve also seen 3D printed props before, like this effort from [Anton].

Control A Quadcopter Over Websockets

The interface

Everyone’s favourite IOT module, the ESP8266, is often the go-to choice for any project that needs quick and cheap control over the web. [Andi23456] wanted to control his quadcopter using the luxury of his mobile phone and thought permanently tethering an ESP12-E module to the quadcopter was exactly what he required.

The ESP8266, really showcasing its all-round prowess, hosts both a web server for a HTML5 based joystick and a Websockets server so that a client, such as a phone, could interact with it over a fast, low latency connection. Once the ESP8266 receives the input, it uses interrupts to generate the corresponding PPM (Pule Position Modulation) code which the RC receiver on the quadcopter can understand. Very cool!

What really makes this realtime(ish) control viable is Websockets, a protocol that basically allows you to flexibly exchange data over an “upgraded” HTTP connection without having to lug around headers each time you communicate. If you haven’t heard of Websockets you really should look really check out this library or even watch this video to see what you can achieve.

Frankendrones: Toy Quads With A Hobby Grade Boost

If you’re not involved in the world of remote controlled vehicles, you may not know there’s a difference between “toy” and “hobby” grade hardware. For those in the RC community, a toy is the kind of thing you’ll find at a big box store: cheap, works OK, but lacking in features and build quality. On the other hand, hobby hardware is generally considered to be of higher quality and performance, as well as being more modular. At the risk of oversimplification: if you bought it ready to go from a store it’s probably a toy, and if you built it from parts it would generally be considered hobby grade.

But with the rock bottom prices of toy quadcopters, that line in the sand is having a harder time than ever holding some in the community back. The mashup of toy and hobby grade components is giving rise to the concept of “frankendrones” that combine the low cost of toy hardware with key upgrades from the hobby realm. Quadcopter blogger [garagedrone] has posted a roundup of modifications made to the Bayangtoys X16, a $99 quadcopter which is becoming popular in the scene.

Some of the modifications are easy enough for anyone to do. Swapping out the original propellers for ones meant for the DJI Phantom 3 increases performance and doesn’t even require tools. If you want to go a bit further down the rabbit hole, you can cut off the X16’s battery connector and replace it with a standard XT60. That lets you use standard 3S LiPo batteries, which are cheaper and higher capacity than the proprietary ones the toy shipped with.

If you have a 3D printer, there are also a number of upgraded parts you can print which will bolt right onto the X16. Payload adapters, landing gear, and GoPro mounts are all just a few clicks (and some filament) away. This library of 3D printable parts is made possible in part because the X16’s frame is itself a clone of another toy quadcopter, the popular Syma X8C. So anything listed as compatible with the Syma X8C should work with the X16 (and vice versa).

Finally, if you really want to take the X16 to the next level, you can swap out the flight controller with an open source and better supported hobby grade model. Some of these flight controllers and associated new receivers can end up costing about half as much as the X16 did to begin with, but the vast improvement in performance and capability should more than make up for the cost.

We’ve covered previous efforts to increase the performance of low cost quadcopters in the past, as well as builds that put frugality front and center. It seems that no matter what your budget is a screaming angel of death is available if you want it.

Thanks to [Calvin] for the tip.

Continue reading “Frankendrones: Toy Quads With A Hobby Grade Boost”

Dubai Police Test Quadcopter Motorcycle

If you ever wish you could be on your quadcopter when you fly it, you will really want to see the video showing the Dubai police department testing the Hoverbike. The Russian company Hoversurf that markets the device doesn’t provide a lot of technical details, but it looks fairly simple. It is basically a motorcycle seat along with a big quadcopter. From the videos about the device, you can deduce that the pilot can control it or you can fly it remotely. You can see one of the videos, below.

There are a few things that worry us here. Of course, the huge spinning propellers as the pilot’s knee level should give you sweaty palms. In the demo, they even show the removal of the propeller guards before the test flight but let’s be honest, those don’t look like they would keep a falling pilot out of the rotors at all anyway. When looking beyond the hype we find it curious that the demo doesn’t show many (if any) shots of the pilot making a turn. The benefit of a vehicle like this to police should be maneuverability and from what we saw the Hoversurf is still limited.

So is it real? Hard to say. The short videos mostly show vertical or horizontal flight with no maneuvering. Is it hard to turn? Is the battery life really short? One other oddity: When we first saw a letter from the US Patent Office on their site, we thought they might have some new technology. However, that letter is simply showing they registered a trademark and doesn’t reference a patent. If there is a patent we want to know what is new and novel here.

Of course, we know it’s possible to build such a machine since we saw [Colin Furze] do it with two rotors instead of four. The US Department of Defense is working on something with a company called Malloy and there are other practical examples. There are also some less practical examples. What we’re really on the lookout for is a product that works so well it will actually be used. You know, like those Segways that airport police use, right?

We hope Hoversurf can bring this to market because we definitely want one. There’s no reason to think they can’t, but we do wish there were more details forthcoming.

Fidget Spinner Slash Drone Is Both

So Hackaday loves fidget spinners and we don’t care who knows it. Apparently so does [Jeremy S Cook], who decided to mash up a spinner and a cheap quadcopter. To what end? Is that even a question? Spinners are the bearing-studded equivalent to the Rubik’s Cube craze of the ’80s and all we can do is embrace it.

[Jeremy] designed a quadcopter shape with a hole in the center matching a VCB 22 mm ceramic bearing he had on hand. He CNCed out the design from a sheet of Lexan resin. Then he detached the electronics amd motors from a quad.

He used a rotary tool to cut off the housing, removed the motors, then inserted them in the new frame, using hot glue to secure them. He installed the control board 90 degrees off of the frame, before realizing it would mess with the accelerometer and re-installed it flat. Meanwhile, the center of the frame sports the all-important bearing.

If you’re looking for more quad projects check out these cool projects: a Power-Glove-controlled drone, this PVC-pipe quadcopter frame, and reverse engineering quadcopter controls.

Continue reading “Fidget Spinner Slash Drone Is Both”