Raspberry Pi Zero smart projector

Smart Projector With Built-in Raspberry Pi Zero

You’ve heard of smartphones but have you heard of smart projectors? They’ve actually been around for a few years and are sort of like a TV set top box and projector combined, leaving no need for a TV. Features can include things like streaming Netflix, browsing in Chrome, and Skyping. However, they can cost from a few hundred to over a thousand dollars.

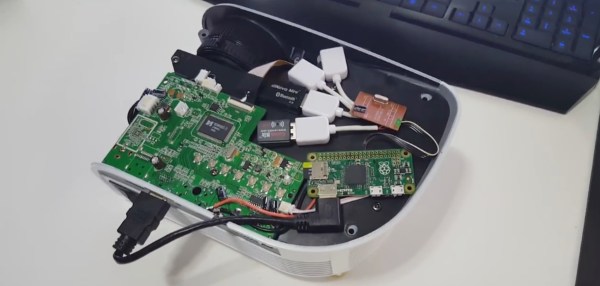
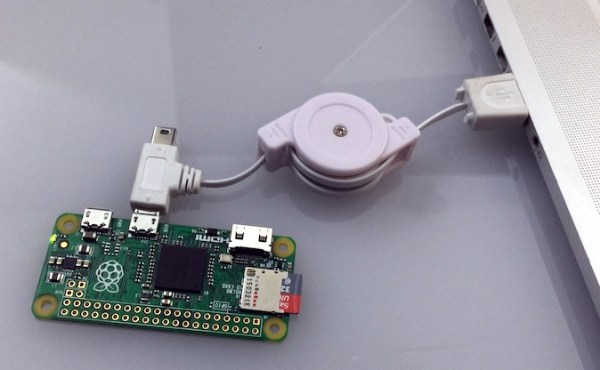
[Novaspirit]  instead made his own cheap smart projector. He first got a $70 portable projector (800×480 native resolution, decent for that price) and opened it up. He soldered an old USB hub that he already had to a Raspberry Pi Zero so that he could plug in a WiFi dongle and a dongle for a Bluetooth keyboard. That all went into the projector.

Examining the projector’s circuit board he found locations to which he could wire the Raspberry Pi Zero for power even when the projector was off. He lastly made the Raspberry Pi dual-bootable into either OSMC or RetroPie. OSMC is a Linux install that boots directly into a media player and RetroPie is a similar install that turns your Raspberry Pi into a gaming machine. You can see a timelapse of the making of it and a demonstration in the video after the break.

Continue reading “Smart Projector With Built-in Raspberry Pi Zero”

Thwomp Drops Brick On Retro Gaming

[Geeksmithing] wanted to respond to a challenge to build a USB hub using cement. Being a fan of Mario Brothers, a fitting homage is to build a retro-gaming console from cement to look just like your favorite Mario-crushing foe. With a Raspberry Pi Zero and a USB hub embedded in it, [Geeksmithing] brought the Mario universe character that’s a large cement block — the Thwomp — to life.

[Geeksmithing] went through five iterations before he arrived at one that worked properly. Initially, he tried using a 3D printed mold; the cement stuck to the plastic ruining the cement on the face. He then switched to using a mold in liquid rubber (after printing out a positive model of the Thwomp to use when creating the mold). But the foam board frame for the mold didn’t hold, so [Geeksmithing] added some wood to stabilize things. Unfortunately, the rubber stuck to both the foam board and the 3D model making it extremely difficult to get the model out.

Like [Han] in carbonite, that's a Rapsberry Pi Zero being encased in cement
Like [Han] in carbonite, that’s a Raspberry Pi Zero being encased in cement
Next up was regular silicone mold material. He didn’t have enough silicone rubber to cover the model, so he added some wood as filler to raise the level of the liquid. He also flipped the model over so that he’d at least get the face detail. He found some other silicone and used it to fill in the rest of the mold. Despite the different silicone, this mold worked. The duct tape he used to waterproof the Raspberry Pi, however, didn’t. He tried again, this time he used hot glue – a lot of hot glue! – to waterproof the Pi. This cast was better, and he was able to fire up the Pi, but after a couple of games his controller stopped working. He cracked open the cement to look at the Pi and realized that a small hole in the hot glue caused a leak that shorted out the USB port on the Pi. One last time, he thought, this time he used liquid electrical tape to waterproof the Pi.

The final casting worked and after painting, [Geeksmithing] had a finished cement Thwomp console that would play retro games. He missed the deadline for the USB Hub Challenge, but it’s still a great looking console, and his video has a lot of detail about what went wrong (and right) during his builds. There’s a great playlist on YouTube of the other entries in the challenge, check them out along with [Geeksmithing]’s video below!

Continue reading “Thwomp Drops Brick On Retro Gaming”

PoisonTap Makes Raspberry Pi Zero Exploit Locked Computers

[Samy Kamkar], leet haxor extraordinaire, has taken a treasure trove of exploits and backdoors and turned it into a simple hardware device that hijacks all network traffic, enables remote access, and does it all while a machine is locked. It’s PoisonTap, and it’s based on the Raspberry Pi Zero for all that awesome tech blog cred we crave so much.

PoisonTap takes a Raspberry Pi Zero and configures it as a USB Gadget, emulating a network device. When this Pi-come-USB-to-Ethernet adapter is plugged into a computer (even a locked one), the computer sends out a DHCP request, and PoisonTap responds by telling the machine the entire IPv4 space is part of the Pi’s local network. All Internet traffic on the locked computer is then sent over PoisonTap, and if a browser is running on the locked computer, all requests are sent to this tiny exploit device.

With all network access going through PoisonTap, cookies are siphoned off, and the browser cache is poisoned with an exploit providing a WebSocket to the outside world. Even after PoisonTap is unplugged, an attacker can remotely send commands to the target computer and force the browser to execute JavaScript. From there, it’s all pretty much over.

Of course, any device designed to plug into a USB port and run a few exploits has a few limitations. PoisonTap only works if a browser is running. PoisonTap does not work on HTTPS cookies with the Secure cookie flag set. PoisonTap does not work if you have filled your USB ports with epoxy. There are a thousand limitations to PoisonTap, all of which probably don’t apply if you take PoisonTap into any office, plug it into a computer, and walk away. That is, after all, the point of this exploit.

As with all ub3r-1337 pen testing tools, we expect to see a version of PoisonTap for sale next August in the vendor area of DEF CON. Don’t buy it. A Raspberry Pi Zero costs $5, a USB OTG cable less than that, and all the code is available on Github. If you buy a device like PoisonTap, you are too technically illiterate to use it.

[Samy] has a demonstration of PoisonTap in the video below.

Continue reading “PoisonTap Makes Raspberry Pi Zero Exploit Locked Computers”

Pi Zero Transforms To Game Boy

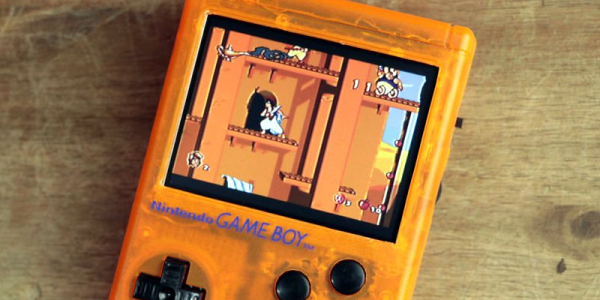
[GreatScott] bought a Game Boy case. Normally, you’d assume you wanted this to repair a damaged Game Boy, but in this case [GreatScott] used a Pi Zero and some 3D printing to build a game system into the tiny box. You can see some videos, below.

Two interesting parts of the project are the source of the LCD display (a rearview camera screen) and the selection of batteries. Lithium ion batteries are all the rage. But if you watch the news, you know there are some safety issues with using the batteries, especially if you use them improperly. [GreatScott] decided to go with nickel metal hydride cells which still need a protection circuit, but are typically less of a danger than the newer technology cells.

Continue reading “Pi Zero Transforms To Game Boy”

Hackaday Links Column Banner

Hackaday Links: November 6, 2016

Here’s a life protip for you: get really, really good at one video game. Not all of them; you only want to be good – top 10% at least – at one video game. For me, that’s Galaga. It’s a great arcade game, and now it’s IoT. [justin] has been working on publishing high scores from a Galaga board to the Internet. The electronics are actually pretty simple – just a latch on a memory address, and an ESP8266 for comms.

On with the mergers and acquisitions! Lattice has been sold to Canyon Bridge, a Chinese private equity firm, for $1.3 Billion. Readers of Hackaday should know Lattice as the creators of the iCE40 FPGA platform, famously the target of the only Open Source FPGA toolchain.

The Internet of Chocolate Chip Cookies. Yes, it’s a Kickstarter for a cookie machine, because buying a tube of pre-made cookie dough is too hard. There is one quote I would like to point out in this Kickstarter: “Carbon Fiber Convection Heating Element (1300W) is more energy-efficient than traditional electric elements and heats up instantly.” Can someone please explain how a heating element can be more efficient? What does that mean? Aren’t all resistive heating elements 100% efficient by default? Or are they 0% efficient? The Internet of Cookies broke my brain.

The USB Rubber Ducky is a thumb-drive sized device that, when plugged into a computer, presents itself as a USB HID keyboard, opens up a CLI, inputs a few commands, and could potentially do evil stuff. The USB Rubber Ducky costs $45, a Raspberry Pi Zero and a USB connector costs $6. [tim] built his own USB Rubber Ducky, and the results are great.

Pi Zero Powered Skateboard

There’s something to be said for whizzing around town on your own automatic personal transport. It’s even better when you’ve built it yourself. That’s just what [The Raspberry Pi Guy] did – built a Wiimote controlled, Raspberry Pi Zero powered skateboard and whizzed around Cambridge to show it off.

It’s a fairly simple build – skateboard, battery, motor and mount, controller, Wiimote and Pi Zero. The Raspberry Pi controls the motor controller which in turn controls the motor speed. The Python code that [The Raspberry Pi Guy] wrote comes in at around a hundred lines and manages the motor controller and the Bluetooth connection to the Wiimote, which is used to control the board’s speed while the user controls the steering. [The Raspberry Pi Guy] says he’s gotten up to 30 km/h on the skateboard, which, given a powerful enough motor and a non-bumpy surface isn’t hard to believe.

It may seem a bit of overkill, running a bit of Python on a Raspberry Pi to run a motor (others have done it with something simpler) but it’s a fun project nonetheless. [The Raspberry Pi Guy] describes where he got the parts to put the skateboard together and has released the Python code on his GitHub page.

Continue reading “Pi Zero Powered Skateboard”

Icehat on a Raspberry Pi Zero

Give Your RPi A Cool FPGA Hat

Need additional, custom IO for your Raspberry Pi? Adding an FPGA is a logical way to expand your IO, and allow for high speed digital interfaces. [Eric Brombaugh]’s Icehat adds a Lattice iCE5LP4K-SG48 FPGA in a package that fits neatly on top of the Raspberry Pi Zero. It also provides a few LEDs and Digilent compatible PMOD connectors for adding peripherals. The FPGA costs about six bucks, so this is one cheap FPGA board.

The FPGA has one time programmable memory, but can also be programmed over SPI. This allows the host Pi to flash the FGPA with the latest bitstream at boot. Sadly, this particular device is not supported by the open source Icestorm toolchain. Instead, you’ll need Lattice’s iCEcube2 design software. Fortunately, this chip is supported by the free license.

Icehat is an open source hardware design, but also includes a software application for flashing a bitstream to the FPGA from the Pi and an example application to get you started. All the relevant sources can be found on Github, and the PCB is available on OSHPark.

While this isn’t the first pairing of a Raspberry Pi and FPGA we’ve seen, it is quite possibly the smallest, and can be built by hand at a low cost.