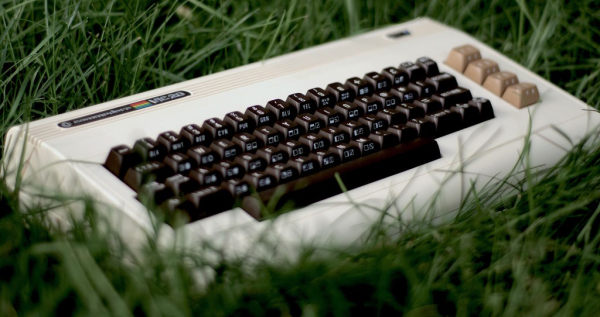
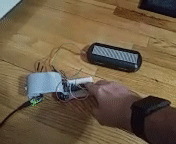
Sense Hat Comes Alive

Remember the Raspberry Pi Sense Hat? Originally designed for a mission to the International Space Station, the board has quite a few sensors onboard as well as an 8×8 RGB LED matrix. What can you do with an 8×8 screen? You might be surprised if you use [Ethan’s] Python Sense Hat animation library. You can get the full visual effect in the video below.

The code uses an array to represent the screen, which isn’t a big deal since there are only 64 elements. Turning on a particular element to animate, say, a pong puck, isn’t hard with or without the library. Here’s some code to do it with the library:

for x in range(0,7):
 ect.cell(image,[0,x],[randint(0,255), randint(0,255), randint(0,255)],0.1)
 ect.cell(image,[0,x],e,0.1)
for x in range(7,0, -1):
 ect.cell(image,[0,x],[randint(0,255), randint(0,255), randint(0,255)],0.1)
 ect.cell(image,[0,x],e,0.1)

Each loop draws a box with a random color and then erases it before going to the next position. The second for loop makes the puck move in the opposite direction. You can probably deduce that the first argument is the screen array, the second is the position. The third argument sets the color, and the final argument sets an animation timer. Looking at the code, though, it does look like the timer blocks which is probably not going to work for some applications.

If that’s all there was, this wouldn’t be worth too much, but you can also draw triangles, circles, and squares. For example:

ect.circle(image,(4,4), 3, [randint(0,255), randint(0,255), randint(0,255)], 0.1)

We covered the Sense Hat awhile back. Of course, it does a lot more than just light up LEDs as you can see from this weather dashboard.

Continue reading “Sense Hat Comes Alive”

Liquid cooled Raspberry Pi with mineral oil

Liquid Cooling Overclocked Raspberry Pi With Style

[HydroGraphix HeadQuarters] has earned his name with this one. While he is using mineral oil instead of hydro, he’s certainly done a nice job with the graphics of it. The ‘it’ in questions is an overclocked Raspberry Pi 3 in a transparent container filled with mineral oil, and with a circulating fan.

He’s had no problem running the Pi at 1.45 GHz while running a Nintendo 64 emulator, getting between 40 °C and 50 °C. The circulating fan is a five volt computer USB fan. It’s hard to tell if the oil is actually moving, but we’re pretty sure we see some doing so near the end of the video below the break.

Mineral oil is not electrically conductive, and is often used to prevent arcing between components on high voltage multiplier boards, but those components are always soldered together. If you’ve ever worked with mineral oil, you know that it creeps into every nook and cranny, making us wonder if it might work its way between some of the (non-soldered) contacts in the various USB connectors on this Raspberry Pi. Probably not, but those of us with experience with it can attest to it’s insidiousness.

Continue reading “Liquid Cooling Overclocked Raspberry Pi With Style”

Vintage Portable TV Turned Retro Gaming System

When [FinnAndersen] found an old TV set by the side of the road, he did what any self-respecting DIY/gaming enthusiast would do: He took it apart and installed a Raspberry Pi 3 running RetroPie in it in order to play retro games on a retro TV!

[Finn] took the CRT out of the TV before realizing that it actually worked. It was already too late, so [Finn] ordered a 12″ LCD screen to put in its place. He liked the idea of the curved screen the CRT had, though, so he molded a piece of acrylic around the CRT and, after some cutting and grinding, had it fitting in the screen’s space.

[Finn] also liked the idea of the TV still being able to view a television signal, so he bought a TV tuner card. After a couple of mods to it, he could control the card with the TV’s original channel changer. He used an Arduino to read the status of the rotary encoders the original TV used. After some trial and error, [Finn] was able to read the channel positions and the Arduino would send a signal to the channel up and down buttons on the tuner card in order to change the channel.

Next up was audio. [Finn] found a nicer speaker than came with the TV, so he swapped them and added an amplifier. The original volume knob is still used to control the volume. A USB Hub is hidden in the side of the TV at the bottom, to allow controllers to connect and finally, a power supply converts the mains voltage to 12V DC which runs both the Raspberry Pi and the TV Tuner.

[FinnAndersen] has built a great RetroPie cabinet reusing a great looking vintage TV. It’s unfortunate that he removed the CRT before figuring out that he could use it, but the replacement looks pretty darn good! And the added advantage? It’s portable, sort of. At least, without the CRT inside, it’s much lighter than it was. Here‘s another retro console inside an old TV, and this article is about connecting a Raspberry Pi to every display you can get your hands on.

Continue reading “Vintage Portable TV Turned Retro Gaming System”

Featured image

Keep The Burglars Away With Some Pi

Ten years ago, we never imagined we would be able to ward off burglars with Pi. However, that is exactly what [Nick] is doing with his Raspberry Pi home security system.

We like how, instead of using a standard siren, [Nick] utilized his existing stereo system to play a custom audio file that he created. (Oh the possibilities!) How many off the shelf alarm systems can you do that with?

The Pi is the brains of the operation, running an open source software program called Home Assistant. If any of the Z-Wave sensors in his house are triggered while the alarm system is armed, the system begins taking several actions. The stereo system is turned on via IR so that the digital alarm audio file can be played. Lights flash on and off. An IP camera takes several snapshots and emails them to [Nick].

Home Assistant didn’t actually have the ability to send images in an email inline at the time that [Nick] was putting together his system. What did [Nick] do about that? He wrote some code to give it that ability, and submitted it through GitHub. That new code was put into a later version of the program. Ah, the beauty of open source software.

Perhaps the most important part of this project is that there were steps taken to help keep the wife-approval factor of the system on the positive side. For example, he configured one of the scripts so that even if the alarm is tripped multiple times in succession, the alarm won’t play over itself repeatedly.

This isn’t [Nick’s] first time being featured here. Check out another project of his which involves a couple of Pi’s communicating with each other via lasers.


The Internet Connected Dog Treat Machine

[Eric] and [Shirin] have a dog called [Pickles], who is the kind of animal that if you are a dog lover you will secretly covet. They evidently dote upon [Pickles], but face the problem that they can’t always be at home to express their appreciation of him. But rather than abandon him entirely, they’ve applied technology to the problem. [Eric] has built an Internet-connected dog treat dispenser, through which they can dispense treats, and watch the lucky mutt wolfing them down.

The body of the machine has been made with lasercut acrylic, and the dispenser mechanism is a rotating hopper driven by a stepper motor. The whole thing — in all its transparent glory — is controlled through a Raspberry Pi, which plays a sound clip of [Shirin] calling [Pickles] for his treat, records his dining enjoyment with its camera, and emails the result to his owners. Behind the scenes it hosts an MQTT server, which can be triggered via an iPhone app, Alexa, or the adafruit.io site. Imagine for a moment: “Alexa, feed my dog!”. It has a ring to it.

He makes the point that this machine is not simply limited to dispensing treats, it could be used to engage [Pickles] in more activities. He hints at a future project involving a ball throwing device (have you ever seen such joy from a dog). There’s no substitute for being there with your dog, but maybe with this device they can make their dog’s life a little less of, well, a dog’s life.

You can see the machine in action in the video we’ve posted below the break.

Continue reading “The Internet Connected Dog Treat Machine”

The Raspberry Pi Becomes A SCSI Device

SCSI devices were found in hundreds of different models of computers from the 80s, from SUN boxes to cute little Macs. These hard drives and CDROMs are slowly dying, and with that goes an entire generation of technology down the drain. Currently, the best method of preserving these computers with SCSI drives is the SCSI2SD device designed by [Michael McMaster]. While this device does exactly what it says it’ll do — turn an SD card into a drive on a SCSI chain — it’s fairly expensive at $70.

[GIMONS] has a better, cheaper solution. It’s a SCSI device emulator for the Raspberry Pi (original link dead, here’s the new location of this writeup). It turns a Raspberry Pi into a SCSI hard drive, magneto-optical drive, CDROM, or an Ethernet adapter using only some glue logic and a bit of code.

As far as the hardware goes, this is a pretty simple build. The 40-pin GPIO connector on the Pi is attached to the 50-pin SCSI connector through a few 74LS641 transceivers with a few resistor packs for pullups and pulldowns. The software allows for virtual disk devices – either a hard drive, magneto-optical drive, or a CDROM – to be presented from the Raspberry Pi. There’s also the option of putting Ethernet on the SCSI chain, a helpful addition since Ethernet to SCSI conversion devices are usually rare and expensive.

Officially, [GIMONS] built this SCSI hard drive emulator for the x68000 computer, developed by Sharp in the late 80s. While these are popular machines for retrocomputing aficionados in Japan, they’re exceptionally rare elsewhere — although [Dave Jones] got his mitts on one for a teardown. SCSI was extraordinarily popular for computers from the 70s through the 90s, though, and since SCSI was a standard this build should work with all of them.

If your retrocomputer doesn’t need a SCSI drive, and you’re feeling left out of the drive-emulation club, the good news is there’s a Raspberry Pi solution for that, too: this Hackaday Prize entry turns a Pi into an IDE hard drive.

Thanks [Gokhan] for the tip!

New Part Day: The $239 Pi Clone

Linaro has announced a new ARM-based single board computer.

The HiKey 960, built in collaboration with 96Boards, gives the user 4 ARM Cortex-A73 cores clocked at 2.4GHz, 4 ARM Cortex-A53 cores clocked at 1.8 GHz, a Mali GPU (ugh), 32GB of Flash storage, 3GB of LPDDR4, HDMI 1.2, WiFi, Bluetooth, USB 3.0 type A, PCIe on an M.2 connector, and a familiar 40-pin GPIO connector whose configuration is not published yet but is one we can make a very educated guess about. This is a powerful ARM-based single-board computer that’s the same size as a credit card.

This single board computer draws more power than a Raspberry Pi (but less than 24 W with a 12V supply), but that’s what you get when you need a powerful ARM chip. Interestingly, the HiKey 960 places all the connectors on one side of the board. This is a feature very often overlooked in ARM-based single board computers; all the ports on your desktop are on the back, and it only makes sense to constrain the cables and dongles to one side of a Nintendo-shaped 3D printed enclosure.

This is not the first ARM-based single board computer that markets itself as a more powerful Pi. The Pine64 was supposed to be significantly more powerful, handle 4K HDMI, and bring Android to the desktop. The first versions of the Pine64 really, really sucked. However, most of the kinks have been worked out and the folks behind the Pine64 are now shipping a somewhat reasonable low-end Chromebookesque laptop for $89. This is a laptop for under a Benjamin, whereas the HiKey 960 will sell for $239. That’s the same price as an Intel NUC or other mini PC running an x86 CPU. Of course, the HiKey 960 will have higher performance compared to the latest Pi, or other Pi Killer such as the Asus Tinker board, but there must be a point of diminishing returns. Either way, we look forward to getting our hands on one of these powerful single board computers.