Pi Microcontroller Still Runs A Webserver

At first glance, the Raspberry Pi Pico might seem like a bit of a black sheep when compared to the other offerings from the Raspberry Pi Foundation. While most of the rest of their lineup can run Linux environments with full desktops, the Pico is largely limited to microcontroller duties in exchange for much smaller price tags and footprints. But that doesn’t mean it can’t be coerced into doing some of the things we might want a mainline Pi to do, like run a web server.

The project can run a static web page simply by providing the Pico with the project code available on the GitHub page and the HTML that you’d like the Pico to serve. It can be more than a static web page though, as it is also capable of running Python commands through the web interface as well. The server can pass commands from the web server and back as well, allowing for control of various projects though a browser interface. In theory this could be much simpler than building a physical user interface for a project instead by offloading all of this control onto the web server instead.

The project not only supports the RP2040-based Raspberry Pi Pico but can also be implemented on other WiFi-enabled microcontroller boards like the ESP8266 and ESP32. Having something like this on hand could greatly streamline smaller projects without having to reach for a more powerful (and more expensive) single-board computer like a Pi 3 or 4. We’ve seen some other builds on these boards capable of not only running HTML and CSS renderers, but supporting some image formats as well.

Continue reading “Pi Microcontroller Still Runs A Webserver”

A white, house-shaped clock with the words "TEMPUS NECTIT" written in faux Roman script in black on a strip of silver at the base of the "roof." a white power cord extends from the left of the enclosure, and the center of the clock is a 22 pin knitting machine wheel with one pin covered in silver metalic. A white plastic peg extends from the bottom right of the enclosure to hold the feedstock yarn.

Tempus Nectit, A DIY Knitting Clock With Instructions

We’re no strangers to unusual clocks here at Hackaday, and some of our favorites make time a little more tangible like [Kyle Rankin]’s knitting clock.

Inspired by our coverage of [Siren Elise Wilhelmsen]’s knitting clock, [Rankin] decided to build one of his own. Since details on the build from the original artist were sparse, he had to reverse engineer how the device worked. He identified that a knitting clock is essentially a knitting machine with a stepper motor replacing the hand crank.

Using a Raspberry Pi with an Adafruit motor hat connected to a stepper motor and a 3D printed motor adapter, [Rankin] was able to drive the knitting machine to do a complete round of knitting every twelve hours. By marking one of the knitting pegs as an hour hand, the clock works as a traditional clock in addition to its year-long knitting task. [Rankin] says he still has some fine tuning to work on, but that he’s happy to have had the chance to combine so many of his interests into a single project.

If you’re looking for more knitting hacks, check out this knitted keyboard instrument or a knitted circuit board.

Continue reading “Tempus Nectit, A DIY Knitting Clock With Instructions”

IOT Message Board Puts Fourteen-Segment Displays To Work

We’re not sure, but the number of recognizable alphanumeric characters that a seven-segment display can manage seems to have more to do with human pattern recognition than engineering. It takes some imagination, and perhaps a little squinting, to discern some characters, though. Arguably better is the fourteen-segment display, which has been pressed into service in this just-for-funsies IOT message board.

As [Steve] tells the story, this is one of those “boredom-buster” projects that start with a look through the junk bin to see what presents itself. In his case, some fourteen-segment common-cathode LEDs presented themselves, and the result was a simple but fun build. [Steve] used some clever methods to get the display stuffed onto two protoboards, including mounting the current-limiting resistors cordwood-style between the boards. A Raspberry Pi drives the display through a very neatly routed ribbon cable, and the whole thing lives in a tidy wooden box.

The IOT part of the build allows the display to show messages entered on [Steve]’s web page, with a webcam live stream to close the loop. Strangely, the display seems stuck on the “HI HACKADAY!” we entered as a test after [Steve] tipped us off, so we’re not sure if we busted it or what. Apologies if we did, [Steve]. And by the way, if your cats are named [Nibble] and [Pixel], well done!

No matter what you do with them, multi-segment displays are pretty cool. But if you think they’re something new, you’ve got another think coming.

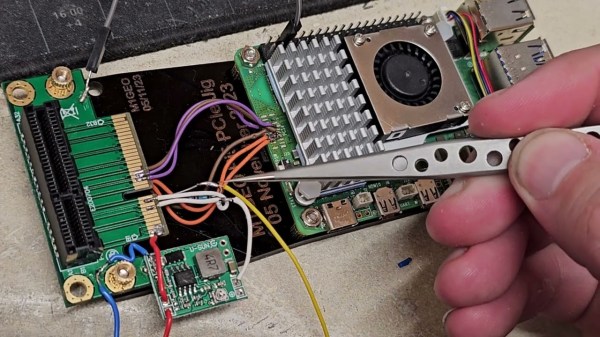
A picture of the bottom of the Pi 4 PCB, showing the three points you need to use to tap into the Pi 4 I2C bus going to the PMIC

Dead Raspberry Pi Boards, PMICs, And New Hope

Since the Raspberry Pi 3B+ release, the Pi boards we all know and love gained one more weakpoint – the PMIC chip, responsible for generating all the power rails a Pi needs. Specifically, the new PMIC was way more vulnerable to shorting 5V and 3.3V power rails together – something that’s trivial to do on a Raspberry Pi, and would leave you with a bricked board. Just replacing the PMIC chip, the MxL7704, wouldn’t help since the Raspberry Pi version of this chip is customized – but now, on Raspberry Pi forums, [Nefarious19] has reportedly managed to replace it and revive their Pi.

First off, you get a replacement PMIC and reflow it – and that’s where, to our knowledge, people have stopped so far. The next step proposed by [Nefarious19] is writing proper values into the I2C registers of the PMIC. For that, you’d want a currently-alive Pi – useful as both I2C controller for writing the values in, and as a source of known-good values. That said, if you go with the values that have been posted online, just having something like a Pi Pico for the I2C part ought to be enough.

[Nefarious19] reports a revived Pi, and this is way more hopeful than the “PMIC failures are unfixable” conclusion we’ve reached before. The instructions are not quite clear – someone else in the thread reports an unsuccessful attempt doing the same, and it might be that there’s a crucial step missing in making the values persist. However, such an advancement is notable, and we trust our readers to take the lead.

A week ago, [Mangy_Dog] on Hackaday Discord brought up fixing Raspberry Pi boards – given that the Raspberry Pi shortages are still an issue, digging up your broken Pi and repairing it starts making sense budget-wise. It’s no longer the ages where you could buy broken Pi boards by the hundred, and we imagine our readers have been getting creative. What are your experiences with fixing Raspberry Pi boards?

Dobsonian Telescope Adds Plate Solver

The amateur astronomy world got a tremendous boost during the 1960s when John Dobson invented what is now called the Dobsonian telescope. Made from commonly-sourced materials and mechanically much simpler than what was otherwise available at the time, the telescope dramatically reduced the barrier to entry for larger telescopes and also made them much more portable and inexpensive.

For all their perks, though, a major downside is increased complexity when building automatic tracking systems. [brickbots] went a different way when solving this problem, though: a plate solver.

Plate solving is a method by which the telescope’s field of view is compared to known star charts to determine what it’s currently looking at. Using a Raspberry Pi at the center of the build, the camera module pointed at the sky lets the small computer know exactly what it’s looking at, and the GPS system adds precise location data as well for a quick plate solving solution. A red-tinted screen finishes out the build and lets [brickbots] know exactly what the telescope is pointed towards at all times.

While this doesn’t fully automate or control the telescope like a tracking system would do, it’s much simpler to build a plate solver in this situation. That doesn’t mean it’s impossible to star hop with a telescope like this, though; alt-azimuth mounted telescopes like Dobsonians just need some extra equipment to get this job done. Here’s an example which controls a similar alt-azimuth telescope using an ESP32 and a few rotary encoders.

Raspberry Pi Adds Second Laptop Monitor

If you have a cheap laptop and you realize you can’t connect a second monitor to it, what do you do? Well, if you are [Pierre Couy], you grab a Raspberry Pi and put together a virtual screen solution.

Like all good projects, this one started with some goals and requirements:

  • Low latency
  • Redable text
  • At least 10 frames per second
  • Fast catch up if the remote screen falls behind
  • Low-bitrate encoding; no hardware acceleration
  • A DHCP server on the Pi to manage the network
  • Power control for the attached monitor

Continue reading “Raspberry Pi Adds Second Laptop Monitor”

Mice Play In VR

Virtual Reality always seemed like a technology just out of reach, much like nuclear fusion, the flying car, or Linux on the desktop. It seems to be gaining steam in the last five years or so, though, with successful video games from a number of companies as well as plenty of other virtual reality adjacent technology that seems to be picking up steam as well like augmented reality. Another sign that this technology might be here to stay is this virtual reality headset made for mice. Continue reading “Mice Play In VR”