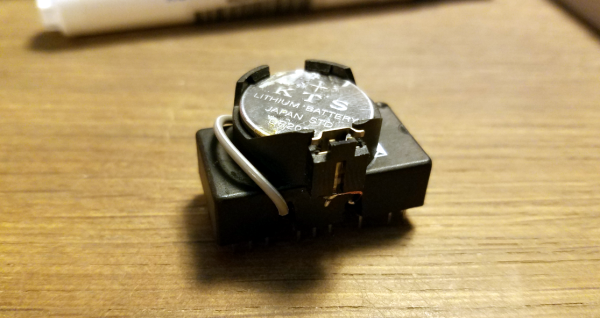
What Is The Matrix…Clock?

We’re surprised we haven’t seen this kind of clock before, or maybe we have, but forgot about it in the dark filing cabinets of our minds. The above picture of [danjhamer’s] Matrix Clock doesn’t quite do it justice, because this is a clock that doesn’t just tick away and idly update the minutes/hours.

matrix clock

Instead, a familiar Matrix-esque rain animation swoops in from above, exchanging old numbers for new. For the most part, the build is what you would expect: a 16×8 LED Matrix display driven by a TLC5920 LED driver, with an Arduino that uses a DS1307 RTC (real-time clock) with a coin cell battery to keep track of time when not powered through USB. [danjhamer] has also created a 3D-printed enclosure as well as added a piezo speaker to allow the clock to chime off customizable musical alarms.

You can find schematics and other details on his Hackaday.io project page, but first, swing down below the jump to see more of the clock’s simple but awesome animations.

Continue reading “What Is The Matrix…Clock?”

Jaw-Dropping Atomic Clock Build

You could cruise the Internet bazaars for a talking clock but you’ll never find one as awesome as this. Just look at it… even if it didn’t work it would be awesome.

[Art] certainly lives up to his username. His Rubidium-standard atomic real-time clock is surely an example of hardware art. The substrate is a collection of point-to-point soldered perfboard modules. Each laid out meticulously. What does such layout call for? A gorgeous enclosure which doesn’t obscure your view of the components. For this he went with a copper tube frame and a custom fabricated aluminum chassis pan.

For the circuit itself [Art] tells us he wanted to build something akin to the old HP nixie frequency counters so he went with logic chips. The pictures and a few video annotations are the only clues we have for how this works. Hopefully your encouragement in the comments will help prompt him to share more about that.

Oh, and the talking clock part that we referred to earlier? Every minute you get a readout of the time thanks to a PIC playing back audio using [Roman Black’s] BTc sound compression algorithm.

Continue reading “Jaw-Dropping Atomic Clock Build”

Topsy Turvy Clock Tells Confusing Time

Looking for a new clock but hate the fact that all the numbers are always in the correct order? Look no further than [Andy]’s topsy turvy clock which correctly tells time despite the fact that the numbers on the face of the clock are in random positions.

At first glance, the clock looks fairly normal despite the mixed-up numerals. Upon closer inspection, the clock is much more than it appears to be. A battery backed real-time clock keeps track of time, and a microcontroller turns the hands of the clock to where they need to be. The clock uses optical sensors to make sure the hands are in the correct starting position when it is first powered on.

Check out the video below for a better illustration of what the clock looks like when in operation. The hour hand is always pointing at the correct hour, and the minute hand starts every five minutes at the number it would have started at on a normal clock, i.e. at 1:15 the hour hand will point at “one” and the minute hand will point at “three”.

We love this very interesting and unique take. It was inspired by a few other clocks, including a version of the infamous Vetinari “random tick” clock which will drive you crazy in a different way.

Infinity Mirror Clock: There’s A Time Joke There Somewhere

Infinity Mirror Clock

We don’t think we’ve seen an Infinity Mirror Clock before, but we love this new twist on an old favorite. Different colors distinguish between seconds, minutes and hours, and an additional IR sensor detects when someone is directly in front of the clock and switches the LEDs off, allowing it to be used as a normal mirror. This build is the work of [Dushyant Ahuja], who is no stranger to hacking together clocks out of LEDs. You can tell how much progress he’s made with the mirror clock by taking a glance at his first project, which is an impressive creation held together by jumbles of wire and some glue.

[Dushyant] has stepped up his game for his new clock, attaching an LED strip along the inside of a circular frame to fashion the infinity mirror effect. The lights receive a signal from an attached homemade Arduino board, which is also connected to a real-time clock (RTC) module to keep time and to a Bluetooth module, which allows [Dushyant] to program the clock wirelessly rather than having to drag out some cords if the clock ever needs an adjustment.

Stick around after the jump for a quick demonstration video. The lights are dazzling to watch; [Dushyant] inserted a stainless steel plate at the center of the circle to reflect the outer rim of LEDs. After a quick rainbow effect, it looks like the mirror enters clock mode. See if you can figure out what time it is. For a more step-by-step overview of this project, swing by his Instructables page.

Continue reading “Infinity Mirror Clock: There’s A Time Joke There Somewhere”

Enjoying The Sunrise Every Single Day

Exif_JPEG_PICTURE

[Andy] wanted to take a few at sunrise, but waking up before sunrise has obvious problems associated with it. Instead, he built a device that calculates the local sunrise time, snaps a picture, and goes to sleep until the next morning.

The camera used for the project was an old Canon point and shoot, chosen for the ability to load CHDK firmware. Other electronics included an Arduino pro mini, a LiPo battery and charger board, real time clock, and an old Nokia LCD for the user interface.

There’s quite a bit of code that goes into figuring out when the sun will rise each day, but once that’s figured out, all [Andy] has to do is take the camera somewhere pretty, point it East, and record a few days worth of sunrises. When put into a ‘game camera’ enclosure, its rugged enough to stand up to everything except a thief, and has enough battery power for a few weeks worth of sunrises.

Video demonstrating the local sunrise time below.

Continue reading “Enjoying The Sunrise Every Single Day”

Hard Drive Clock Is Simple And Elegant

Binary hard drive clock

[Aaron] has been wanting to build his own binary desk clock for a while now. This was his first clock project, so he decided to keep it simple and have it simply display the time. No alarms, bells, or whistles.

The electronics are relatively simple. [Aaron] decided to use on of the ATMega328 chips he had lying around that already had the Arduino boot loader burned into them. He first built his own Arduino board on a breadboard and then re-built it on a piece of protoboard as a more permanent solution. The Arduino gets the time from a real-time clock (RTC) module and then displays it using an array of blue and green LED’s. The whole thing is powered using a spare 9V wall wort power supply.

[Aaron] chose to use the DS1307 RTC module to keep time. This will ensure that the time is kept accurately over along period of time. The RTC module has its own built-in battery, which means that if [Aaron’s] clock should ever lose power the clock will still remember the time. The RTC battery can theoretically last for up to ten years.

[Aaron] got creative for his clock enclosure, upcycling an old hard drive. All of the hard drive guts were removed and replaced with his own electronics. The front cover had 13 holes drilled out for the LED’s. There are six green LED’s to display the hour, and seven blue LED’s for the minute. The LED’s were wired up as common cathode. Since the hard drive cover is conductive, [Aaron] covered both sides of his circuit board with electrical tape and hot glue to prevent any short circuits. The end result is an elegant binary clock that any geek would be proud of.

Pokewithastick, An Arduino Programmable Web-logger/server


[Stewart] tipped us about his very nice project: pokewithastick. It is an Arduino compatible board (hardware, not footprint) based on the ATMEGA1284P which can be programmed to collect and post data to internet logging sites such as Thingspeak or Xively.

As you can see in the picture above, it has a small 50x37mm footprint (roughly 2″x1.5″). The pokewithastick is composed of an Wiz820 Ethernet module, a micro-SD card slot, 2 serial ports, one battery backed Real Time Clock (RTC), one radio connector (for the usual nRF24L01 2.4GHz radio), one power & user LED and finally a reset button. There are two power rails on the board which can be split (5v + 3.3V) or combined (3.3v only) which may allow you to connect Arduino shields to it. You can program the board using the standard 6-pin header or via a serial programmer if an appropriate (Arduino) bootloader is installed.

The project is open hardware, has been designed using Kicad and all the files can be downloaded as a zip file.