An overlay is shown on a topographical map. High points are highlighted in blue. The letters "A" and "B" are shown in red text at two points.

Using A Scientific Satellite For Passive Radar

The basic principle of radar systems is simple enough: send a radio signal out, and measure the time it takes for a reflection to return. Given the abundant sources of RF signals – television signals, radio stations, cellular carriers, even Wi-Fi – that surround most of us, it’s not even necessary to transmit your own signal. This is the premise of passive radar, which uses passive RF illumination to form an image. The RF signal doesn’t even need to come from a terrestrial source, as [Jean Michel Friedt] demonstrated with a passive radar illuminated by the NISAR radar-imaging satellite (pre-print paper).

NISAR is a synthetic-aperture radar satellite jointly built by NASA and ISRO, and it completes a pass over the world every twelve days. It uses an L-band chirp radar signal, which can be picked up with GNSS antennas. One antenna points up towards the satellite, and has a ground plane blocking the signal from directly reaching the second antenna, which picks up reflections from the landscape under observation. Since the satellite would illuminate the scene for less than a minute, [Jean-Michel] had to predict the moment of peak intensity, and achieved an accuracy of about three seconds.

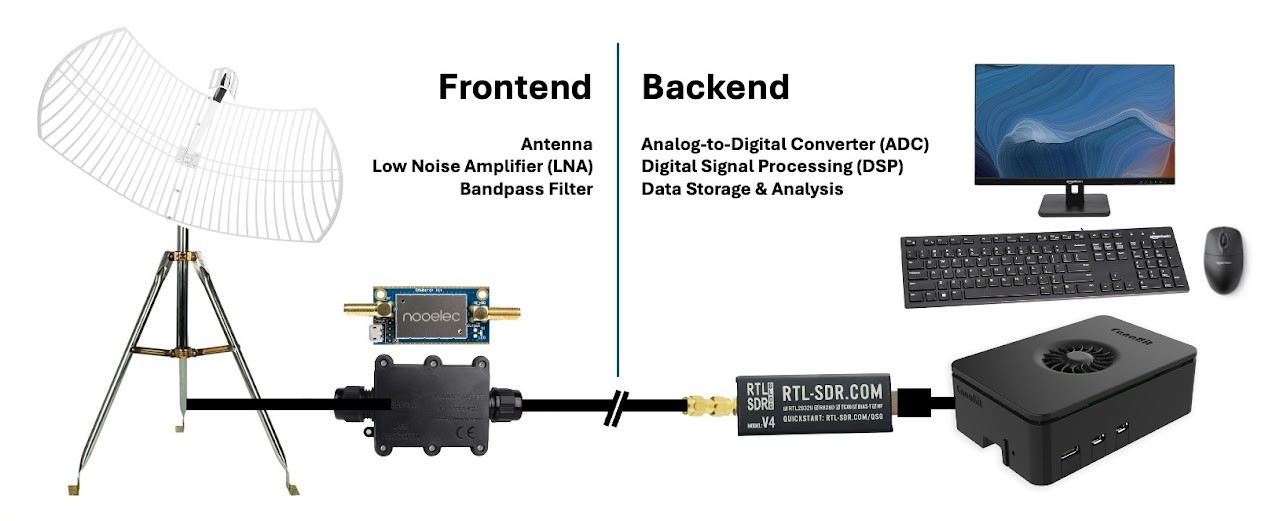
The signals themselves were recorded with an SDR and a Raspberry Pi. High-end, high-resolution SDRs such as the Ettus B210 gave the best results, but an inexpensive homebuilt MAX2771-based SDR also produced recognizable images. This setup won’t be providing any particularly detailed images, but it did accurately show the contours of the local geography – quite a good result for such a simple setup.

If you’re more interested in tracking aircraft than surveying landscapes, check out this ADS-B-synchronized passive radar system. Although passive radar doesn’t require a transmitter license, that doesn’t mean it’s free from legal issues, as the KrakenSDR team can testify.

An oscilloscope display is seen in lower left corner. In the rest of the image, two purple circuit boards are connected by SMA RF cables. A wire antenna is connected to one board.

Building A $50 SDR With 20 MHz Bandwidth

Although the RTL-SDR is cheap, accessible, and capable enough for many projects, it does have some important limitations. In particular, its bandwidth is limited to about 3.2 MHz, and the price of SDRs tends to scale rapidly with bandwidth. [Anders Nielsen], however, is building a modular SDR with a target price of $50 USD, and has already reached a bandwidth of almost 20 MHz.

If this project looks familiar, it’s because we’ve covered an earlier iteration. At the time, [Anders] had built the PhaseLoom, which filters an incoming signal, mixes it down to baseband, and converts it to I/Q signals. The next stage is the PhaseLatch, a board housing a 20-MHz, 10-bit ADC, which samples the in-phase and quadrature signals and passes them on to a Cypress FX2LP microcontroller development board. [Anders] had previously connected the ADC to a 6502 microprocessor instead of the FX2LP, but this makes it a practical SDR. The FX2LP was a particularly good choice for this project because of its USB 2.0 interface, large buffers for streaming data, and parallel interface. It simply reads the data from the SDR and dumps it to the computer.

Continue reading “Building A $50 SDR With 20 MHz Bandwidth”

Adding A Panadapter To A Classic Receiver

There was a time when only the richest ham radio operators could have a radio with a panadapter. Back in the day, this was basically a spectrum analyzer that monitored a broad slice of the receiver’s intermediate frequency so you could see signals on either side of the receiver’s actual frequency. Today, with SDR technology and computers, this is an easy thing for receivers to implement. But what if you want to refit a classic radio? It isn’t that hard, and [Mirko Pavleski] shares his notes on how he tackled the project. You can also check it out in the video below.

The plan is simple. A FET amplifier taps the radio’s IF stage before the first IF filter. This provides good isolation and buffering. Then, an emitter follower stage provides a matched output to the SDR through a low-pass filter. The SDR remains tuned to the IF frequency, of course. The rest is essentially software and procedures.

Continue reading “Adding A Panadapter To A Classic Receiver”

off grid weather station

915 MHz Forecast: Rolling Your Own Offline Weather Station

There are a lot of options for local weather stations; most of them, however, are sensors tied to a base station, often requiring an internet connection to access all features. [Vinnie] over at vinthewrench has published his exploration into an off-grid weather station revolving around a Raspberry Pi and an RTL-SDR for communications.

The weather station has several aspects to it. The main sensor package [Vinnie] settled on was the Ecowitt WS90, capable of measuring wind speed, wind direction, temperature, humidity, light, UVI, and rain amount. The WS90 communicates at 915 MHz, which can be read using the rtl_433 project. The WS90 is also available for purchase as a standalone sensor, allowing [Vinnie] to implement his own base station.

For the base station, [Vinnie] uses a weatherproof enclosure that houses a 12V battery with charger to act as a local UPS. This powers the brains of the operation: a Raspberry Pi. Hooked to the Pi is an RTL-SDR with a 915 MHz antenna. The Pi receives an update from the WS90 roughly every 5 seconds, which it can decode using the rtl_433 library. The Pi then turns that packet into structured JSON.

The JSON is fed into a weather model backend that handles keeping track of trends in the sensor data, as well as the health of the sensor station. The backend has an API that allows for a dashboard weather site for [Vinnie], no internet required.

Thanks, [Vinnie], for sending in your off-grid weather station project. Check out his site to read more about his process, and head over to the GitHub page to check out the technical details of his implementation. This is a great addition to some of the other DIY weather stations we’ve featured here.

2G Gone? Bring It Back Yourself!

Some parts of the world still have ample 2G coverage; for those of in North America, 2G is long gone and 3G has either faded into dusk or beginning its sunset. The legendary [dosdude1] shows us it need not be so, however: Building a Custom 2G GSM Cellular Base Station is not out of reach, if you are willing to pay for it. His latest videos show us how.

Before you start worrying about the FCC or its equivalents, the power here is low enough not to penetrate [dosdude]’s walls, but technically this does rely in flying under the radar. The key component is a Nuand BladeRF x40 full-duplex Software Defined Radio, which is a lovely bit of open-source hardware, but not exactly cheap. Aside from that, all you need is a half-decent PC (it at least needs USB-3.0 to communicate with the SDR, the “YateBTS”  software (which [dosdude1] promises to provide a setup guide for in a subsequent video) and a sim card reader. Plus some old phones, of course, which is rather the whole point of this exercise.

The 2G sunset, especially when followed by 3G, wiped out whole generations of handhelds — devices with unique industrial design and forgotten internet protocols that are worth remembering and keeping alive. By the end of the video, he has his own little network, with the phones able to call and text one another on the numbers he set up, and even (slowly) access the internet through the miniPC’s network connection.

Unlike most of the hacks we’ve featured from [dosdude1], you won’t even need a soldering iron, never mind a reflow oven for BGA. 

Continue reading “2G Gone? Bring It Back Yourself!”

The Wow! signal represented as "6EQUJ5" with Jerry R. Ehman's handwritten comment.

Listening For The Next Wow! Signal With Low-Cost SDR

As you might expect, the University of Puerto Rico at Arecibo has a fascination with radio signals from space. While doing research into the legendary “Wow! Signal” detected back in 1977, they realized that the burst was so strong that a small DIY radio telescope would be able to pick it up using modern software-defined radio (SDR) technology.

This realization gave birth to the Wow@Home project, an effort to document both the hardware and software necessary to pick up a Wow! class signal from your own backyard. The University reasons that if they can get a bunch of volunteers to build and operate these radio telescopes, the resulting data could help identify the source of the Wow! Signal — which they believe could be the result of some rare astrophysical event and not the product of Little Green Men.

Ultimately, this isn’t much different from many of the SDR-based homebrew radio telescopes we’ve covered over the years — get a dish, hook your RTL-SDR up to it, add in the appropriate filters and amplifiers, and point it to the sky. Technically, you’re now a radio astronomer. Congratulations. In this case, you don’t even have to figure out how to motorize your dish, as they recommend just pointing the antenna at a fixed position and let the rotation of the Earth to the work — a similar trick to how the legendary Arecibo Observatory itself worked.

The tricky part is collecting and analyzing what’s coming out of the receiver, and that’s where the team at Arecibo hope to make the most headway with their Wow@Home software. It also sounds like that’s where the work still needs to be done. The goal is to have a finished product in Python that can be deployed on the Raspberry Pi, which as an added bonus will “generate a live preview of the data in the style of the original Ohio State SETI project printouts.” Sounds cool to us.

If you’re interested in lending a hand, the team says they’re open to contributions from the community — specifically from those with experience RFI shielding, software GUIs, and general software development. We love seeing citizen science, so hopefully this project finds the assistance and the community it needs to flourish.

Thanks to [Mark Stevens] for the tip.

6502 Puts On An SDR Hat

The legendary 6502 microprocessor recently turned 50 years old, and to celebrate this venerable chip which brought affordable computing and video gaming to the masses [AndersBNielsen] decided to put one to work doing something well outside its comfort zone. Called the PhaseLoom, this project uses a few other components to bring the world of software-defined radio (SDR) to this antique platform.

The PhaseLoom is built around an Si5351 clock generator chip, which is configurable over I2C. This chip is what creates the phase-locked loop (PLL) for the radio. The rest of the components, including antenna connectors and various filters, are in an Arduino-compatible form factor that let it work as a shield or hat for the 65uino platform, an Arduino-form-factor 6502 board. The current version [Anders] has been working on is dialed in to the 40-meter ham band, with some buttons on the PCB that allow the user to tune around within that band. He reports that it’s a little bit rough around the edges and somewhat noisy, but the fact that the 6502 is working as an SDR at all is impressive on its own.

For those looking to build their own, all of the schematics and code are available on the project’s GitHub page. [Anders] has some future improvements in the pipe for this project as well, noting that with slightly better filters and improved software even more SDR goodness can be squeezed out of this microprocessor. If you’re looking to experiment with SDR using something a little bit more modern, though, this 10-band multi-mode SDR based on the Teensy microcontroller gets a lot done without breaking the bank.