Art of 3D printer in the middle of printing a Hackaday Jolly Wrencher logo

Forget The UV Resist Mask: Expose Custom PCBs Directly On Your SLA Printer

For the enterprising hobbyist and prototyping hardware developer, creating custom PCBs remains somewhat of a struggle. Although there are a number of approaches to go about this, they usually involve printing or drawing a mask that is used to expose the photoresist layer on the to-be-etched PCB. Here [Andrew Dickinson]’s Photonic Etcher project provides an intriguing shortcut, by using the UV source of an MSLA 3D printer directly after converting the project’s Gerber files into a format the MSLA printer can work with.

The concept is as simple as can be: since MSLA printers essentially function by creating a dynamically updated UV mask (either via an LCD panel or DLP system), this means that an MSLA printer can be used to expose the PCB’s UV-sensitive photoresistive coating, effectively making the mask there insoluble during the etching step. This can be done with negative as well as positive photoresistive coatings, depending on the use case.

The obvious advantage of this approach is that you don’t need an additional UV source or any kind of separate mask, only an MSLA printer with a large enough work area to fit the PCB you wish to expose. One limitation of [Andrew]’s project at this point is that it can only convert Gerbers to PWMS (Photon Mono) files, but this can presumably be fairly easily extended to support more MSLA printers.

Up Close And Personal With An Unusual 3D Printer Kit

While there are still plenty of folks out there tinkering with custom 3D printers, it’s safe to say that most people these days are using a commercially-available machine. The prices are just so low now, even on the resin printers, that unless you have some application that requires exacting specifications, it just doesn’t make a whole lot of sense to fiddle around with a homebrew machine.

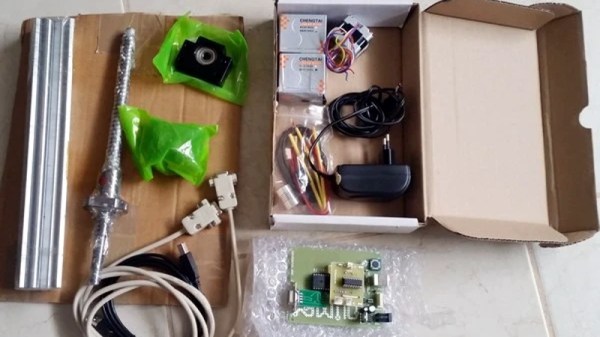
As it so happens, [Nicolas Tranchant] actually does have such an application. He needs ultra-high resolution 3D prints for his jewelry company, but even expensive printers designed for doing dental work weren’t giving him the results he was looking for. Rather than spend five-figures on a machine that may or may not get the job done, he decided to check out what was available in kit form. That’s when he found the work of [Frédéric Lautré].

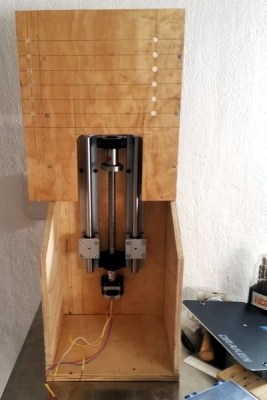
A look at the heavy-duty Z axis.

He purchased the unique “Top-Down” SLA kit from him back in 2017, and now after four years of working with the machine, [Nicolas] decided he would share his experiences with the rest of the class. The basic idea with this printer is that the light source is above the resin vat, rather than below. So instead of the print bed being pulled farther away from the resin on each new layer, it actually sinks deeper into it.

Compared to the “Bottom-Up” style of resin printers that are more common for hobbyists, this approach does away with the need for a non-stick layer of film at the bottom of the tank. Printing is therefore made faster and more reliable, as the part doesn’t need to be peeled off the film for each new layer.

[Nicolas] goes into quite a bit of detail about building and using the $700 USD kit, including the occasional modifications he made. It sounds like the kit later went through a few revisions, but the core concepts are largely the same. It’s worth noting that the kit did not come with the actual projector though, so in his case the total cost was closer to $1,400. We were also surprised to see that [Frédéric] apparently developed the software for this printer himself, so the tips on how to wrangle its unfamiliar interface for slicing and support generation may be particularly helpful.

Unfortunately, it sounds like [Frédéric] has dropped off the radar. The website for the kit is gone, and [Nicolas] has been unable to get in touch with him. Which is a shame, as this looks to be a fascinating project. Perhaps the Hackaday community can help track down this mysterious SLA maestro?

SLA 3D Printed Vortex Cooled Rocket Engine

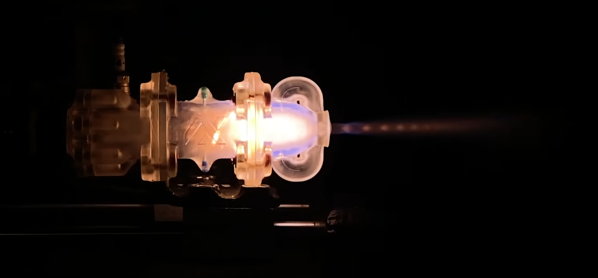
3D printing is an incredible tool for prototyping and development, but the properties of the materials can be a limiting factor for functional parts. [Sam Rogers] and colleagues at [AX Technologies] have been testing and developing a small liquid-fueled rocket engine and successfully used vortex cooling to protect a resin 3D printed combustion chamber. (Video, embedded below.)

Vortex cooling works by injecting oxygen into the combustion chamber tangentially, just inside the nozzle of the engine, which creates a cooling, swirling vortex boundary layer along the chamber wall. The oxygen moves to the front end of the combustion chamber where it mixes with the fuel and ignites in the center. This does not protect the nozzle itself, which only lasts a few seconds before becoming unusable. However, thanks to the modular design of the test engine, only the small nozzle section had to be reprinted for every test. While this part could be manufactured using a metal 3D printer, the costs are still very high, especially at this experimental stage. The clear resin parts also allow the combustion observed and more accurate conclusions to be drawn from every test.

This engine intended to be used as a torch igniter for a much larger rocket engine. Fuel is injected into the front of the combustion chamber, where a spark plug is located to ignite the oxygen-fuel mixture. The flow of the oxygen and fuel is controlled by two servo-operated valves connected to a microcontroller, which is mounted with the engine on linear rails. This allows the test engine to move freely, and push against a load cell to measure thrust. The spark is created before the valves are opened to prevent a delayed ignition, which can blow up the engine, and getting the valve sequence and timing correct is critical. Many iterations and destroyed parts later, the [AX Technologies] team achieved successful ignition, with a clear supersonic Mach diamond pattern in the exhaust.

This is just one more example of 3D printing and cheap electronics allowing impressive progress on a limited budget. Another example is [Joe Barnard]’s progress in getting a model rocket to land itself with a solid fuel engine. Companies and organisations have been using 3D printed components in rocket engines for a few years now, and we’ve even seen an open source version.

Improving Exposure On A Masked SLA Printer

It’s taken longer than some might have thought, but we’re finally at the point where you can pick up an SLA 3D printer for a few hundred bucks. These machines, which use light to cure a resin, are capable of far higher resolution than their more common FDM counterparts, though they do bring along their own unique issues and annoyances. Especially on the lower end of the price spectrum.

[FlorianH] recently picked up the $380 SparkMaker FHD, and while he’s happy with the printer overall, he’s identified a rather annoying design flaw. It seems that the upgraded UV backlight in the FHD version of the SparkMaker produces somewhat irregular light, which in turn manifests itself as artifacts on the final print. Due to hot spots on the panel, large objects printed on the SparkMaker show fairly obvious scarring.

Now you might expect the fix for this problem to be in the hardware, but he’s taken it in a different direction. These printers use an LCD panel to block off areas of the UV backlight, thereby controlling how much of the resin is exposed. This is technique is officially known as “masked SLA”, and is the technology used in most of these new entry level resin printers.

As luck would have it, the SparkMaker FHD allows showing various levels of grayscale on the LCD rather than a simple binary value for each pixel. At least in theory, this allows [FlorianH] to compensate for the irregular backlight by adjusting how much the UV is attenuated by the LCD panel. He’s focusing on the printer he personally owns, but the idea should work on any masked SLA printer that accepts grayscale values.

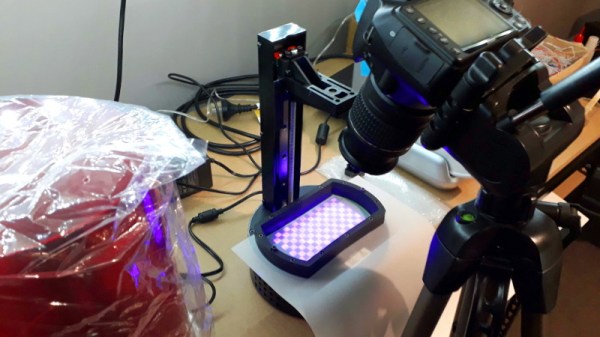
The first step was to map the backlight, which [FlorianH] did by soaking thin pieces of paper in a UV reactant chemical, and draping them over the backlight. He then photographed the illumination pattern, and came up with some OpenCV code that takes this images and uses the light intensity data to compensate for the local UV brightness underneath the sliced model.

So far, this method has allowed [FlorianH] to noticeably reduce the scarring, but he thinks it’s still possible to do better. He’s released the code for this backlight compensation script, and welcomes anyone who might wish to take a look at see how it could be improved.

An uneven backlight is just one of the potential new headaches these low-cost “masked” SLA printers give you. While they’re certainly very compelling, you should understand what you’re getting into before you pull the trigger on one.

What Actually Happens At A Hardware Hacking Con

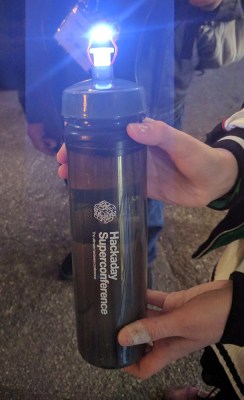
The Hackaday Superconference was last weekend, and it was the greatest hardware con on the planet. What can you build out of a conference badge? If you answered “a resin-based 3D printer” you would have won a prize. If you decided to put your badge in a conference water bottle and make a stun gun you’d receive adoration of all in attendance. Yeah, it got that crazy.

Yes, there’s a Supercon badge in that bottle and it’s now a stun gun.

At other tech conferences, you’ll find gaggles of nerds sitting around a table with MacBooks and Thinkpads. The Superconference is different. Here, you’ll find soldering irons, tackle boxes filled with components, and loose WS2812s scattered about the floor. The smell of solder flux wafts through the air. You detect a hint of ozone.

The depth and breadth of hacks that came out of this were simply stunning. We a binocular virtual reality hack, an internet trolling badge, blinky add-on boards, audio add-on boards, a film festival was shot on the badge, and much more which you’ll find below.

We have started a Badge Hacks list and want to see details of all of the hacks. So if you were at Supercon be sure to publish them on Hackaday.io and send a DM to be added to the list.

Starting Up An Extra Day of Hacking

To get all of this creativity rolling we did something a bit different for this year’s Superconference. Instead of opening the doors up on Saturday morning, we set up a badge hacking area and party on Friday afternoon. The drinks flowed like the meniscus on a properly soldered lead, and by 2pm on Friday, everyone was hacking firmware on the incredible camera badge for this year’s con.

We didn’t stop on Friday. The Superconference is a hardware hacking conference, and that meant we brought out the soldering irons, experimented with melting aluminum with gallium, reflowed a few boards, and created a few deadbug LED cubes. This went on all weekend.

Continue reading “What Actually Happens At A Hardware Hacking Con”

3D Printed Nozzles Turbocharge Microsphere Production

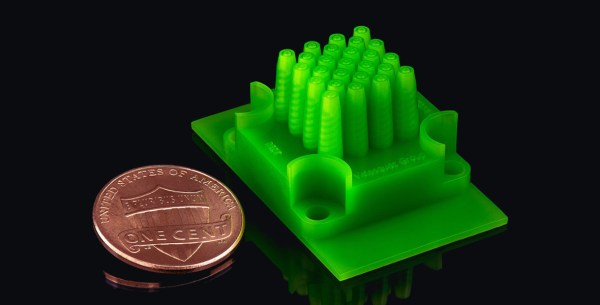
Researchers at MIT have used 3D printing to open the door to low-cost, scalable, and consistent generation of microencapsulated particles, at a fraction of the time and cost usually required. Microencapsulation is the process of encasing particles of one material (a core) within another material (a shell) and has applications in pharmaceuticals, self-healing materials, and dye-based solar cells, among others. But the main problem with the process was that it was that it was slow and didn’t scale, and it was therefore expensive and limited to high-value applications only. With some smart design and stereolithography (SLA) 3D printing, that changed. The researchers are not 3D printing these just because they can; they are printing the arrays because it’s the only way they can be made.

Continue reading “3D Printed Nozzles Turbocharge Microsphere Production”

Open Source SLA Printer Software Slices From The Browser

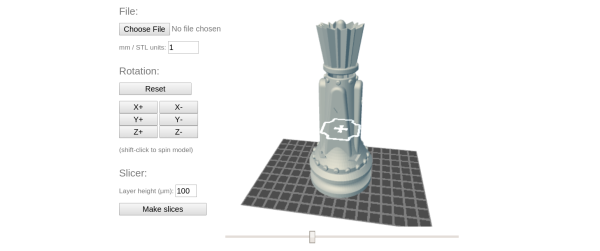
Resin-based SLA printers need a different slicing algorithm from “normal” melted-plastic printers. Following their latest hackathon, [Matt Keeter] and [Martin Galese] from Formlabs have polished off an open source slicer, and this one runs in your browser. It’s Javascript, so you can go test it out on their webpage.

Figuring out whether or not the voxel is inside or outside the model at every layer is harder for SLA printers, which have to take explicit account of the interior “empty” space inside the model. [Matt] and [Martin]’s software calculates this on the fly as the software is slicing. To do this, [Matt] devised a clever algorithm that leverages existing hardware to quickly accumulate the inside-or-out state of voxels during the slicing.

[Matt] is stranger to neither 3D mesh manipulation nor Hackaday. If you’re just getting started in this realm, have a look at Antimony, [Matt’s] otherworldly CAD software with a Python interface to get your feet wet with parametric 3D modeling.