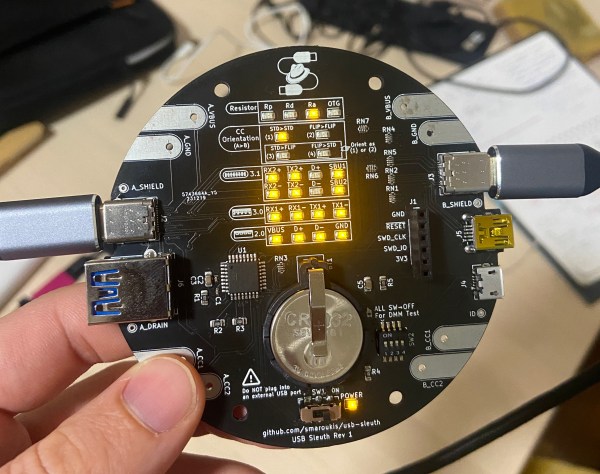
Sound Sculpture Uses Daisy Seed To Generate Audio

Here at Hackaday, we love a good art piece, whether that involves light or sound. Combining both is a sure-fire way to get our attention, and [Eirik Brandal] did just that with his Void Extrusion piece.

The project is built around the Daisy Seed from Electrosmith. It’s an embedded platform designed for musical purposes, which made it perfect for [Eirik]’s project. Based on an STM32 chip, it’s very capable when it comes to DSP tasks. In this role, it’s charged with algorithmic music composition, providing the captivating soundtrack that emanates from the sculpture.

The sculpture itself looks almost like a fancy mid-century home from the Hollywood Hills, but it’s fundamentally a little more abstract than that. [Eirik] built it as an opportunity to experiment with using 3D printed forms in his work. To that end, it features a beautiful diffused LED wall and a speaker enclosure as an integral part of the build. The LEDs are run from an Arduino Nano Every.

[Eirik’s] work shows us that “generative” music can be intoxicating and compelling with a real sense of feeling and mood. The sculpture is a visually-capable pairing that works with the soundscape. It recalls us of some other great artworks we’ve featured from [Eirik] before, too.

Continue reading “Sound Sculpture Uses Daisy Seed To Generate Audio”

Magic 8 Ball Provides Tech Support

ChatGPT might be making the news these days for being able to answer basically any question it’s asked, those of us who are a little older remember a much simpler technology that did about the same thing. The humble “Magic 8 Ball” could take nearly the same inputs, provided they were parsed in simple yes/no form, and provide marginal help similar to the AI tools of today. For a toy with no battery or screen, this was quite an accomplishment. But the small toy couldn’t give specific technical support help, so [kodi] made one that can.

The new 8 Ball foregoes the central fluid-filled chamber for an STM32 Blue Pill board with a few lithium batteries to power it. The original plastic shell was split in two with a hacksaw and fitted with a 3D printed ring which allows the two halves to be reconnected and separated again when it needs to charge. It uses a circular OLED to display the various messages of tech support, which are displayed when an accelerometer detects that the toy has been shaken.

Granted, most of the messages are about as helpful to solving a tech support issue as the original magic 8 Ball’s would have been, but we appreciate the ingenuity and carefree nature of a project like this. It also did an excellent job at operating in a low-power state as well, to avoid needing to charge it often. There have been a few other digital conversions of these analog fortune tellers as well, like this one which adds GIFs to each of the original answers.

Photograph of a BLDC motor controller circuit board

Take A Ride Through The Development Of A Custom BLDC Motor Controller

The folks over at the [Barkhausen Institut] are doing research into controlling autonomous fleets of RC cars and had been using off the shelf electronic speed controllers (ESCs) to control the car motors. Unfortunately they required more reliable feedback for closed loop control of the motors, so they created their own open source hardware brushless DC (BLDC) controller.

The motor controller they developed uses an STM32 microcontroller that talks to a TMC6140 3 phase MOSFET driver to drive 6 IRLR 2905 MOSFETs. The [Barkhausen Institut] researchers went with the SimpleFOC library as the basis to program the STM32, with installed hall effect sensors indicating motor orientation for their closed loop control.

Designing a functioning BLDC and ESC controllers can be subtle, and their post goes into details about the problems and solutions they came up with to deal with with what was ultimately improper isolation of the MOSFETs interfering with the power rail for the STM32. The source for their BLDC motor controller is available through their GitLab page. For more information on the parent project that uses the BLDC driver, be sure to check out their work on a connected convoy of RC cars.

There’s now a wealth of open source BLDC drivers and projects, many of which we’ve featured in the past, like the Moteus and haptic smart knob, and it’s nice to see other projects explore different options.

Pocket-Sized Thermal Imager

Just as the gold standard for multimeters and other instrumentation likely comes in a yellow package of some sort, there is a similar household name for thermal imaging. But, if they’re known for anything other than the highest quality thermal cameras, it’s excessively high price. There are other options around but if you want to make sure that the finished product has some sort of quality control you might want to consider building your own thermal imaging device like [Ruslan] has done here.

The pocket-sized thermal camera is built around a MLX90640 sensor from Melexis which can be obtained on its own, but can also be paired with an STM32F446 board with a USB connection in order to easily connect it to a computer. For that, [Ruslan] paired it with an ESP32 board with a companion screen, so that the entire package could be assembled together with a battery and still maintain its sleek shape. The data coming from the thermal imagining sensor does need some post-processing in order to display useful images, but this is well within the capabilities of the STM32 and ESP32.

With an operating time on battery of over eight hours and a weight under 100 grams, this could be just the thing for someone looking for a thermal camera who doesn’t want to give up an arm and a leg to one of the industry giants. If you’re looking for something even simpler, we’ve seen a thermal camera based on a Raspberry Pi that delivers its images over the network instead of on its own screen.

The completed oscilloscope in parts, with the screen in the front connected with prototyping wires, protoboarded buttons on the right, and the BlackPill board somewhere behind

DIY STM32 Scope Is Simple, Cheap, And Featureful

Would you like to have a small digital oscilloscope? Do you have a spare BlackPill (STM32F401) board and a TFT display laying around? [tvvlad1234] presents us with a simple and educational digital storage oscilloscope design that barely needs any components for you to build one, and it’s packed with features just like you would expect from a self-respecting open-source project. Not just that — it can even stream data to your computer, in a format compatible with the TekScope software!

The same scope design, but now on a self-etched boardIt’s hard to overshadow just how easy this scope is to build, use, and hack on. You really don’t need much in the way of parts, a protoboard will do, though you can also etch or order your own PCBs. The front-end is super straightforward to find components for and assemble, a few opamps and resistors is all you need. So after jumper-wiring the LCD and three push buttons to your BlackPill, you’re golden.

Of course, the simple frontend results in the input range being from -3.3 V to 3.3 V, but as you could guess, this is exactly the kind of project where you could tweak the resistors and even upgrade it later on. Are you a bit lost in how oscilloscopes work? [tvvlad1234] has an explainer for you, too!

This build could easily take up a honorary “temporary turned permanent” place on your bench, thanks to its McGyver-esque qualities. It’s also, quite possibly, a better scope than the red “soldering kit” ones we’ve seen online. All in all, it’s a strong contender in the “simple and powerful DIY scope” arena, before this, we’ve seen one built with an Arduino Nano, and one with a Pi Pico.

Dumping script window, showing the bytes being dumped one by one from the STM chip

Need To Dump A Protected STM32F0x? Use Your Pico!

Sometimes, security mechanisms can be bypassed if you just do things slightly out of the ordinary. For instance, readout protection on microcontrollers is a given nowadays, to the point where it’s intentionally enabled and relied upon as a major technical measure to protect intellectual property. The gist is — when you connect to a microcontroller over its debug interface and then ask to read its flash memory, it will politely refuse. However, [Racerxdl] shows us that in practice, it’s not flawless protection – for certain chips, you just need to be a little quicker than usual.

Usually, flashing and debugging software will chat with the microcontroller for a bit, and probe parameters before going for any direct requests. However, if you skip the courtesy and bluntly get to the point immediately right after power is applied to the microcontroller, you can intimidate them just enough to give you one byte of its memory before it refuses to cooperate further. Since that can be any byte you wish, you can read the entire flash — one byte at a time.

You need to power cycle the chip before you can progress, so the hardware does involve a bit more than just an SWD interface, and it will take a fair bit more time than reading out a non-protected chip the usual way; plus, of course, the debugging interface needs to be active for this in the first place, which isn’t always the case. However, it still beats paying a few thousand dollars for a factory in China to decap your chip and read it out using a fancy machine.

[Racerxdl] didn’t just write a proof-of-concept for this attack – they implemented it for one of our favourite chips, the RP2040. As such, you no longer need an unobtainium STM32 to dump an unobtainium STM32.

To be clear, [Racerxdl] didn’t design this attack — it’s been around for some time now. Credit for that goes to Johanes Obermaier. All in all, this is a wonderful reminder that seemingly reliable security mechanisms can be foiled by the simplest tricks. For instance, if your chip erases the flash when you unlock its protection, you can just tell it not to.

DIY Macro Keyboard Wood Be Nice

Editing video tends to involve a lot of keyboard shortcuts, and while this might be fine for the occasional edit, those who regularly deal with video often reach for a macro pad to streamline their workflow. There are plenty of macro keyboards available specifically meant to meet the needs of those who edit a lot of video, but if you want something tailored for your personal workflow you may want to design your own keyboard like this wooden macro pad from [SS4H].

The keyboard itself is built around an STM32 microcontroller, which gives it plenty of power to drive and read the keyboard matrix. It also handles an encoder that is typically included on macro keyboards for video editing, but rather than using a potentiometer-type encoder this one uses a magnetic rotary encoder for accuracy and reliability. There’s a display built into the keyboard as well with its own on-board microcontroller that needs to be programmed separately, but with everything assembled it looks like a professional offering.

[SS4H] built a prototype using 3D printed parts, but for the final version he created one with a wooden case and laser etched keys to add a bit of uniqueness to the build. He also open-sourced all of the PCB schematics and other files needed to recreate this build so anyone can make it if they’d like. It’s not the only macro keyboard we’ve seen before, either, so if you’re looking for something even more esoteric take a look at this keyboard designed to be operated by foot.

Continue reading “DIY Macro Keyboard Wood Be Nice”