The Forgotten Rescue Of The Salyut 7 Space Station

With only two space stations in orbit around Earth today in the form of the International Space Station and the Chinese Tiangong (‘Sky Palace’) station, it’s easy to forget how many space stations were launched in the previous century. And the Soviet Union launched by far the most, as part of the Salyut (Russian for ‘salute’ or ‘fireworks’) program. Although the program entailed both military (Orbital Piloted Station, or OPS) and civilian (Durable Orbital Station, or DOS) stations, it was the civilian stations that saw the most success, as well as the most daring rescue attempt with the recovering of the Salyut 7 space station.

Salyut 7 (DOS-6) was set to repeat Salyut 6’s success after its launch on April 19th 1982, until disaster struck in February 1985. Due to a series of electrical and other faults ground communication with the space station was cut off, and the at the time unmanned space station began to gradually tumble towards the Earth’s atmosphere. This left those in charge with two options: leave the station to burn up in the atmosphere, or stage a rescue mission.

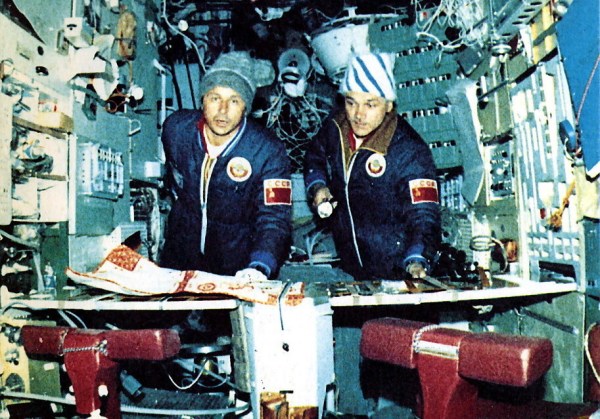
Ultimately, on June 6th, 1985, Soyuz T-13 launched to rendezvous with Salyut 7. On board were cosmonauts Vladimir Dzhanibekov – who had previously manually docked with Salyut 7 – and Viktor Savinykh. Both men had done all they could to perform a manual docking and attempt to revive the stricken space station. Ultimately they managed to revive the station using what little charge was left in its batteries and the Soyuz’s thrusters, all the while braving freezing temperatures in the dead station’s interior.

Salyut 7 would continue to perform its duties until February 1991, with Mir (DOS-7, launched 1986) as the first modular space station taking over. The final DOS module (DOS-8) that directly traces its lineage to this era is still in orbit today as the ISS’ Zvezda module, keeping the Salyut legacy and the bravery of Dzhanibekov and Savinykh alive.

Op-Amp Challenge: A Low Noise Amplifier For Those Truly Low Noise Measurements

When something is described as “Low Noise”, it is by the nature of the language a relative phrase. The higest quality magnetic tape is low noise compared to its cheaper sibling for example, but still has noise many would consider unacceptable. In instrumentation however, “Low Noise” has to really mean just that, with a range of specialist techniques to produce circuitry with a truly low noise level for the most demanding of signal applications. As an example [Floydfish] has created a low noise instrumentation amplifier that should serve as a learning exercise for anyone interested in pushing low noise circuitry to the limit.

Anyone who can dredge the hazy recesses of their mind for barely-remembered electronics lectures will know that the overall noise figure of a system is dictated by that of its first component. Thus perhaps the most interesting part of the schematic is at the input, where a row of low-noise op-amps are presented in parallel. We have to admit having to look this one up, to find that it’s a technique whereby the signal outputs of each chip are the same and thus sum, while the noise output of each is different and thus the summed noise output is proportionally lower. This stage is then followed by a buffer and a set of filters for different output frequency ranges.

Our op-amp competition of which this is a part is certainly delivering the goods when it comes to the amny techniques with which these versatile parts can be used. Few of us may need to make such a low noise amplifier, but at least now we’ve learned how.

Laser Triangulation Makes 3D Printer Pressure Advance Tuning Easier

On its face, 3D printing is pretty simple — it’s basically just something to melt plastic while being accurately positioned in three dimensions. But the devil is in the details, and there seems to be an endless number of parameters and considerations that stand between the simplicity of the concept and the reality of getting good-quality prints.

One such parameter that had escaped our attention is “pressure advance,” at least until we ran into [Mike Abbott]’s work on automating pressure advance calibration on the fly. His explanation boils down to this: the pressure in a 3D printer extruder takes time to both build up and release, which results in printing artifacts when the print head slows down and speeds up, such as when the print head needs to make a sharp corner. Pressure advance aims to reduce these artifacts by adjusting filament feed speed before the print head changes speed.

The correct degree of pressure advance is typically determined empirically, but [Mike]’s system, which he calls Rubedo, can do it automatically. Rubedo uses a laser line generator and an extruder-mounted camera (a little like this one) to perform laser triangulation. Rubedo scans across a test print with a bunch of lines printed using different pressure advance values, using OpenCV to look for bulges and thinning caused when the printer changed speed during printing.

The video below gives a lot of detail on Rubedo’s design, some shots of it in action, and a lot of data on how it performs. Kudos to [Mike] for the careful analysis and the great explanation of the problem, and what looks to be a quite workable solution.

Continue reading “Laser Triangulation Makes 3D Printer Pressure Advance Tuning Easier”

A miniature 486 desktop PC running Lemmings

Tiny 3D Printed Gaming PC Contains Real Retro Hardware

Emulators are easy and convenient, but for some retrocomputing enthusiasts nothing comes close to running classic software on actual era-appropriate hardware. This can become a problem, though, for those into vintage PC gaming: old PCs and their monitors are notoriously large and heavy, meaning that even a modest collection will quickly fill up a decent family home. There is a solution however, as [The Eric Experiment] demonstrates in his latest video. He designed and built a 3D-printed mini PC that runs on an actual 486 processor.

An ordinary desktop motherboard would have required a rather large case to begin with, so [Eric] started his project by buying an old industrial PC board. Such a device has the processor and all main motherboard components sitting on an ISA card, which then connects to other ISA cards through a backplane. This way, a complete system with expansion cards can be made way more compact than even the sleekest desktop PCs of the time. An SD-card-to-IDE converter makes for an extremely slim hard drive replacement, while a Gotek floppy emulator allows the system to boot as if there’s actually a floppy drive present.

A small 486 tower case being assembled
Even the side panels slide in exactly like they do on real PC cases.

All of this is pretty neat to begin with, but by far the most impressive parts of the Tiny 486 project are the enclosures that [Eric] designed for the PC and its accompanying monitor. Both were modelled off real-world examples and are accurate down to the smallest details: the tilting stand that clips onto the base of the monitor for instance, or the moving latch on the faux 5.25″ floppy drive. That latch operates a cleverly hidden door that reveals the USB connector for the floppy emulator. The compulsory seven-segment LED display on the mini tower’s front panel now finally serves a useful purpose – indicating which floppy image is currently active.

Sporting an Intel 486-DX4 100 MHz processor, 32 MB of RAM, a Tseng ET4000 video card and an ESS Audiodrive for sound, the tiny 486 can run DOS or Windows 95, although performance in the latter is a bit limited due to the lack of a local-bus video card. It’s perfectly fine for most DOS games though, and a lot more practical than a full-sized desktop PC.

There are several ways to make a tiny game PC, like using PC/104 standard boards or repurposing old network equipment. The crucial part needed to turn it into a gaming machine is a proper sound card, which you can even build from scratch if needed. Thanks for the tip, [Nathan]!

Continue reading “Tiny 3D Printed Gaming PC Contains Real Retro Hardware”

PC Classics, Right In Your Browser With EmuOS

[Emupedia]’s work to preserve computer history by way of making classic and abandoned games and software as accessible as possible is being done in a handy way: right in your browser with EmuOS.

A few moments of BIOS startup kicks off EmuOS right in a browser window.

Doing things this way has powerful “Just Works” energy. Visit that link in a modern browser and in no time at all you’ll be looking at a Windows 95 (or Windows 98, or Windows ME) desktop, filled with a ton of shortcuts to pre-installed and ready-to-run classic software. Heck, you can even keep it simple and be playing the original Microsoft Solitaire in no time flat. There is also a whole ton of DOS software waiting to be fired up, just double-click the DOSBox icon, and browse a huge list. The project is still in development, so not everything works, but the stuff that does is awfully slick.

Here’s some additional background that goes into more detail about the project and its capabilities, but if you’d prefer to just click around to explore, here’s the main link again (and here’s a list of mirrors.)

If OS emulation is your thing, don’t miss emulating the IBM PC on an ESP32 microcontroller. And if you’re more into lesser-known vintage operating systems, how about re-inventing PalmOS to run on x86 architecture?

The New Hotness

If there’s one good thing to be said about the chip shortage of 2020-2023 (and counting!) it’s that a number of us were forced out of our ruts, and pushed to explore parts that we never would have otherwise. Or maybe it’s just me.

Back in the old times, I used to be a die-hard Atmel AVR fan for small projects, and an STM32 fan for anything larger. And I’ll freely admit, I got stuck in my ways. The incredible abundance of dev boards in the $2 range also helped keep me lazy. I had my thing, and I was fine sticking with it, admittedly due to the low price of those little blue pills.

An IN-12B Nixie tube on a compact driver PCBAnd then came the drought, and like everyone else, my stockpile of microcontrollers started to dwindle. Replacements at $9 just weren’t an option, so I started looking around. And it’s with no small bit of shame that I’ll admit that I hadn’t been keeping up with the changes as much as I should have. Nowadays, it’s all ESP32s and RP2040s over here, and granted there’s a bit of a price bump, but the performance is there in abundance. But I can’t help feeling like I’m a few years back of the cutting edge.

So when I see work like what [CNLohr] and [Bitluni] are doing with the ultra-cheap CH32V003 microcontrollers, it makes me think that I need to start filling in gaps in my comfortable working-set of chips again. But how the heck am I supposed to keep up? And how do you? It took a global pandemic and silicon drought to force me out of my comfort zone last time. Can the simple allure of dirt-cheap chips get me out? We’ll see!

How To Model A Twisted Part In FreeCAD

Quick references are handy, but sometimes it’s nice to have a process demonstrated from beginning to end. In that spirit, [Darren Stone] created a video demonstrating how to model a twisted part in FreeCAD, showing the entire workflow of creating the part as a blend of surfaces and curves that get turned into a solid.

FreeCAD is organized using the concept of multiple “workbenches” which are each optimized for different tools and operations, and [Darren] walks through doing the same jobs in a few different ways.

This twisted bracket is a simple part that is nevertheless nontrivial from a CAD perspective, and that makes it a good candidate for showing off the different workbenches and tools.

The video below is also pretty good overall demonstration of what designing a part from a mechanical drawing looks like when done in FreeCAD. As for mechanical drawings themselves, we’ve seen FreeCAD can be used to make those, too.

Continue reading “How To Model A Twisted Part In FreeCAD”