The Kraakdoos — Musical Abuser Of An Ancient OpAmp

A friend from the newly founded Yeovil Hackerspace introduced me to a device known as “The Kraakdoos” or cracklebox.

The cracklebox is an early electronic instrument produced by STEIM in the 1970s. The instrument consists of a single PCB with a number of copper pads exposed on one side. The player touches the pads and the instrument emits… sounds which can perhaps best be described as squeeze and squeals.

While the cracklebox was original sold as a complete instrument, the device has been reverse engineered, and the schematic documented. What lies inside is quite fascinating.

The heart of the cracklebox is an ancient opamp, the LM709. The LM709 is the predecessor to the famous LM741. Unlike the 741 the 709 had no internal frequency compensation. Frequency compensation is used to intentionally limit the bandwidth of an opamp. As input frequency increases, the phase shift of the opamp also increases. This can result in undesirable oscillation, as the feedback network forms an unintentional phase-shift oscillator.

Most modern opamps have internal frequency compensation, but the 709 doesn’t. Let’s see how this is used in the cracklebox:

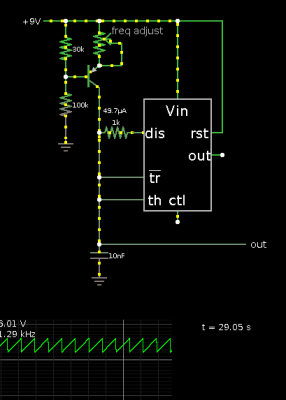
krackdoos_schRather than using the frequency compensation pins as intended the cracklebox just routes them out to pads. In fact the cracklebox routes almost all the pins on the opamp out to pads, including the inverting and non-inverting inputs. A single 1MOhm feedback resistor is used in a non-inverting configuration. However reports suggest the instrument can work without a feedback resistor at all!

Continue reading “The Kraakdoos — Musical Abuser Of An Ancient OpAmp”

Hackaday Links Column Banner

Hackaday Links: July 19, 2015

Everybody needs an external USB drive at some time or another. If you’re looking for something with the nerd cred you so desperately need, build a 5 1/4″ half height external drive. That’s a mod to an old Quantum Bigfoot drive, and also serves as a pretty good teardown video for this piece of old tech.

The Woxun KG-UV2D and KG-UV3D are pretty good radios, but a lot of amateur radio operators have found these little handheld radios eventually wear out. The faulty part is always a 24C64 Flash chip, and [Shane] is here to show you the repair.

Last year there was a hackathon to build a breast pump that doesn’t suck in both the literal and figurative sense. The winner of the hackathon created a compression-based pump that is completely different from the traditional suction-based mechanism. Now they’re ready for clinical trials, and that means money. A lot of money. For that, they’re turning to Kickstarter.

What you really need is head mounted controls for Battlefield 4. According to [outgoingbot] it’s a hacked Dualshock 4 controller taped to a bike helmet. The helmet-mounted controller has a few leads going to another Dualshock 4 controller with analog sticks. This video starts off by showing the setup.

[Jan] built a modeling MIDI synth around a tiny 8-pin ARM microcontroller.  Despite the low part count, it sounds pretty good. Now he’s turned his attention to the Arduino. This is a much harder programming problem, but it’s still possible to build a good synth with no DAC or PWM.

Hackaday Prize Entry: 3D Printed Modular Keyboard

There is a big community of people creating all kinds of synthesizers, but until now no one has attempted to make a keyboard controller like the one [Tim] created. Not only has he created the keyboard synthesizer, but he’s developed one that is modular and 3D printed so you can just expand on the synth you have rather than go out and buy or build a new one.

The design has a lot useful features. Since the design is modular, you can 3D print extra octaves of keys if you need, and simply build off of the existing keyboard. The interior has mounts that allow circuit boards to be screwed down, and the exterior has plenty of available places to put knobs or sliders. Anything that could possibly be built into a synthesizer is possible with this system, and if you decide you want to start small, that’s possible too!

All of the design files are available from Pinshape if you want to get started. The great thing about this controller is that you could use a 555-based synth in this keyboard controller, or a SID synth, or any other synth you could think of!

The 2015 Hackaday Prize is sponsored by:

Busted Wah Pedal Becomes New Synth Tool

Sometimes we get lucky and find a part we need for a project in our parts drawer. [Scissorfeind] got even luckier and found a part for his project lying around in the street. It was a Crybaby Wah pedal, a classic effects pedal typically used for a guitar. Since it was somewhat damaged, [Scissorfeind] got to work creating a control voltage (CV) and volume circuit for his Korg synthesizer.

For those who aren’t synthesizer aficionados, CV is a method of controlling the pitch of a tone. A higher voltage creates a higher tone and vice-versa. The wah pedal has a rocker on it that allows one’s foot to control the effect, but this particular one has been modified for CV instead of the wah-wah sound these pedals normally make. [Scissorfeind] built in a switch that will allow it to control volume as well, which makes this pedal quite unique in the effects world.

[Scissorfeind] built the custom circuit out of other parts he had lying around (presumably not in the street) and put the entire thing together on perfboard, then fit it all back together in the pedal. Now he has a great control voltage pedal for the vintage Korg synthesizer he recently restored! [Scissorfeind] knows his way around a synth, but if you’re looking to get started on a synthesizer project we have a great tutorial for you!

Hackaday Links Column Banner

Hackaday Links: January 25, 2015

Misumi is doing something pretty interesting with their huge catalog of aluminum extrusions, rods, bolts, and nuts. They’re putting up BOMs for 3D printers. If you’ve ever built a printer with instructions you’ve somehow found on the RepRap wiki, you know how much of a pain it is to go through McMaster or Misumi to find the right parts. Right now they have three builds, one with linear guides, one with a linear shaft, and one with V-wheels.

So you’re finally looking at those fancy SLA or powder printers. If you’re printing an objet d’arte like the Stanford bunny or the Utah teapot and don’t want to waste material, you’re obviously going to print a thin shell of material. That thin shell isn’t very strong, so how do you infill it? Spheres, of course. By importing an object into Meshmixer, you can build a 3D honeycomb inside a printed object. Just be sure to put a hole in the bottom to let the extra resin or powder out.

Remember that episode of The Simpsons where Homer invented an automatic hammer? It’s been reinvented using a custom aluminum linkage, a freaking huge battery, and a solenoid. Next up is the makeup shotgun, and a reclining toilet.

[Jan] built a digitally controlled analog synth. We’ve seen a few of his FM synths VA synths built from an LPC-810 ARM chip before, but this is the first one that could reasonably be called an analog synth. He’s using a digital filter based on the Cypress PSoC-4.

The hip thing to do with 3D printers is low-poly Pokemon. I don’t know how it started, it’s just what the kids are doing these days. Those of us who were around for Gen 1 the first time it was released should notice a huge oversight by the entire 3D printing and Pokemon communities when it comes to low-poly Pokemon. I have corrected this oversight. I’ll work on a pure OpenSCAD model (thus ‘made completely out of programming code’) when I’m sufficiently bored.

*cough**bullshit* A camera that can see through walls *cough**bullshit* Seriously, what do you make of this?

Mixer For Korg Volcas

Korg, everyone’s third or fourth favorite synth company, but one of the only ones that still in business, recently put out a new line of synths, drum machines, and groove boxes. They’re called Volcas, and they’re cheap, analog, and very cool. [Jason] has a few of these Volcas, and while he enjoys the small form factor, using an off-the-shelf mixer to dump send the audio from these machines to his computer takes up too much space. He created a passive mini mixer to replace his much larger Mackie unit.

The circuit for this tiny passive mixer is an exercise in simplicity, consisting of just a few jacks, pots, and resistors. [Jason] overbuilt this; even though the Volcas only have mono out, he wired the entire mixer up for stereo.

The enclosure – something that looks to be a standard Hammond die cast aluminum enclosure – was drilled out, and a lovely laser cut acrylic laminate placed on top. It looks great, and for anyone interested in learning soldering, you couldn’t come up with a better first project.

A 16-voice Homebrew Polyphonic Synth

Homebrew synths – generating a waveform in a microcontroller, adding a MIDI interface, and sending everything out to a speaker – are great projects that will teach you a ton about how much you can do with a tiny, low power uC. [Mark] created what is probably the most powerful homebrew synth we’ve seen, all while using a relatively low-power microcontroller.

The hardware for this project is an LPC1311 ARM Cortex M3 running at 72 MHz. Turning digital audio into something a speaker can understand is handled by a Wolfson WM8762, a stereo 24-bit DAC. Both of these chips can be bought for under one pound in quantity one, something you can’t say about the chips used in olde-tyme synths.

The front panel, shown below, uses 22 pots and two switches to control the waveform, ADSR, filter, volume, and pan. To save pins on the microcontroller, [Mark] used a few analog multiplexers. As far as circuitry goes, it’s a fairly simple setup, with the only truly weird component being the optocoupler for the MIDI input.

goom2

The software for the synth is written mostly in assembly. In a previous version where most of the code was written in C, everything was a factor of two slower. Doing all the voice generation in assembly allowed for twice as many simultaneous voices.

It’s a great project, and compared to some of the other synth builds we’ve seen before, [Mark]’s project is at the top of its class. A quick search of the archives says this is probably the most polyphonic homebrew synth we’ve seen, and listening to the sound sample on the project page, it sounds pretty good, to boot.